When you leave off your machine in functioning state the battery is a crucial matter of concern since it can be automatically shut down after a short time from displaying the alert sign of low power level. But you can customize it in pursuance of your comfort.
In this post, we will write on how to change Percentage Level of Low Battery Warning on Windows 10 and Critical Level too to set a necessary interval and avoid involuntarily Shutting Down of a machine.
As per Windows 10 nature, the low battery level is adjusted to 10% whereas you will see the critical level at the 5%. This means when your machine’s battery level falls down to the last 10% of charge, Windows will display you a low battery level message. And when it reaches to the most extreme of 5%, you will be shown critical battery level warning of your machine.
So, if you don’t like to be warned at the end moment, you can always choose to adjust the percentage as per your convenience. If you believe the warning comes very early for you, you can change the percentages to a bit higher level and vice versa.
You can set different percentages for two different situations, one while your machine is running on battery and the other while it is plugged in. Hence, this article will exhibit you the steps of how to change low and critical battery level on Windows 10 for both situations.
How to Change Percentage Level of Low Battery Warning on Windows 10
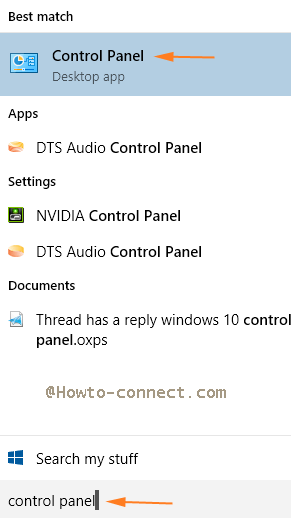
- Type control panel in the text area of the search and hit the same in displayed result at the top.
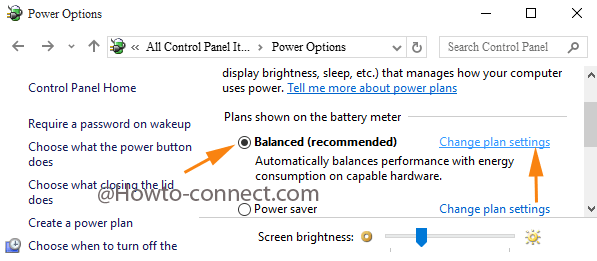
- By making the view of the icons in small look, pick up Power Options.
- Now in the arrived window, you will see various power plans where you need to look for the one you have opted for. Click Change plan settings link attached to your plan.
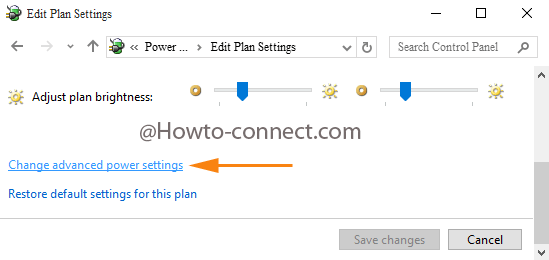
- Similar to the underneath exhibiting screenshot, on Edit plan settings, execute a strike on Change advanced power settings link.
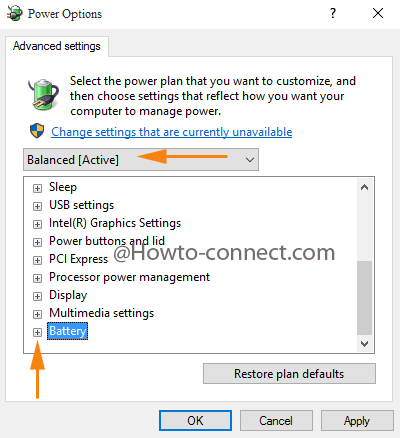
- Your above action will bring a separate window of Power Options on the screen.
- Now, ensure your power plan is singled out in the drop down menu.
- Take yourself to the choice at the bottom portion and in the present settings and do a double click on Battery to unfold it.
- You require optimizing the changes of Low battery level furthermore Critical battery level in two dissimilar choices.
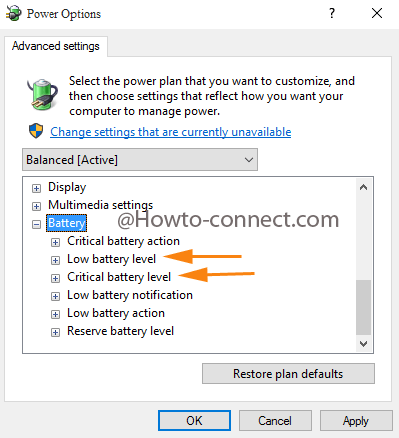
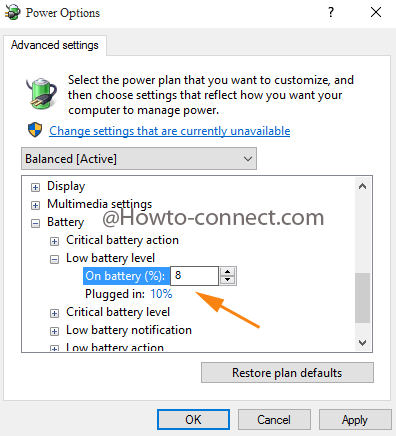
- First, let us see the Low battery level. Stretch out it and On battery and Plugged in options are exhibited. Click on the present set percentages of each option and alter the percentage as per your choice.
- Then extract the Critical battery level and there also you two options are visible where you have to click on each of them to alter the numbers.
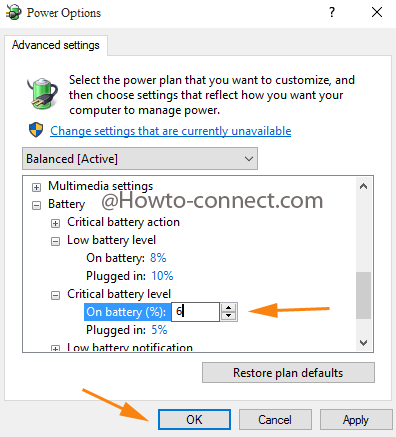
- Once you are done with the alterations, click Apply and Ok buttons to implement.
- From now onwards whenever your machine touches the set percentage level of battery, you will be alerted by the system.
Besides after you Change Percentage Level of Low Battery Warning on Windows 10 you can also wield alterations in screen time out settings which can help you to avoid involuntarily shutting down of the machine.