Multiple Methods and Steps to Change Screen Resolution From Graphics Cards in Windows 10 from concerned UI. – The latest Microsoft operating System created several bugs including errors affecting laptop’s display. Earlier Brightness regarding issues upset Windows 10 users. At the same level, Screen resolution also stands as an annoying problem. However, settings program comprises a drop down to apply relevant resolution to laptop or desktop monitor. But, sometimes, the drop down falls short to set an appropriate one. In similar circumstances, the Graphics card plays the role of a savior.
Different graphics cards provide their own interface helping to change screen resolution. So this article presents a compilation of methods to increase or decrease the same.
Table of Contents
Change Screen Resolution From Graphics Cards in Windows 10
On Intel(R) HD Graphics Card
Different laptops integrate inbuilt Intel(R) HD graphics allow changing the resolution quite simply. This Intel card provides selecting the suitable one Directly from Screen. In addition, the card’s control panel also offers a platform to make a relevant selection of resolution.
1. Straightway from the Desktop
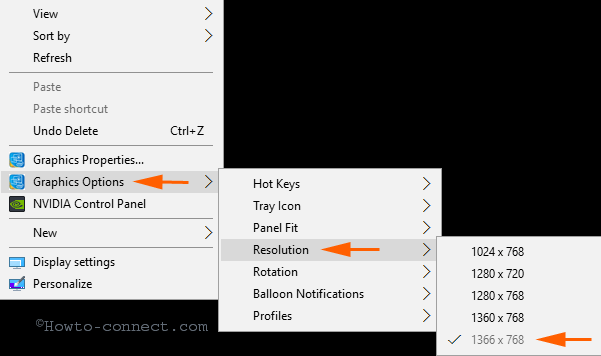
Step 1 – The first and foremost task is to Perform a right-click on a vacant spot on the desktop. Hover on the choice Graphics options visible on the Desktop context menu.
Step 2 – Place the mouse pointer on the option Resolution appearing on the submenu.
Step 3 – You see multiple ranges of resolutions for instance, 1360×768, 1024×768, 1280×720, 1280×768, 1366×768. Hit on the appropriate one to pretty simply Change Screen Resolution From Graphics Cards in Windows 10.
Form Intel(R) HD Graphics Control panel
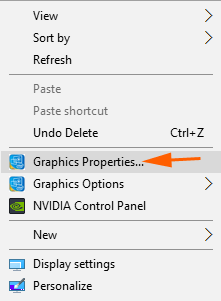
Step 1 – Carry out a right-click on the desktop hereafter choose Graphics Properties.
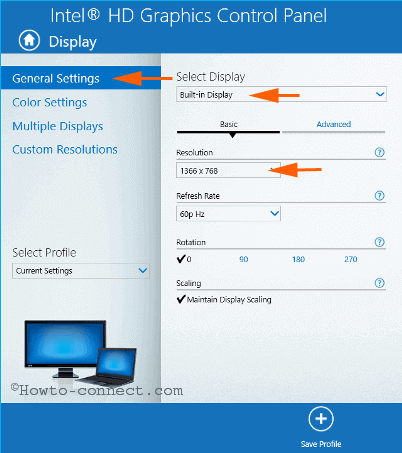
Step 2 – Intel(R) HD Graphics Control panel comes into view on the screen, hit on Display.
Step 3 – By default General settings opens, move ahead to the right-hand side. On the top, select proper display. In most of all circumstances, the inbuilt Display is affixed on the graphics card, so you don’t need to change it.
Step 4 – Click on the drop-down beneath Resolution and choose the reasonable one for the monitor.
Step 5 – In addition, Intel(R) HD Graphics permits to set Custom Resolutions too. Click on Custom resolutions in the left sidebar of the control panel. On the right segment, a warning pop-up appears, click on OK. But before going ahead we suggest reading the content on the warning pop up carefully.
Step 6 – Once more move to the right sidebar and choose Built-in Display in the drop down.
Step 7 – Fill up the boxes and practice with Underscan Percentage slider to Change Screen Resolution From Graphics Cards in Windows 10
Change Screen Resolution From NVIDIA Graphics
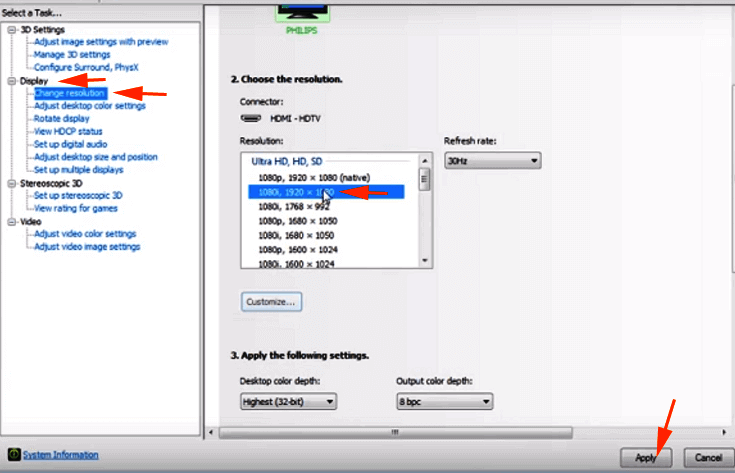
Step 1 – Write NVIDIA Control Panel in the Cortana search area and click on the best result at the top. Firstly, On the NVIDIA Control Panel navigation tree pane, within Display, hit gently on Change resolution.
Step 2 – Click the Picture that represents the Display you want to affect.
Step 3 – If multiple choices exist, press the Connector list arrow. Hereafter, choose the connector type for your display.
Step 4 – In the Resolution list box, scroll to locate the one that you want to set and then click the Resolution.
Step 5 – Finally, Click Apply to Change Screen Resolution From Graphics Cards in Windows 10.
Step 6 – When you want to create a custom resolution, hit the Customize button and then Create custom resolution on the Customise pop up.
Change Screen Resolution From AMD Graphics Card
You can Change Screen Resolution on Windows 10 system via AMD Catalyst control center if you occupy this particular card.
Step 1 – Perform a right-click on an unoccupied space on the desktop and select AMD Catalyst control center.
Step 2 – On the left pane, locate Preset and click on it. Do you notice a few presets in this block? If yes, then you need to delete them one by one. Hence, click on Manage Presets link to show them on a pop up.
Step 3 – On the pop-up in the right pane, opt for Presets successively. Hit the Delete button every time for respectively selected presets.
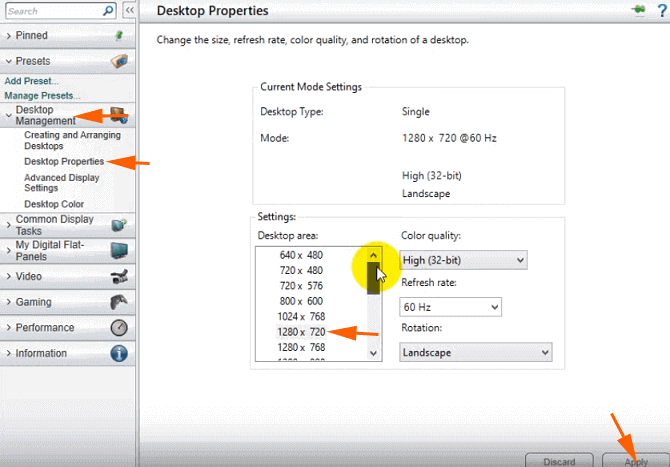
Step 4 – Once all Presets get deleted, click on Desktop Management. After the expansion of Desktop management block, press the option Desktop Properties.
Step 5 – Navigate yourselves to the right pane and see multiple resolution choices. Click on the necessary one and hit the Apply button.
Step 6 – Instantly, you see a confirmation dialog asking “You Display has been reconfigured, Do you want to keep these changes”. Click on Yes for the implementation of the new resolution.
Step 7 – Once you applied, the correct resolution, click on the Add Preset link, write it in the pop-up and click Save. Repeat the same process for another resolution and add a new preset for it. In this manner, you have a collection of presets, which can be enforced later to Change Screen Resolution From Graphics Cards in Windows 10 in a single click.
Conclusion
The Graphics cards control panel interfaces efficiently take you out either of these kinds of issues. Hence, when you get trapped in screen related problems you should decide to get the help of the ways doubtlessly.