Methods to Change Settings in Compatibility Mode Windows 10 with steps. – You will find many apps of the earlier version available in Windows 10. But few old applications create certain issues and fails to run perfectly in this OS. So, if some apps on your Windows 10 refuses to work, try modifying their compatibility settings. Verify the state of your PC by following our guide on How to Check Whether your PC is Compatible with Windows 10.
To Change Settings in Compatibility Mode Windows 10 for any program, you have to navigate to its Properties wizard. There, you will be able to modify the settings for the current user as well as for all users. Well, it also provides you a few settings including Run compatibility troubleshooter option.
To learn more about troubleshooting, pursue our guide on Use Common Windows Update Troubleshooter on Windows 10, 8.1, 7.
Some apps have problems with display, mostly in the case where the user uses a strong resolution display PC. In addition, few games do not launch as they cannot detect the original version of the Windows which they are used to. So, the settings in the Compatibility mode in Windows 10 suggests answering all these issues.
Table of Contents
How to Change Settings in Compatibility Mode Windows 10
Step 1 – To change the settings, search and right-click on the .exe file of the app. Instead, make a right-click on the shortcut of the app and click on the last option reading Properties.
Know 4 Ways to Open File Properties in Windows 10.
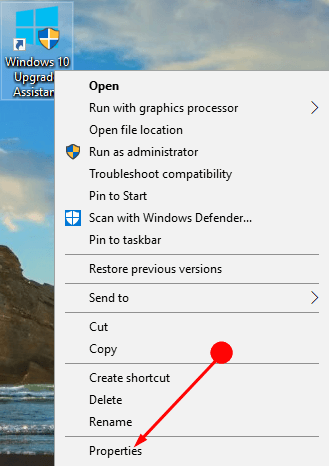
Note – Suppose the app is on the Start menu, right-click on the app tile and finally hover on More and click Open File location. This will open the shortcut of the app. Now, again execute a right-click on the file and even here click on Properties.
Step 2 – Properties box will come into view, switch to Compatibility tab from all the tabs at the top of the box.
Changing Compatibility Mode for Current User
Step 3 – Go to the Compatibility mode section and moving ahead, select the option Run this program in compatibility mode for. After selecting the option, click the drop-down that appears below it. This will give you a list of options and from there choose the Windows version for which the app is designed for.
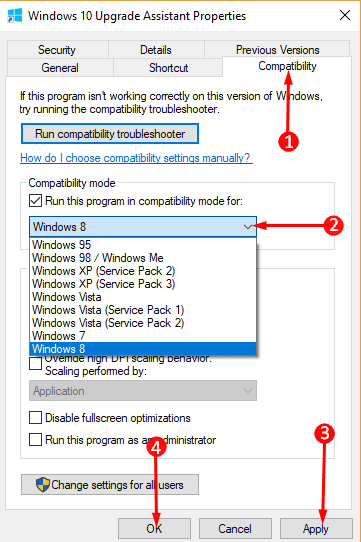
Step 4 – Lastly, click the OK button and this will make the Change Settings in Compatibility Mode Windows 10 effective.
Changing Compatibility Mode for all the Users
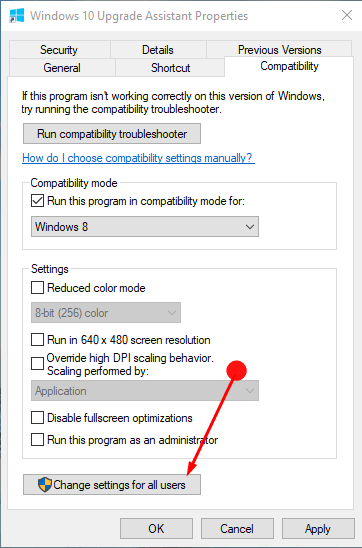
Step 5 – If you are logged in as an administrator, you can do this adjustment for all users. For that just click the button Change settings for all users.
Step 6 – Follow the above Step 3 in the next box that opens to change the settings for all the users.
Compatibility Features
Once you Change Settings in Compatibility Mode Windows 10, you will notice few other settings in the below section. To improve its performance of an app, Windows 10 gives you a number of compatibility options that you can turn on.
1) Reduced color mode – This is the first feature in the Settings section that lets the app use fewer colors so that some old apps can run. This benefits those apps that could run only in 256 color mode.
2) Run in 640 × 480 screen resolution – Use this specific setting when a graphics of the app is ragged and improper.
3) Override high DPI scaling behavior – This feature incorporates three options to perform the scaling and they are namely Application, System and System (Enhanced).
Read our full guide on How to Enable High-DPI Support For Application on Windows 10.
4) Disable fullscreen optimizations – This is the new setting and it is useful for those who want to play their games in a borderless fullscreen mode.
5) Run this program as an administrator – This setting lets you launch the program with admin rights all the time but users not signed in as admin will not find this feature.
Find more Tips to Run a Program Using Administrator Privilege in Windows 10.
Running Compatibility Troubleshooter
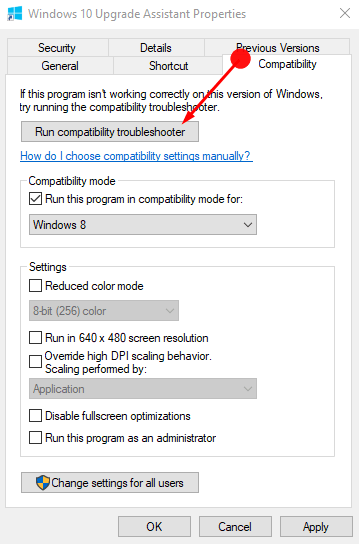
The compatibility mode comes with a special feature, Run Compatibility Troubleshooter.
Get a complete guide on How to Run Program Compatibility Troubleshooter on Windows 10 After Creators Update.
As you click on this tab it will start detecting the issue of your app and will fix it if possible. But if it is not fixed then it will definitely provide you with the guidelines. Just follow them and finish the compatibility troubleshooting process.
Closing Words
So, here you see how simple is it to Change Settings in Compatibility Mode Windows 10. Whenever you face any compatibility issues follow this guide, fix the issue, and enjoy a ceaseless Windows 10.