2 procedures to Change System Cooling Policy For Your Power Plan on Windows 10. – System Cooling Policy power lets a user determine the mode of cooling for their Windows 10 device. In the Processor Power Management, 2 methods are available for the cooling – Active and Passive. Active raises the fan speed and the slow down the processor in order to retain cooling. While Passive does the vice versa as it reduces the processor and then increases the fan speed. See easy methods for How to Set up Power Plans in Windows 10.
This guide will explain two ways about Change System Cooling Policy For Your Power Plan in Windows 10. You should try to keep it in the Passive mode as it cuts a lot of power expense by reducing the clock on the processor, so, gives more battery time. Let’s start the guide –
Table of Contents
Ways to Change System Cooling Policy For Your Power Plan in Windows 10
Before you begin it is important to know that this will modify the policy for all users using the same power plan scheme.
Way 1 – Changing Processor Power Management in System Cooling Policy in Power Options
Step 1 – Type Control Panel in the Cortana Search Box and select it in the result section of the Best Match.
To get additional procedures see How to Open Control Panel on Windows 10.
Or if you directly want to reach the Power Options then go another way. Click Start button, type power plan and when it displays Choose a power plan, click it.
Step 2 – In this way, you first need to reach the Advanced power Options. Hence, select Change Plan Settings near the functional plan.
See a guide regarding the topic – How to Restore Power Plan Advanced Settings to Default in Windows 10.

Step 3 – Here, click on the Change Advanced Power Settings link located on the bottom of the window.

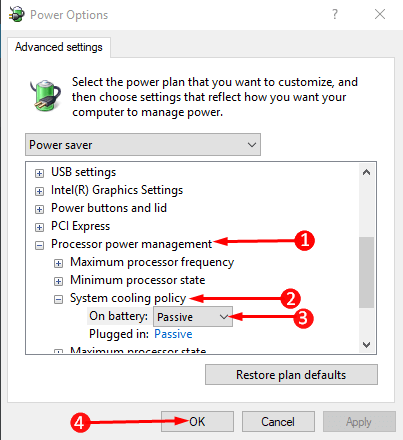
Step 4 – Advanced settings of the Power options dialog box appears, so, double click on Processor Power management to expand it. Moving ahead, double click on System Cooling Policy to see the further features under this option.
Step 5 – Here, again double click on the On Battery option to find a drop-down box. From the drop – down choose the option Active or Passive whichever is applicable. Then continue doing the same with the option Plugged In.
Step 6 – Once done, select Apply after then OK button at the bottom of the box. After this, shut down the box as the choice is registered.
Way 2 – Changing Processor Power Management in System Cooling Policy via Command Prompt
Step 1 – In the Start search box, type Command Prompt and choose the same in the result section of the Best match. This will open the command prompt.
If you require help for the same then read How to Launch Elevated Command Prompt on Windows 10.
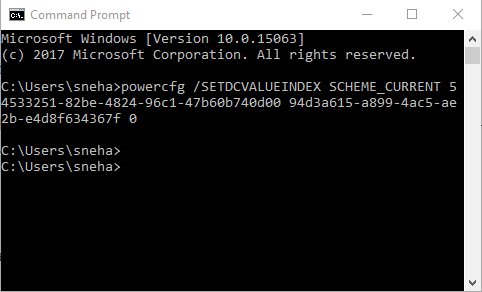
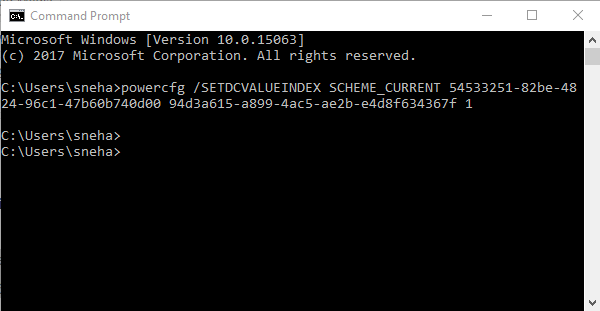
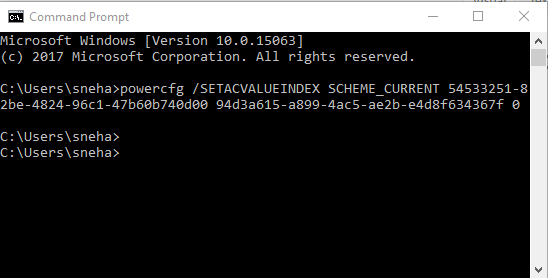
Step 2 – In the Command Prompt, type or copy and paste the given commands one after another. Kindly remember to copy – paste the command of the correct option.
Option 1 – On Battery (Passive)
powercfg /SETDCVALUEINDEX SCHEME_CURRENT 54533251-82be-4824-96c1-47b60b740d00 94d3a615-a899-4ac5-ae2b-e4d8f634367f 0
Option 2 -On Battery (Active)
powercfg /SETDCVALUEINDEX SCHEME_CURRENT 54533251-82be-4824-96c1-47b60b740d00 94d3a615-a899-4ac5-ae2b-e4d8f634367f 1
Option 3 – Plugged In (Passive)
powercfg /SETACVALUEINDEX SCHEME_CURRENT 54533251-82be-4824-96c1-47b60b740d00 94d3a615-a899-4ac5-ae2b-e4d8f634367f 0
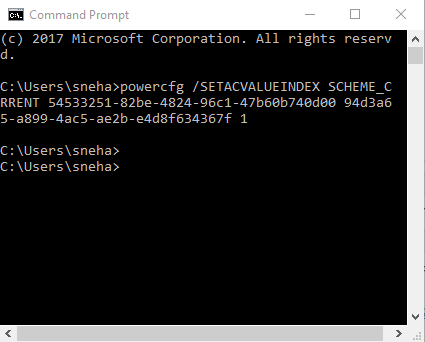
Option 4 – Plugged In (Active)
powercfg /SETACVALUEINDEX SCHEME_CURRENT 54533251-82be-4824-96c1-47b60b740d00 94d3a615-a899-4ac5-ae2b-e4d8f634367f 1
Concluding Words
So, hopefully, the methods to change Processor Power Management in System Cooling Policy on Windows 10 are pretty easy. After you change the Power options, then the device will apply the same as its default settings. But whenever you want to go back to the previous settings, simply revert back the modifications.