Windows 10 lets its users create a USB Recovery Drive that helps their system in troubleshooting and fixing the problems via retrieving the data herewith the drive. With the assistance of USB Recovery Drive, you can avoid the situations like System Restore, Refresh, and Reset in your Windows 10 computer. It was always advised to the users that they should create this beforehand, that means far before getting into the trouble because it will be really our bad luck to repair the system.
Actually, the users can also create the recovery disc but they usually go with the USB recovery drive as they don’t have a bootable DVD because nowadays the computers are without having a DVD player bundled within them. In this article, we will learn how to create a bootable USB Recovery Drive in Windows 10. With this creation, you will be able to boot to the Advanced Startup options which will provide you assistance in troubleshooting and also will recover your Windows 10.
Actually, there are some keynotes that you need to keep in mind before going ahead with the process. They are:-
- A 32-bit Windows 10 operating system will create only a 32-bit USB Recovery Drive that will be used to repair only 32-bit Windows 10 system.
- A 64-bit Windows 10 operating system will create only a 64-bit USB Recovery Drive that will be used to repair only 64-bit Windows 10 system.
- You must log in to Windows 10 with all the Administrative authorities.
Moving forward, we will go through the entire procedure to create USB Recovery Drive in Windows 10.
How to Create USB Recovery Drive in Windows 10
Step 1
The first thing that you need to do is to launch the Recovery Media Creator on your screen. And to do so, you have two ways. One is making a search of it from the Search field and the other is through Control Panel. See both the ways and opt for the one that suits you more.
The new Search box of Windows 10 can be seen on the Taskbar where you need to make a search of the phrase RecoveryDrive.exe. Then you will see an option called RecoveryDrive in the results. Click on it to open.

Another way is to launch the Control Panel small icons view on your screen. And then click the Recovery link.

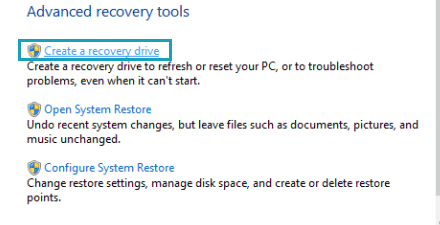
Under the recovery window, make a click on the link that asks you to Create a recovery drive.
Step 2
If you are asked for User Account Control permission, click Yes button and allow it to proceed further.
Step 3
In the following screen, on the Recovery Drive wizard, click the Next button.

By default, the option of contents to copy from the recovery partition to the recovery drive is not present as there are not many OEM Windows 10 computers present who can hold the factory recovery partitions with them.
And if you choose to create a reset recovery image, copy the recovery partition from the PC to the recovery drive option will be obtainable for you to select.
Step 4
If you have not attached the USB drive to its respective port till now, you will be asked to do so right away.

Step 5
Connect the USB drive and choose the USB drive which you wished to create a recovery drive of it. Select the USB drive and click the Next button.

Step 6
Next, click on the Create button.

You will be shown a warning message which will tell you that the USB drive that you are using to Create USB Recovery Drive in Windows 10 will not keep hold of any data that was stored in it. So, it is advised to use a USB drive that is vacant. You can even transfer all the stuff to another storage device or location.
Step 7
The process to create USB Recovery Drive in Windows 10 will be in progress.

Step 8
After the creation is finished, you will be notified about it. So click on the Finish button.

Step 9
Your Windows 10 USB Recovery Drive is now created. Detach it from the system now.
Final Touch
Create USB Recovery Drive in Windows 10 and see how it works wonders for you when you have undergone some critical problem that obstructs the smooth working of your system. The steps are clearly mentioned above will all the screenshots. We hope that this will provide you a lot of help. We are eagerly looking forward to your reviews in the comments section. And if you have some extra information about the topic, please do share with us and give us the opportunity to learn something from you.
gary ruedas
says:Awesome really helped
Val
says:I got the standard free edition of Aomei backupper than a 120 GB “Professional” SSD for $22.0 and an Inland USB adaptor for $6.99 from Micro Center and I made a clone of disc C: on SSD disc. I have 2 Toshiba HD one for Windows 7 the other for Windows 10, I change boot UEFI BMR to start in desired OS. With Aomei I cloned each internal HD on SSD via USB. Also, I can use them installed as an internal drive. To me is much easier than using image, repair discs and restore Flash drives.
Ah_Huang
says:I made a usb recovery drive ,but when I tried to do” System Restore” it could not find “the earlier restore points”.I have had my “System Protection” ON and I have had TWO earlier “restore points”.WHY?
Andrew Syska
says:I just learned that HP only allows one Recovery Set per computer. Since I upgraded my HP Desktop from Win7 to Win10, and had already made a set of Recovery Disks on Win7, I am not, apparently, allowed to make another Recovery USB set for Win10. It sucks… I tried without success.