3 Methods to Enable Archive Scanning in Windows Defender in Windows 10 Stepwise. – Windows Defender is a built-in security tool on Windows 10 that scans files Offline, Manually, and online. When you run manual scanning Windows Defender includes every kind of file except archives to guard them against any threat.
But a registry hack is available allowing you Enable Archive Scanning in Windows Defender On Windows 10. The scanning of the archive files in Windows 10 is helpful with the security point of view and.
Table of Contents
Ways to Enable Archive Scanning in Windows Defender On Windows 10
Method 1 – Using PowerShell Prompt
Step 1 – First, you need to press the Start button and type powershell. Once you see the result under Best match, right click and select Run as administrator.
If you experience trouble follow How to Run PowerShell as administrator in Windows 10.
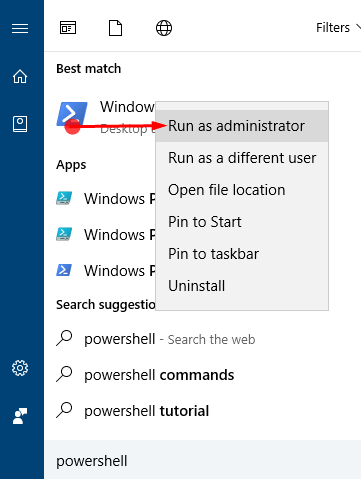
Step 2 – Select Yes on UAC prompt.
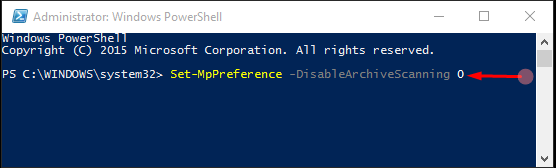
Step 2 – Now you now need to type or copy-paste the under given command to stop scanning the archive files.
Set-MpPreference -DisableArchiveScanning 0
Step 3 – Press Enter so that scanning may begin
If you want to invalidate the Scan Archive Files by using the following method.
Step 4 – In a similar way, type or copy- paste the following command and subsequently press Enter.
Set-MpPreference -DisableArchiveScanning 1
Method 2 – Using Registry Tweak
Step 1 – To Enable Archive Scanning in Windows Defender using Registry hack first launch the Registry Editor.
First, click on the Start button which is on the extreme left side of the taskbar. Then you will find a search box where type regedit and then press Enter. After pressing Enter you may be asked by the User Account Control your permission. Click on the Yes button to permit.
To know the procedures in detail, see – How to Access Registry Editor in Windows 10 – 5 Simple Tips.
Step 2 – Once you open the Registry Editor type or copy paste the following registry key
HKEY_LOCAL_MACHINE\SOFTWARE\Policies\Microsoft\Windows Defender\Scan
If you do not have Scan Registry Key then you may need to create the same. In order to do so kindly use the following process.
Step 1 – Right click on Windows defender entry and select New from the list of options.
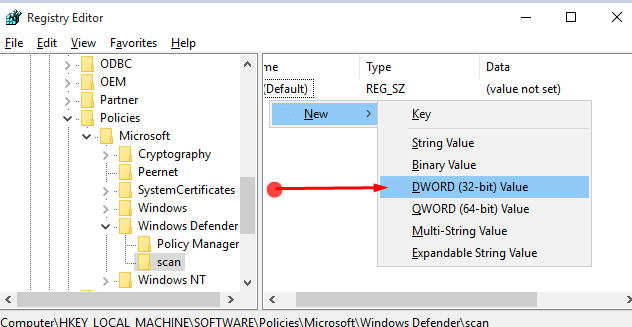
Step 2 -Rename the new key as Scan and click on this to highlight. Now you need to move to the right pane of the registry editor.
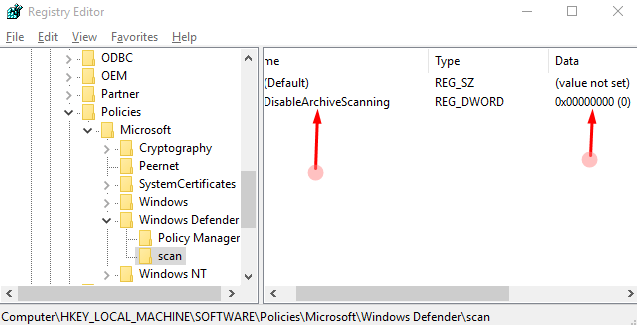
Step 3 – Right click on a vacant area and choose DWORD (32-bit) Value option in the right pane. Once the New value is created, put its name as DisableArchiveScanning.
Step 4 – Leave the Value data as it is.
Step 5 – Reboot the PC to Archive Scanning in Windows Defender On Windows 10.
If at all you re-consider to undo the changes you have just made delete the value “DisableArchiveScanning“.
Method 3 – Using Group Policy
In order to let the Windows Defender scan the archive files, you can also use Local Group Policy Editor.
Step 1 – Click Start button located on the taskbar, write gpedit and gently strike Enter.
If you experience uncomfortable with step 1 then learn from – Open Group Policy Editor in Windows 10 Using 8 Methods.
Step 2 – Pursue the path
Computer Configuration => Administrative Templates => Windows Components => Windows Defender => Scan.
Step 3 – Coming to the right-hand side of scan click twice on Scan Archive Files. On the Scan Archive files policy settings Dialog box, check the choice Enabled.
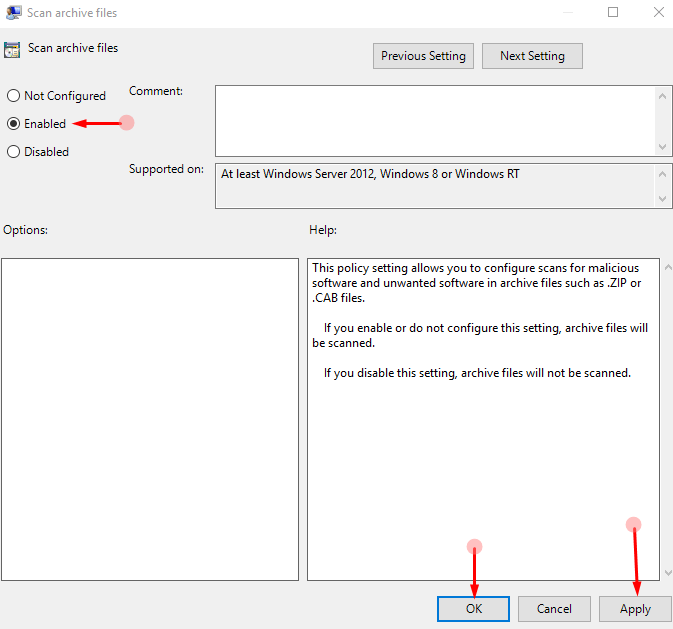
Step 4 – Click Apply followed by OK on the policy setting dialog for Archive Scanning in Windows Defender On Windows 10.
Conclusion
Windows Defender gives you a basic defense against the virus or any such threat. If you need a much better and assured way of defending your device from any threats then you may use the above-given methods.