Registry keys manipulations to Enable/Disable Particular Shortcuts Keys on Windows 10. – Keyboard worth great value for users but sometimes you need to limit certain utilities on it. Few Shortcut keys are available which let assigned programs access with a punch only. For example, Win+E launches File explorer, Win+W opens Windows Ink Workspace. But at the same time, you can enable or disable these keys.
After disabling the keys, they will not launch their respective programs. Effortless registry hacks exhibit the wonder to Enable/Disable Particular Shortcuts Keys on Windows 10. Let’s see:
Table of Contents
How to Enable/Disable Particular Shortcuts Keys on Windows 10
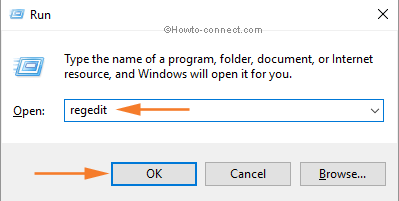
Step 1 – To begin with, perform a right-click on the Windows button, and upon the appearance of a menu, click the option Run. Alternatively, you can press the combination of Win+R.
Step 2 – Now, type in regedit on the specific area adjacent to Open and click OK.
Step 3 – As a result, you will come across a UAC prompt where you should click on Yes.
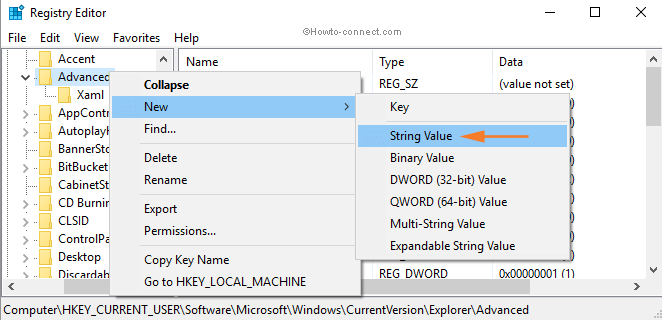
Step 4 – When the registry editor appears on the screen, navigate to the below-written path. Hence, open the keys one by one in the left segment.
HKEY_CURRENT_USER\Software\Microsoft\Windows\CurrentVersion\Explorer\AdvancedStep 5 – Now, when you reach the Advanced key, right-click on it. Hover the cursor on New and subsequently click on the 2nd option String Value.
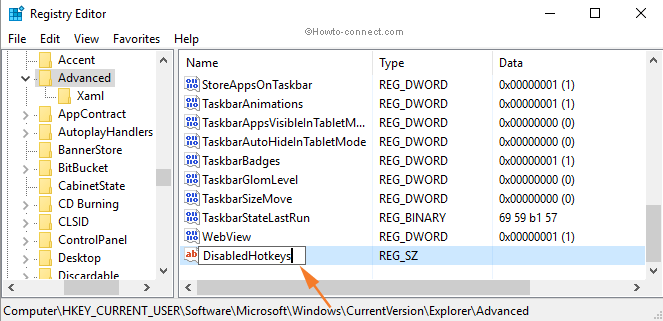
Step 6 – Next, name this String Value as DisabledHotkeys and then do a double-click on it.
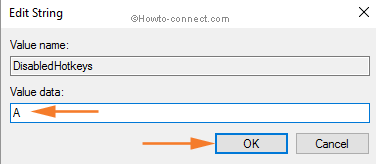
Step 7 – Depending on what characters of shortcut keys you desire to disable, type in that character in the Value data space.
For instance,
1. Write down E if you want to disable the shortcut Win+E.
2. Type in the character I in order to disable the shortcut Win+I.
3. Write out EI to disable the shortcut Win+E and Win+I.
Step 8 – Once you assign the characters in the Value data box, click OK.
As shown above, follow the guidelines and whenever you press those shortcut keys, they will be left unassigned.
Note – To re-assign the specific shortcut key(s), simply remove that character in Step 7 above and click OK.
In Windows, these are the some of the keyboard shortcuts that use the WIN key along with the combination of other keys. Few are here –
Shortcut Keys Results Win+A Launches Action Center Win+R This specified sequence opens Run box Win+E Starts the File Explorer Win+I Launch Settings application Win+P Open the Project screen Win+S Brings Cortana search Win+L Locks the screen Win+M Minimize all the active windows Win+SHIFT+M Bring back the running minimized window Win+B Targets Taskbar notification area Win+T Focus Taskbar buttons Win+X Launches power user menu Win+D Takes you to Desktop Win+Prt Sc Takes and saves a snapshot
Conclusion
To summarize, Windows provide an option to disable all Windows shortcut keys at a time. But with these simple and straightforward steps, you can disable one or multiple shortcut keys of your choice.