How to Establish HDMI TV to Computer Connection in Windows 10 -Are you excited to enjoy Movies in DVD drive, YouTube Videos and the materials available on the Internet on a bigger screen. Advanced or you can say every HDMI Supporting Television comprises an inbuilt port and facilitate a cable you are able to pretty simply utilize and set up the connection.
Table of Contents
Requirements to Set up HDMI TV to Computer Connection
- The first basic task is to ensure whether both the television and PC hold HDMI ports.
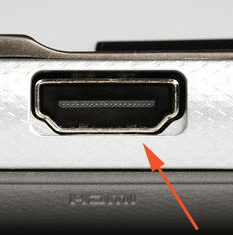
- If your PC is not outdated, it will positively have an HDMI port in it (For further clearance, see the below image).
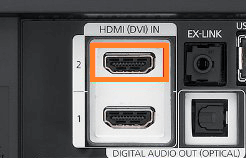
- Most of the Modern days televisions hold one HDMI port. Besides if the TV is less than six years old, then it should have the port (the port is described in orange below).
- Ensure that you possess one cable before starting the process.
How to Connect PC to TV Via HDMI in Windows 10
- First and foremost, plug one end of the cable in the television HDMI port thereupon insert the other end to the PC’s HDMI port.
- As you are staying on Windows 10, all that you need to do is to turn on the PC and television and confirm that television is set to the exact HDMI channel. On most of the Televisions, You can do by holding and pressing the AV button.
- PC will show the best and suitable setting but somehow if you don’t see, observe the next steps.
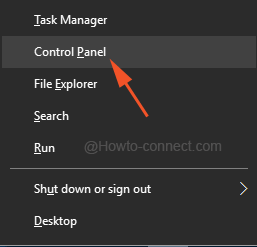
- Apply the combinations of “Win and X” keys and upon the arrival of user power menu, click “Control Panel“.
- Leave the icons into the small size and thereupon hit “Display” symbol in the Control Panel.
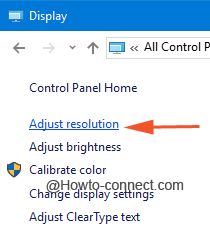
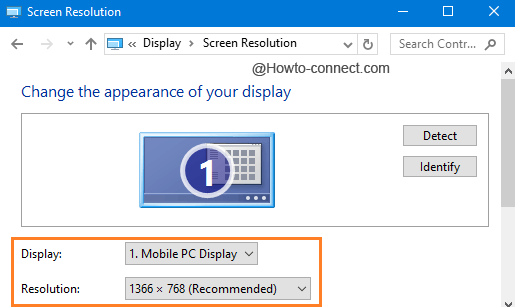
- In the observable links on the left flank, go ahead with a click on “Adjust resolution”.
- Click the drop down in front of “Display” and choose your TV name and see the “Resolution” box and select the resolution that will be accurate for your television in the followed screen.
Now you need to ensure that the sound is coming to be from your television, instead of PC, and to make it happen, look the below steps –
- If the Control Panel is still open on the screen it’s ok, otherwise, open it as guided above and click Sound icon or symbol.
- You see more than one device on the Playback tab in the opened dialog box. If the Television is not appearing on the list perform a right-click on a vacant space in the and select “Show disabled devices”.
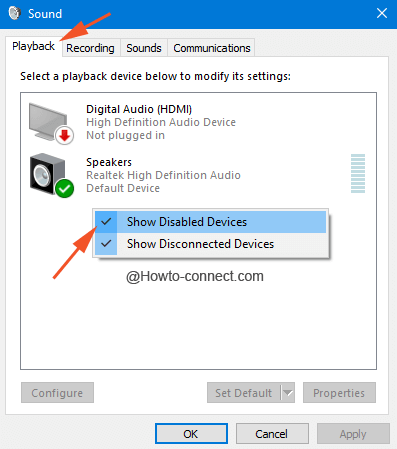
- Your Television or HDMI Speaker will begin showing within the list. Make a right click on the Speaker and prefer to select Enable choice.
After the HDMI TV to Computer Connection gets set up successfully you are able to straightforwardly view and listen the operation of the system on the screen of HDMI Television. You can now seamlessly experience the Youtube videos, or videos from your DVD Player, for instance on your television. It is found that the first time connections take a little bit of time, so be patient and once you nailed it, it will be easier to do the connections later on.