Windows 10 Display Settings provide you a decent range of options to view items and images clear. You want everything to look good on the system screen whether you edit pictures, write texts or browse. Even when you enjoy gaming, watch movies, or work for programming, the desktop screen setup should be cozy. So, using various tools, you can adjust the brightness, choose screen resolution, set scaling size, detect multiple displays and more. Here, in this article, we will discuss all the ways using which you can Get Best Experience from Windows 10 Display Settings very easily.
Table of Contents
How to Get Best Experience from Windows 10 Display Settings
We want you to Get Best Experience from Windows 10 Display Settings and for your convenience, we have divided the article into sections. Follow them carefully and explore all the options and settings one by one.
How to Access Windows 10 Display Settings
Way 1 – Through Settings App
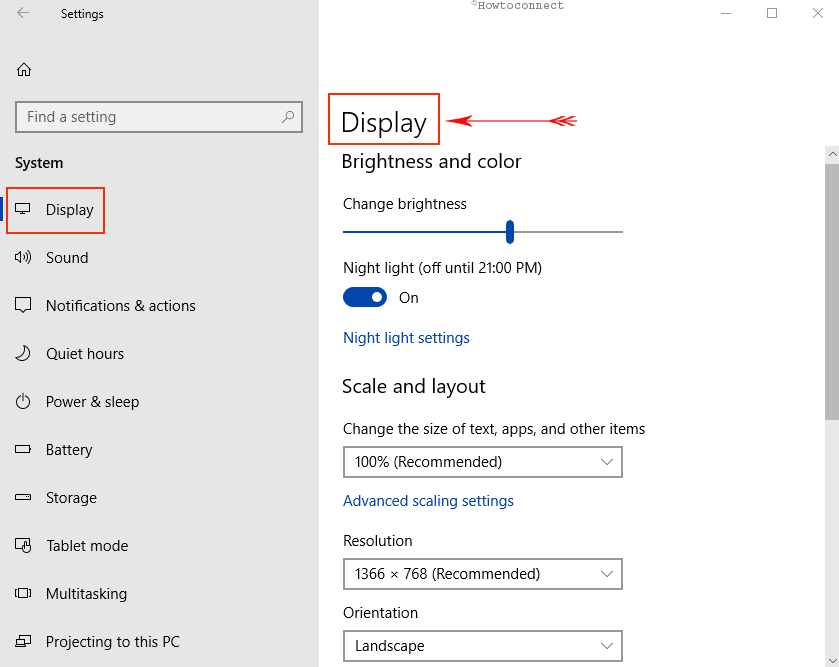
Step 1 – Use the hotkeys Windows and I all together and launch the default Settings program. Moreover, you can also access the same from the Start Menu.
Step 2 – Click System when the app opens with various categories.
Step 3 – By default, the Display settings page comes into view. Shift to its corresponding right side and you can see several settings to Get Best Experience from Windows 10 Display Settings.
Way 2 – Via Desktop Context Menu
Step 1 – Locate an empty space or area on your desktop. Conduct a right-click, reach out to Display settings and click on it.
Step 2 – That’s it and Display Settings page immediately opens up on the screen.
Let us now explore towards the display settings one by one in details.
1. Brightness and color
Brightness and color is the first section that you see here. It provides you two options –
A] Change Brightness
B] Night Light.
1 A] How to Change Brightness of the Screen in Windows 10
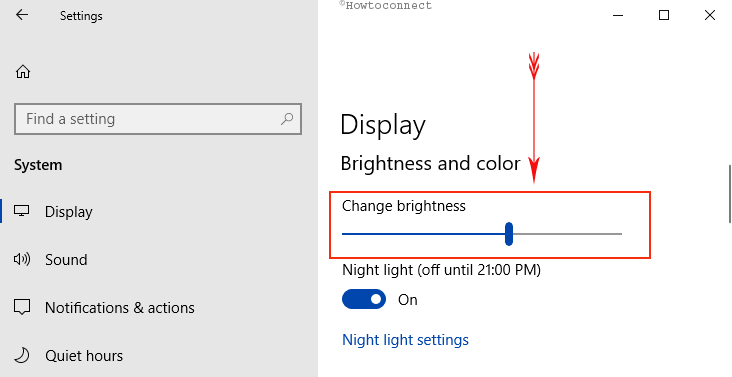
Just under the heading Change brightness, you get to notice a slider as indicated in the given picture. Using the slider you can fine-tune and regulate the brightness accordingly. The more you drag it towards the right the more bright the screen gets. In the contrast, when you move it towards left, it lowers the brightness of the screen.
1 B] How to Use Night Light
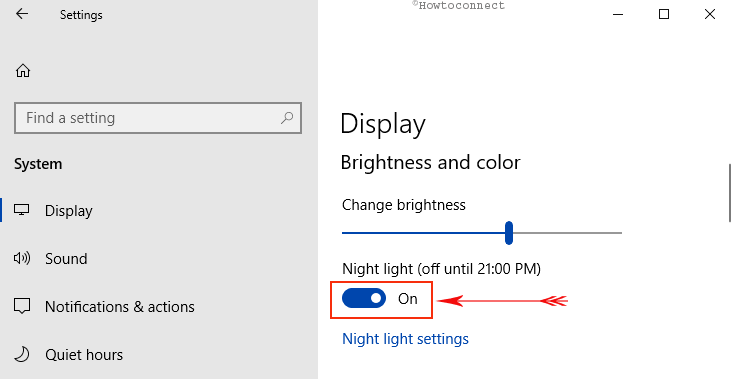
This is the new setting that got introduced especially for those users who generally suffer from eye strain. It is actually a short wavelength and the high energy light. In simple words, enabling this option will use sunny colors at night which eventually reduces the eye tiredness and also helps you in healthy sleep. So, toggle On the switch that appears below Night Light to enable it (see snapshot).
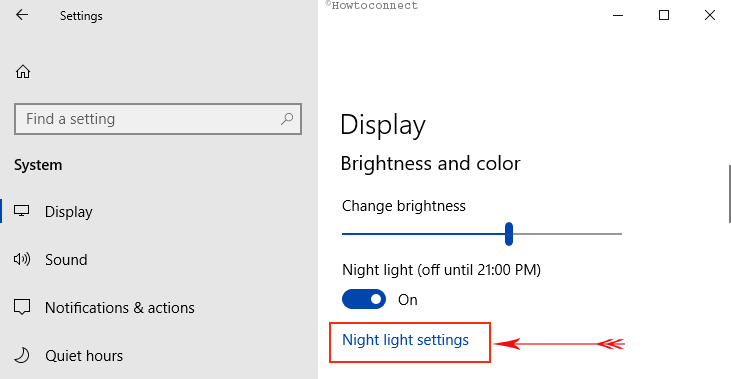
“Night Light” generally gets activated between sunset and sunrise. And then you can experience the change in the screen color as the feature starts using warm colors. So, to configure it as per preference, click the Night light settings option as shown in the given screenshot.
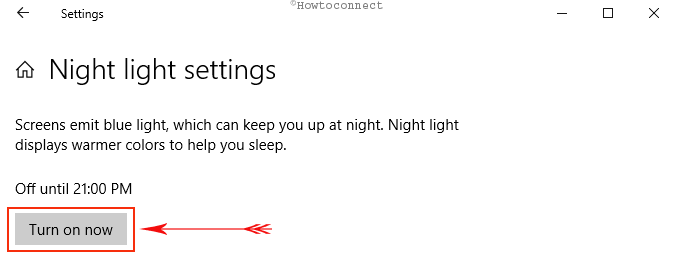
Manually Turn on Night Light
As mentioned above, Night Light generally activates all by itself between sunset and sunrise. However, if your ‘location services‘ are not enabled, you can manually turn this Night Light feature on. To do so, click the Turn on now button as depicted in the screenshot below.
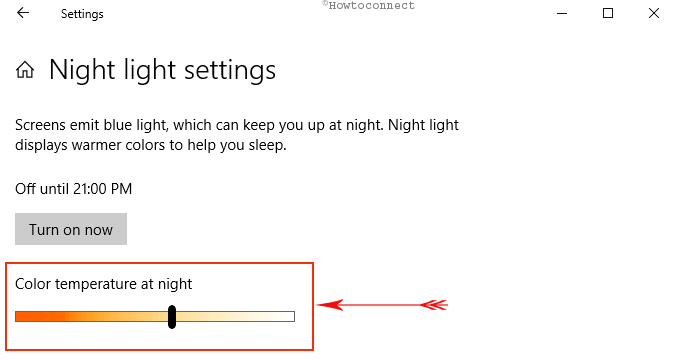
Change Color Temperature of Night Light
If you see that the emitted color is not suitable, you can configure the temperature. To do so drag the bar that appears below the option namely Color Temperature at Night.
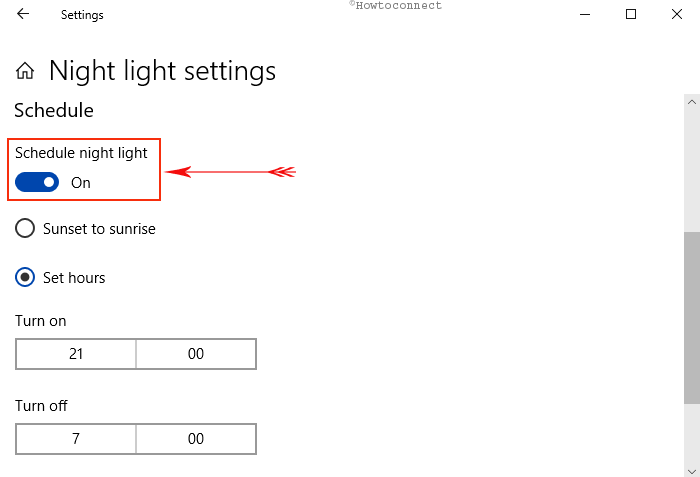
Schedule Night Light
Some users don’t prefer to enable location services and for them, they can have their own schedule of night light. So, toggle on Schedule night light option. By default, this option starts working depending on your location’s relevant time. Once you enable it, you can find two radio buttons below – Sunset to Sunrise and Set hours.
You can choose Sunset to Sunrise option if your location services are activated. Otherwise, you can choose the Set hours radio button.
After you select set hours you can now assign Turn on and Turn off time accordingly.
2. Scale and layout
The section that comes with the Display settings is the Scale and layout. It furthermore contains three options –
A ] Change the size of text, apps, and other items
B ] Resolution
C ] Orientation
Now, let us head towards all these 3 subsections of Scale and layout.
2 A] How to Adjust Apps, icons and Text size
Icons, size of text and well-arranged apps helps to work a lot easier with Windows 10. Unfortunately, these appear tiny in High resolutions display making the navigation way difficult to an application. To eliminate this fact, Microsoft included options scaling option for display setting. Upon application, you can easily find an appropriate setup to balance screen real estate and legibility. Here are the steps to do so:
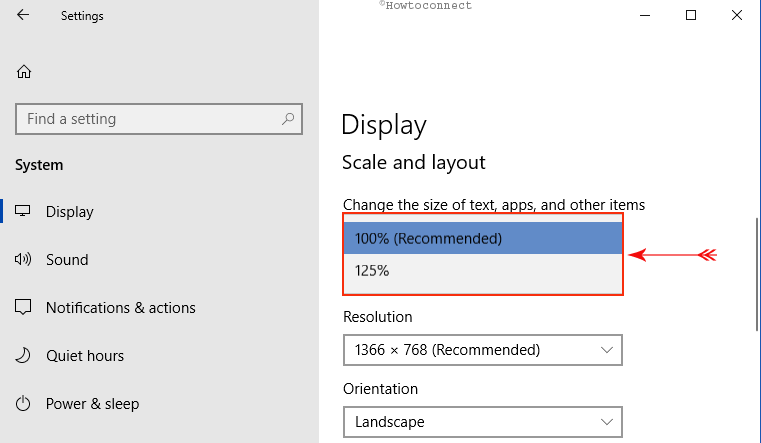
Step-1: Click on the drop-down menu under Change the size of text, app, and other items and choose the preferable one from the list. However, the recommended scale is the best that works for most users.
Read our full tutorial on How to Change Text and Apps Size on Windows 10 Creators Update.
Step-2: If you are not satisfied with this setup, you can customize it also by clicking the Advanced scaling settings available under drop down box.
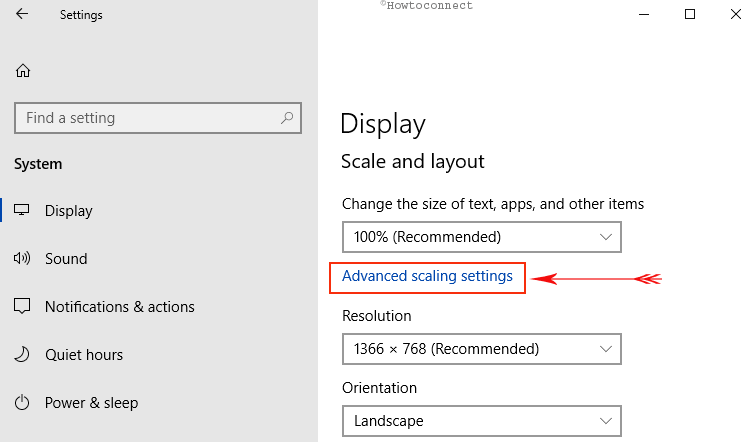
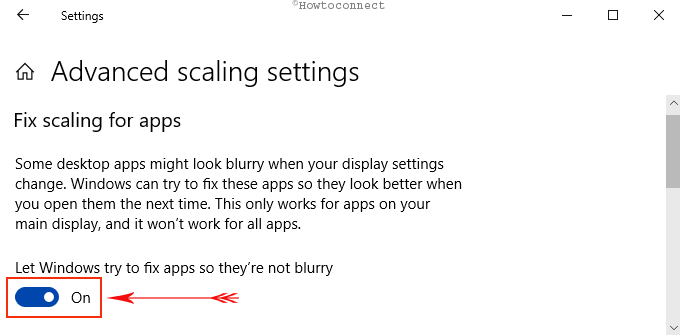
Fix Scaling for apps
Certain desktop apps appear blurry when certain display settings are incorrectly modified. Windows 10 makes an attempt to fix these programs so they look better when you access them the next time. However, this only works for applications on your main display. it won’t work for all programs. So, toggle On the switch that you find just below the option let Windows try to fix apps so they are not blurry ( see screenshot).
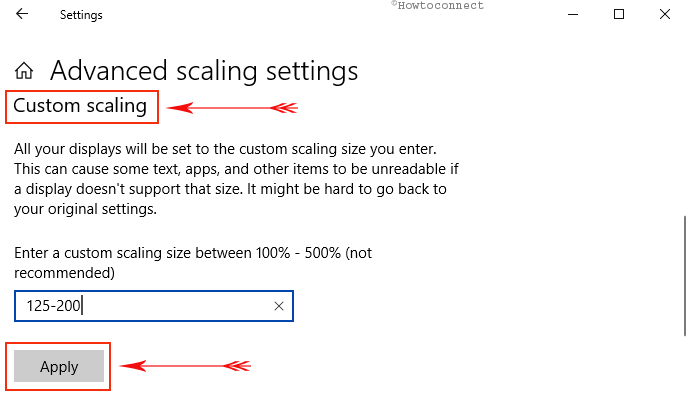
Custom scaling
Windows 10 provides you an option so that you can set your display using the size that suits you best. But if the display doesn’t support that size then some text, apps, and other items become unreadable. So you should be quite careful while inputting custom scale size. Just click on the textbox below the option “Enter a custom scaling size between 100% to 500%“. After inputting the scaling click Apply.
2 B] How to Set Screen Resolution
Native or recommended resolution is the best suited that Windows offer. Display and the applications might appear fuzzy once you set this incorrectly. Therefore, if you do not have sound knowledge about it and yet want to Get Best Experience from Windows 10 Display Settings, you need to rely on the native resolution. Comply with the following guidelines:
Step-1: Click on the drop-down box under Resolution as indicated in the snapshot below.
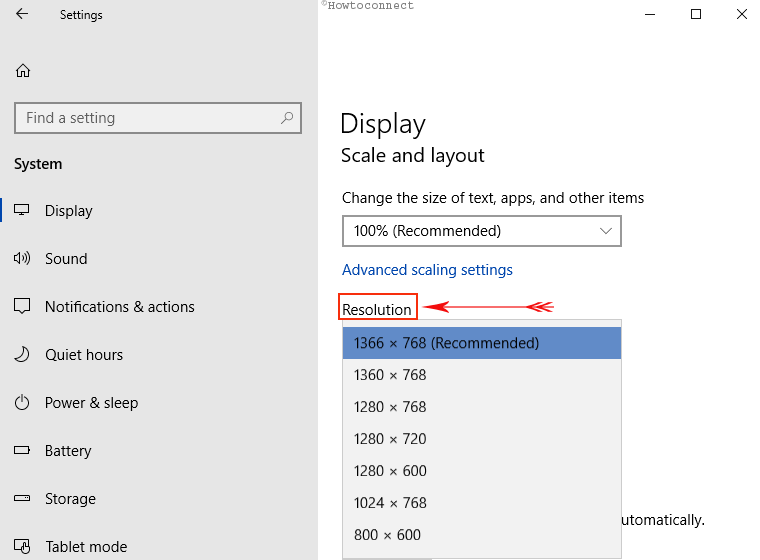
Step-2: Choose the one recommended by Windows. You can also try out the other numbers and see which one fits best for you.
For reference, you may like to learn How to Show Screen Resolution in Desktop Context Menu in Windows 10.
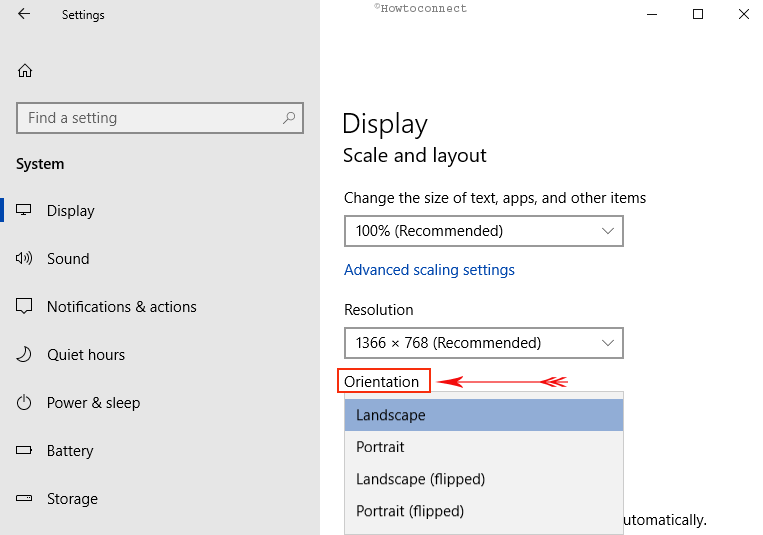
2 C] How to Change Orientation
The Windows 10 Display Settings provides another significant feature that lets you rotate the screen. With this “Orientation” drop-down menu, you can set the screen either “Landscape, Portrait, landscape (flipped), or Portrait (Flipped)”. So, use any of the following to flip your display and Get Best Experience from Windows 10 Display Settings.
Landscape – It displays the content (including text and images) in a wider part of the screen. This mode is always used in PCs. In this mode, the width is more than its height such as Panoramic View.
Portrait – This is the contrast with the above mode. Here, the height is always more than the width. For example, selecting this will make the screen look like a book view. But you need to tilt your heading to view or read the contents if you are using a laptop or a desktop. This mode works best in phones.
Landscape (flipped) – If you choose this, the angle of rotation changes to 180°.
Portrait (flipped) – Choosing only Portrait will turn it the screen to 90° whereas choosing this flipped option makes it to 180°.
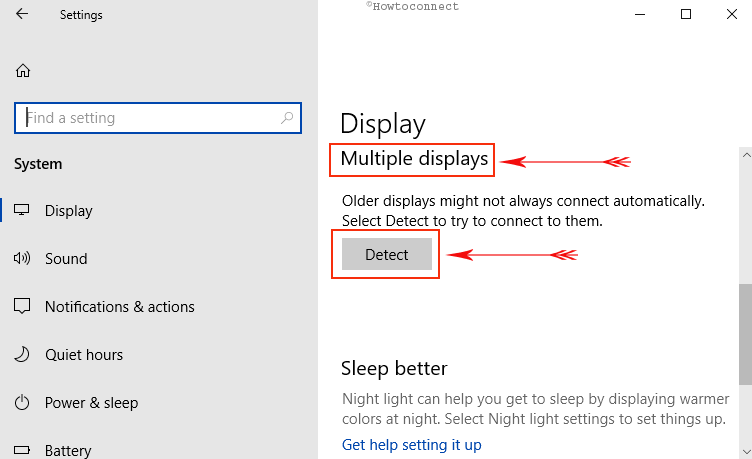
3. Multiple Displays
The last and the final section of Windows 10 Display Settings page is the Multiple Displays. Sometimes, older displays might not always connect all by itself. So, a click on the Detect button and Windows will immediately start finding out another display.
Conclusion
A display must be as comfortable as we need to work along. Additionally, well-arranged display smoothes the work progress. Lots of things are involved in making a great display. We have tried to guide you through few all the ways so that you Get Best Experience from Windows 10 Display Settings. Apply all these properly and enjoy working with your system.