Being an avid gamer, you always want to improve your Windows 10 PC performance. Being a features laden OS Windows 10 Contains DX 12 which is substantially faster than its predecessors and presents an ideal environment for gaming. Few easy customization and carefulness can make your Windows 10 PC blaze faster to enhance your gaming experience. So, in this article, we thought to share with you some tips on How to make Windows 10 PC fast for gaming.
Top 10 PC Games with Download links
How to Record Running Games in Windows 10 Using DVR
Table of Contents
How to Make Windows 10 PC Fast for Gaming
For an Instant Boot up, Upgrade Your Graphics Driver
The focus point of your gaming is entirely based on the graphics card, but it cannot extend its accurate result until you have the correct software on your system. There is always a distinction in the working of the driver that shipped with your PC and the most recent streamlined graphics card. Presently there are three graphic cards that are popular amongst the users: Nvidia GeForce, ATI Radeon, and Intel HD Graphics. Visit their respective sites to upgrade which one you have.
Drivers Download pages:
But, wait! How will you know what cards you own?
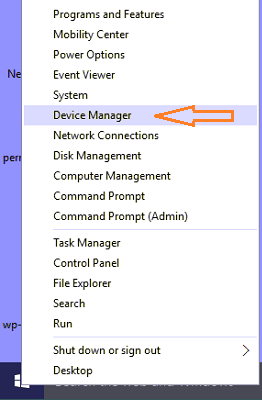
- It is very simple! Launch the Device Manager on your screen from the Power user menu.
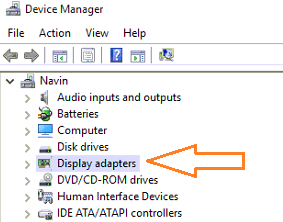
- Make your way to the Display Adapters and extend it.
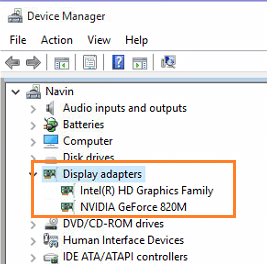
- You can view each one of your graphics cards ordered in a list. Make a right-click and go with Update Driver Software.
Overclock a Graphics Card
The positive outcome of your gaming experience is mainly dependent on the graphics card. Before you proceed with the overclocking procedure, you need to consider a few things like system stability and cooling power. In simple terms, overclocking a graphic card is operating it above its set frequency and stock GPU. So, it is all about making your graphics card run beyond its factory speed setting. But you should also take in consideration that overclocking results in high depletion of power and emission of an extra amount of heat.
Establish More Memory
The core reason for smooth game work is the extra memory. The minimum amount of RAM required for your computer is 4GB. Though, if you can afford 8 or 16 GB of memory, you can start imagining a smooth gameplay. The system needs more memory as the latest games are heavy and also if you have bulk programs loaded on your computer for gaming, you definitely need 16 GB of memory. Fire up the Task Manager and see it by yourself how much memory is used for gaming.
Mount Games on Solid-State Drive
SSDs or Solid-State Drives are always preferred than hard drives. And for the best result of gameplay, consider this in place of your hard drive. SSDs are quicker in the working when compared with the others and also it lessens the loading time of a game. As the present upcoming games are very heavy, it is suggested to employ 250 GB SSD. With this massive change, you will be definitely able to spend more time in playing rather than waiting.
Deactivate SuperFetch and Prefetch
Both are the components of Windows are supposed to boost applications and system during startup times. But these traits are becoming an obstacle in the phase of time of loading and background activities for games. So, it is suggested to deactivate these two to improve the gameplay.
Let us see how to deactivate SuperFetch
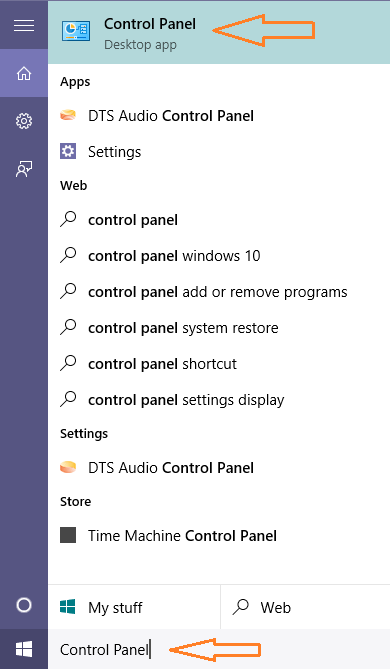
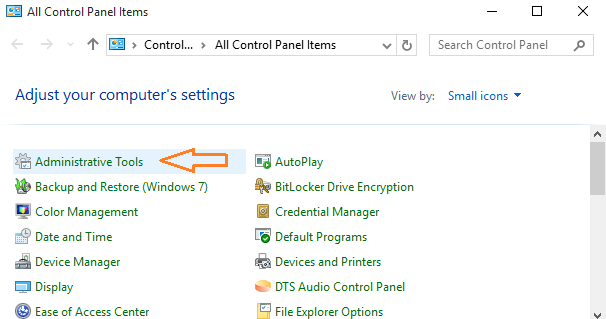
- Type Control Panel in the Cortana search and get the result on top.
- After launching Control Panel, go to the small or large view of it so that all the icons are modified to be clearly visible. Press Administrative tools link.
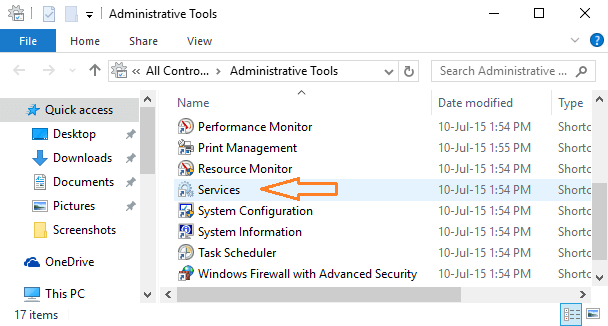
- Now, pick up Services for the provided administrative tools.
- Here, you need to make a search for SuperFetch. Come down and you can see it listed.
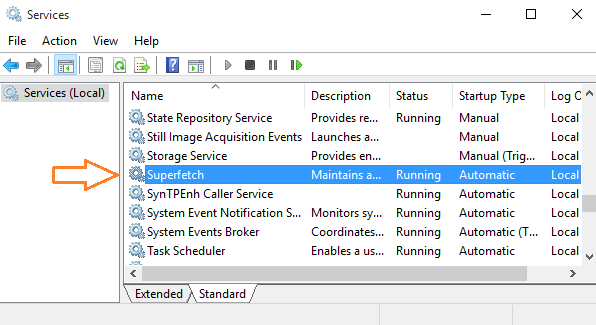
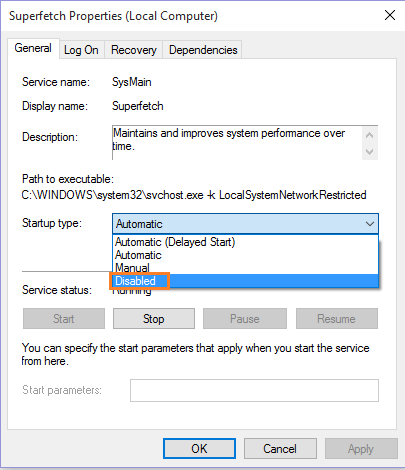
- Double click on it and set it to Disabled. Click Ok.
Now, we will see how to deactivate Prefetch
- Type the command regedit on the Cortana search field and you can see its icon on the top.
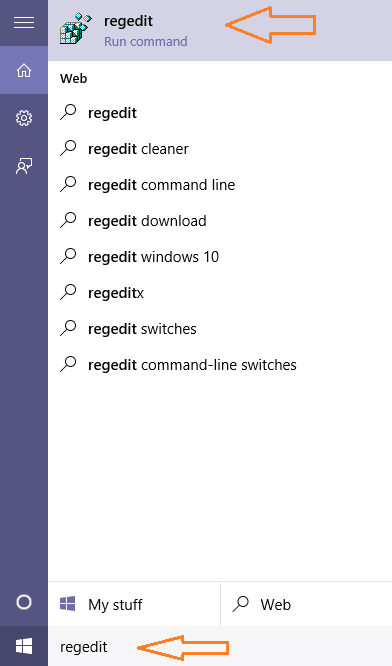
- After passing through the UAC, the Registry Editor window will be on your screen.
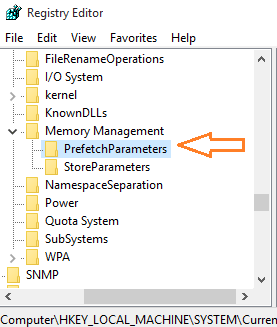
- Follow the path to find the Prefetch: HKEY_LOCAL_MACHINE / SYSTEM / CurrentControlSet / Control / Session Manager / Memory Management / PrefetchParameters
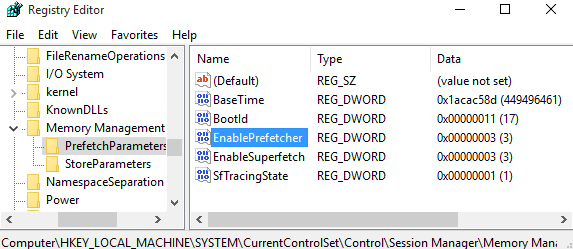
- On the right side, double-click on EnablePrefetcher
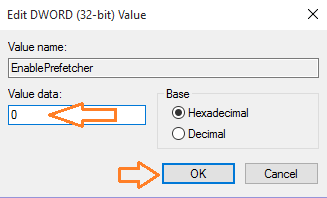
- And on its open Edit window, set the value to 0. Click Ok button.
Adjust NVIDIA Control Panel
All the Nvidia drivers are set with their individual control panels. These control panels empower you to manage 3D settings. Most of the settings are customized by the game itself though there are some things that the drivers control panel can do for you. So, it is the best idea to scan through the options and adjust the settings to experience and balance the quality.
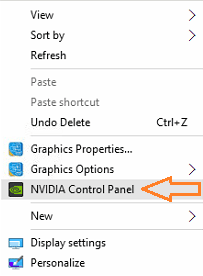
To launch the NVIDIA Control Panel, right-click on a vacant part of the desktop and pick NVIDIA Control Panel in the context menu. This unfolds the NVIDIA Control Panel on your screen.
Below mentioned are the succinct important settings you can modify:
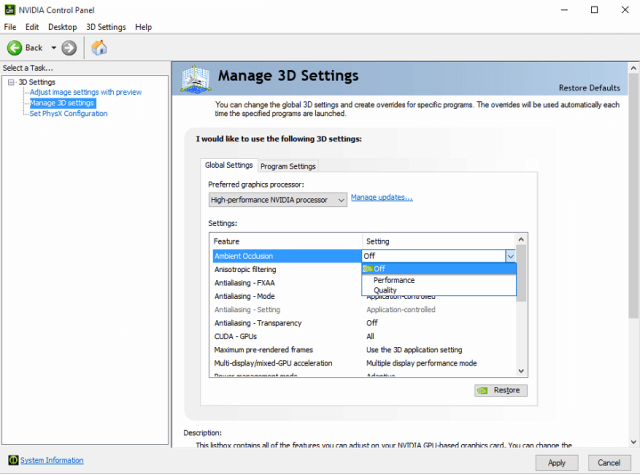
- Maximum Pre-rendered frames: The processor manages a number of frames prior to transfer them to the graphics card and this setting manages it. To experience smooth gameplay, raise its value. But while using the keyboard and mouse, you can encounter a lag. To avoid it, make the setting to “1”.
- Threaded Optimization: It is suggested to keep this On since the multi-core processors of this setting while you run the game. This is awesome as it helps the game to be more stable, high, and smooth.
- Vertical sync: When you deactivate this setting, the game runs absolutely perfect but you will witness that some area of your screen is not representing properly. But make a note to deactivate it only if you a better frame rate your monitor when compared to your gameplay.
Check the Performance of your Computer
In order to lift up the quality of gameplay, you need to confirm that your computer is fast enough to handle the games. There are many things that help your Windows 10 PC run faster. For more details on this tip you can read our related article:
Things to do to Make Windows 10 PC Fast – User Guide
So, we have examined all the above tips and the end results were outstanding. What are you thinking yet? Just follow the above tips. Well, the results also depend on your system. If you are using a computer that is made for heavy games, then it is good luck after you Make Windows 10 PC Fast for Gaming.