Methods to Increase or Decrease Drag and Drop Sensitivity in Windows 10. – To move items from one location to another, users mostly prefer the drag and drop feature of Windows. By default, drag and drop work when an item is grabbed and moved for about 4 pixels of distance or more. But this feature sometimes creates trouble for most of them when unknowingly the items get moved. Registry Editor solves a similar problem, read the guide – Delete Recent, Frequent from File Explorer on Windows 10.
Well, all thanks to Registry Editor as it lets you increase or decrease drag and drop sensitivity in Windows 10. The drag and drop sensitivity is the minimum distance in pixels that the user has to cover to move a certain item.
The default distance is 4 pixels but you can increase the sensitivity to say 30 or 50 or 100. For example – You increase the sensitivity to 30, then drag the item to 30 pixels of distance, and when you leave it, that particular item will be moved. And the same behavior goes when you decrease the drag and drop sensitivity.
So, in this guide, follow the below-mentioned directions to Increase or Decrease Drag and Drop Sensitivity in Windows 10 through Registry Editor.
Table of Contents
How to Increase or Decrease Drag and Drop Sensitivity in Windows 10
You have to be little careful while modifying the string value in the below steps. So, follow this guide on How to Import and Export Registry Editor on Windows 10.
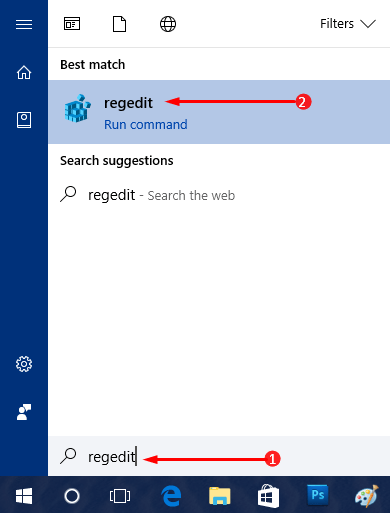
Step 1 – Open Start Menu and type Regedit and immediately Cortana will display Regedit on the top, select it.
Pursue more ways to open the same – How to Access Registry Editor in Windows 10 – 5 Simple Tips.
Step 2 – This might make UAC prompt pop-up with its details. Approve the prompt by selecting Yes and let the Registry Editor open.
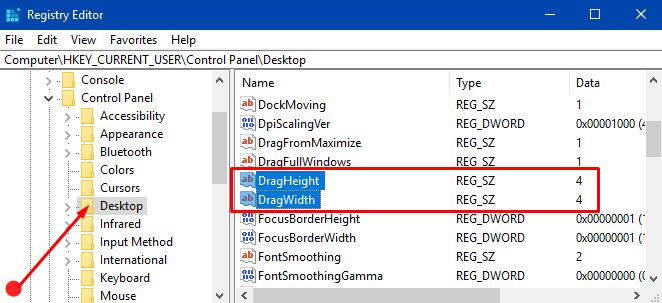
Step 3 – In the Registry Editor window, you have to navigate to the below-mentioned key that shows up in the left sidebar.
HKEY_CURRENT_USER\Control Panel\Desktop
Step 4 – Move to the right side of the Desktop key and locate two strings – DragHeight and DragWidth.
To Increase Drag and Drop Sensitivity
Step 5 – First, double-click DragHeight string and to increase its sensitivity, change the Value from 4 to say 80. Click OK on the edit box.
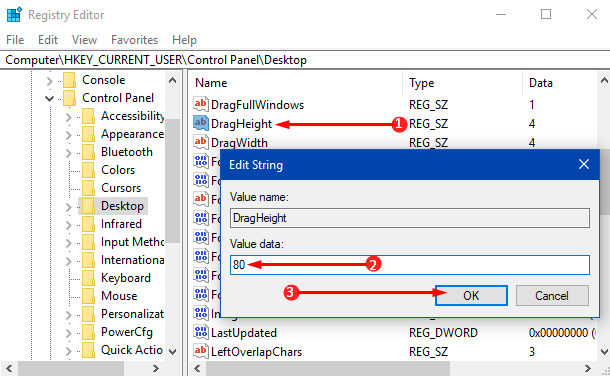
Note – You can enter any number, but if you set the value too high such as 1000, you will not be able to drag any item.
Step 6 – Moving ahead, double-click DragWidth string and put the same number that you used in Step 5 for DragHeight string.
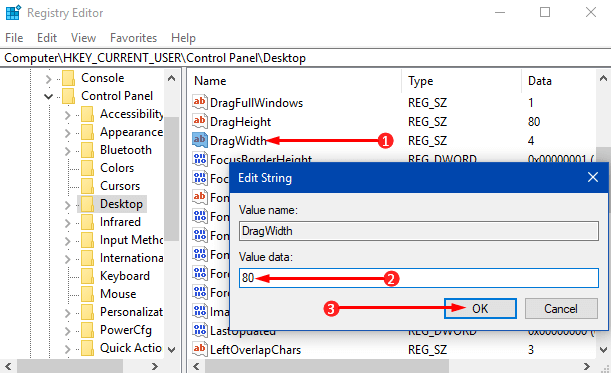
Step 7 – Finally, click OK and restart the PC to make the changes effective.
To Decrease Drag and Drop Sensitivity
Step 8 – Again perform a double-click on DragHeight and set a lower Value such as 2 to decrease the drag and drop sensitivity. Click OK after lowering the value.
Step 9 – Now, its turn to assign a new value to DragWidth and so, double-click its string and enter the same Value of DragHeight.
Step 10 – Lastly, click OK, restart the PC, and change in the sensitivity will take place.
Summing Up
So, this is a good tweak when you want to avoid any accidental movement of a certain item on your PC. Generally, users prefer to increase the sensitivity so that no other user can change the location of items mistakenly. Hence, completing the above steps carefully will make you able to Decrease or Increase Drag and Drop Sensitivity in Windows 10. If you have more configuration options to this feature of Windows, do write them in the below comments form.