Search Bar in Settings App Doesn’t Work on Windows 10 – Settings program includes a search box to serve requisite results. But, Few users experience a peculiar behavior in it when they attempt to search any setting. Instead of presenting appropriate results, the application says No results or something like this after every query.
Likewise, the search on the taskbar (Cortana) also does not bring items matching with the Settings application. Hence, this solution presents a straightforward method to overcome Search Bar in Settings App Doesn’t Work on Windows 10. Search results on the Windows operating system are served by Indexer hence, you require modifying the concerned settings.
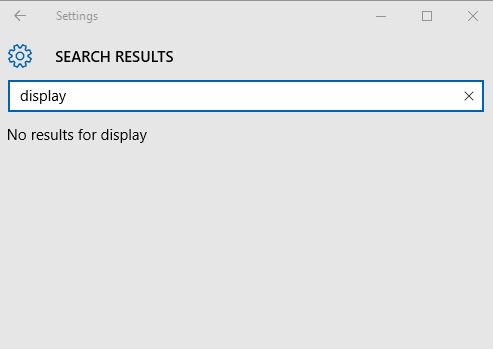
Table of Contents
How to Fix Search Bar in Settings App Doesn’t Work on Windows 10
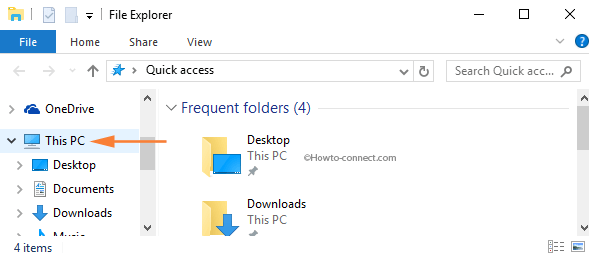
Step 1 – Launch File explorer (Keyboard Shortcut is Win & E) applying the method you are comfortable with. and press This PC in Quick access.
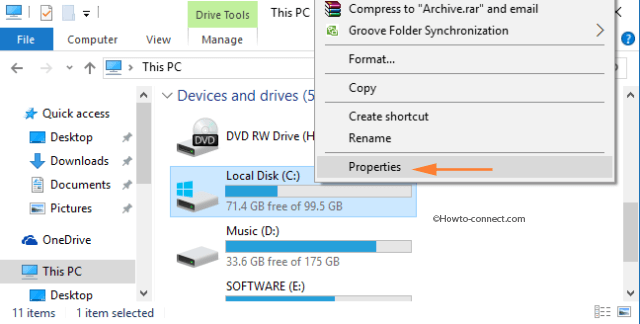
Step 2 – On the right-hand side, locate Local Disk (C) and do a right-click on it. Once the context menu prompts hit on Properties.
Noteworthy is we are assuming here the system files are placed in the C drive.
Step 2 – The Properties wizard for Local drive (C) drive arrives and by default, General tab is appearing.
In this tab, ensure that the tiny square box titled Allow files on this drive to have contents indexed in addition to file properties is checked.
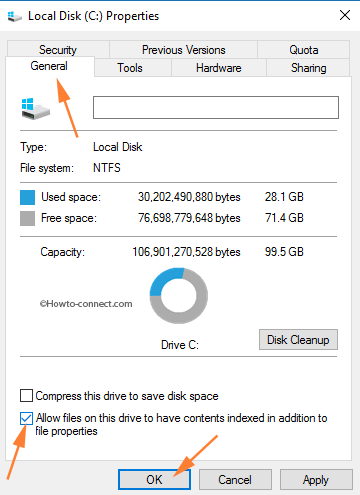
Step 3 – If not, insert a tick mark on it and hit Apply and Ok buttons.
Step 4 – Copy the path and paste it into the address bar of the widespread File Explorer and hit Enter.
%LocalAppData%\Packages\windows.immersivecontrolpanel_cw5n1h2txyewy\LocalState

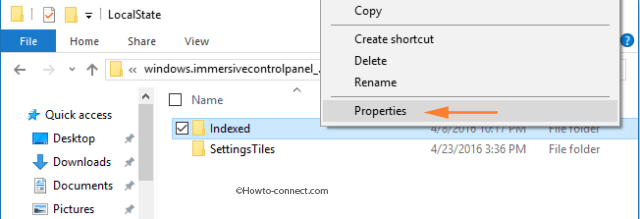
Step 5 – In the subsequent window, trace out a folder labeled Indexed.
Step 6 – Next, right-click on the Indexed folder and tap the choice at the bottom Properties.
Step 7 – When Indexed Properties box arrives on the screen, stay into the General tab, and hit the button termed Advanced.
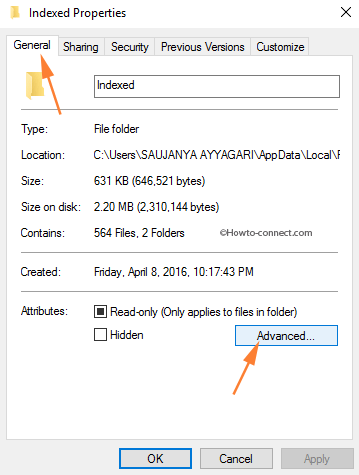
Step 8 – The above action opens Advanced Attributes dialog box on the screen.
Step 9 – Insert a tick mark on the tiny square cell that reads as Allow files in this folder to have contents indexed in addition to file properties.

Step 10 – Remark that in a few instances, you might find the option already selected. If so, then uncheck the cell and click OK to apply the modification. Again, launch that Attributes box and tick mark the aforesaid option.
Step 11 – Finally, hit Ok buttons of all the opened boxes.
Step 12 – Finally, It’s is time to reboot the machine and after it starts up, the indexing service will scan all the files in the folder. This will eventually make the search of the Settings program function again.
Conclusion
Well, follow the steps outlined in this article, and let us get informed if you fix Search Bar in Settings App Doesn’t Work.