
You all know that Trim Command for SSD is necessary to boost up the performance of a solid state drive. These commands safely remove the data that is no longer in use from SSD’s memory. This task also makes sure that disk write proceeds at full speed and empowers the drive for long durability. So, in this guide, we present you a sequence of Trim command that enhances Windows 10 and 11 Solid State Drive experience. You can also follow our guide to Trim SSD on Windows 10 Using PowerShell.
What is Trim command?
A Trim command lets your Windows 10 or 11 OS inform the SSD that certain parts of data are not considered in use and thus can be deleted without creating any harm. Moreover, this also saves the time in removing a specific block of data, especially, when you require additional space to store new data. Once this operation is over, the performance of the SSD highly improves. You may like to know How to Clone Hard Drive on Windows 10 to HDD / SSD.
By default, the Trim command for SSD in Windows 10 and 11 is enabled but for any reason, if it is not, it badly affects the performance of the drive. Hence, this guide provides you all the necessary commands that you need to know about Trim for your SSD in Windows 10 OS. For reference, pursue another guide on How to Erase Hard Drive with DiskPart in Windows 10. Let us walk towards the series of steps and see what are those commands that help you in configuring Trim for SSD.
Table of Contents
Run Trim Command for SSD in Windows 11 and 10
Step 1 – First of all, open Command Prompt as admin to Run Trim Command for SSD in Windows 10, 11. Type cmd on Cortana search box and when you see Command Prompt below the Best match, conduct a right-click on it. Select Run as administrator from the few options that come into view on Cortana.
Find more ways to Launch Elevated Command Prompt on Windows 10.
Step 2 – Click Yes when you notice the UAC on the computer screen.
Step 3 – Copy/paste the below command lines in and make sure to press Enter to get the correct results.
Now, follow the below sections to check the TRIM status of SSD on your PC and depending on the status enable or disable it as per preference.
1. Check Current Status of TRIM Support for SSDs
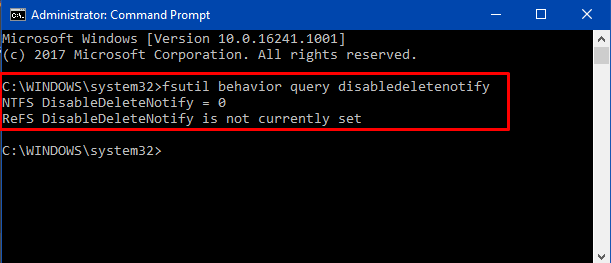
Before anything else, the first Trim Command for SSD is to check its status. Depending on what file system (NTFS or ReFS) you are using, you can find their TRIM support for SSDs using the below command.
fsutil behavior query disabledeletenotify
Now, let us see the possible results and their descriptions.
| Sr. No. | TRIM Status Results | Description |
| 1. | NTFS DisableDeleteNotify = 0 | This specifies that SSDs with NTFS has TRIM already enabled. |
| 2. | NTFS DisableDeleteNotify = 1 | If the status displays the Value as 1, it states that SSDs with NTFS has TRIM disabled. |
| 3. | NTFS DisableDeleteNotify is not currently set | This status illustrates that TRIM support will automatically get enabled when an SSD with NTFS is connected. |
| 4. | ReFS DisableDeleteNotify = 0 | The 0 with ReFS denotes that TRIM support is enabled for SSDs with ReFS. |
| 5. | ReFS DisableDeleteNotify = 1 | Here the Value 1 with ReFS signifies that TRIM is disabled for SSDs with ReFs. |
| 6. | ReFS DisableDeleteNotify is not currently set | This specific result interprets that TRIM support will itself be enabled when an SSD with ReFS is connected. |
2. Trim Command for SSD with NTFS File System
If you are using the NTFS file system, you can see the status of Trim for SSD by executing the above-mentioned commands. So, depending on the status, you can use any of the below Trim commands.
2.1. To Enable TRIM – NTFS
fsutil behavior set disabledeletenotify NTFS 0
2.2. To Disable TRIM – NTFS
fsutil behavior set disabledeletenotify NTFS 1
3. Trim Command for SSD with ReFS File System
If you are using ReFS file system and prefer to make any changes, follow any of the below commands as per your need.
3.1. Enable TRIM – ReFS
fsutil behavior set disabledeletenotify ReFS 0
3.2. Disable TRIM – ReFS
fsutil behavior set disabledeletenotify ReFS 1
If you are concerned about disk space, you can Reduce Windows 10 Disk Footprint on your PC.
Conclusion
Hence, using the above-mentioned commands you can get to know about the support of TRIM on your SSD. Moreover, you can also enable or disable Trim feature for your file system depending on its status. However, the Trim command for SSD in Windows 11 and 10 is an essential feature as it improves the performance of your PC and takes it to one level up. In the end, if you have more commands for the same, write to us.
Ty
says:How to Trigger Trim in Windows (via powershell, command prompt, Scheduled task): https://social.technet.microsoft.com/Forums/en-US/775e0231-1ebb-424c-b7fb-0afddd0479ca/solved-how-to-trigger-trim-in-windows-via-powershell-command-prompt-scheduled-task?forum=win10itprogeneral