The Computer Management tool of Windows 10 has Local Users and Groups listed under its System Tools. In our recent talk about Computer Management, we have briefly described Local Users and Groups. So, today we bring you an entire topic on Local Users and Groups. Here, in this article, we will share with you the steps to create local user account in Windows 10 through Computer Management. And also we will discuss how to see and modify the properties of a user account. Along with this, you will also learn the procedure for creating a User Group.
Table of Contents
How to Create Local User Account in Windows 10
Before we start with the procedure, few simple things are needed to be noted down to create local user account:
- To finish the below procedure, the minimum group membership required is of Administrators.
- On the local computer, you must be a member of the Administrators group.
- Or to carry out the entire process, if prompted, you must give your details for the Administrator account on the local computer.
- The username that you will provide, should not be similar to other existing username or user group of the computer.
- The username that you will provide can hold up to twenty characters having uppercase or lowercase.
- Only these characters are not allowed: ” / \ [ ] : ; | = , + * ? < > @
- You can use up to 127 characters for the password.
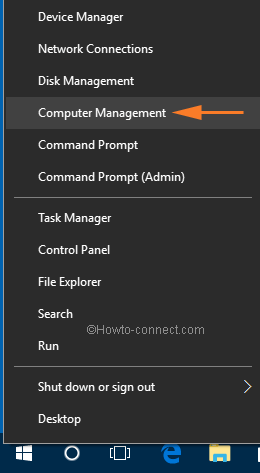
To carry out the procedure, you need to get into the Computer Management. And the easiest way is to obtain it from the Power Menu. When you make right click on the Start Menu, the Power Menu comes up. So, click Computer Management.
Now, on the left column of the Computer Management window, navigate the following path: Local Users and Groups -> Users folder.

Get into the center area of the Computer Management window and perform right click on the vacant space and choose New User to create local user account.

Your above action will lead to the emergence of New User window. Here, you have to enter the details of the new users. Provide the name of the user in the User Name field followed by a description in the Description box (optional).
Then, enter a password in its respective box and to confirm it re-enter it in the Confirm password field. You will see a few options with a checkbox to each in the lower half of the New User window. Let’s see what they mean:

User must change password at next logon: If you wish not to use a password now, you can mark the checkbox which says Use must change password at next logon. In this way, when the user first uses this user account, he must set his own password.
User cannot change password: Here, only the administrator will be able to do any changes on the password for that particular user account.
Password never expires: Usually, this option is chosen by the corporate environments. They use certain for the user account password which gets expire after a certain amount of time.
Account is disabled: The user account will be disabled and cannot be put into use if this option is selected.
After carrying out the settings as per your requirement, click the Create button to create the user account. Now, the newly created user account is all ready to be used. After you are over with the procedure, click the Close button of the New User window.
The user accounts that have been created by this procedure will not hold any administrative authorities and thus will be registered as the members of the Users group. And it will have the authority only to utilize the present resources and applications.
How to View & Change the Properties of a User Account in Windows 10
After you create local user account there is also a provision to modify or edit the properties of the prevailing users. As mentioned above, get to the Users folder and then go to the center area of the window where you will see the list of prevailing users. Now, look for the user account whose Properties you wish to change and make a right-click on it to choose its Properties option.

The Properties window of the selected account opens up on the screen. The options that were mentioned in the previous section of this article will be seen in the General tab. You can modify the changes if needed.

The next tab is Member of. This tab displays the list of those groups in which the user is a member. To be a member of another group, click on the Add button and choose the required user group. If you wish to remove its membership from any of the prevailing groups, choose that user group and click on the Remove button.

The following tab is the Profile tab. This tab is mainly used by corporate network scenarios. It provides you to set the Profile path which is the place where the user profile data is saved. The Logon script should be executed on the login of the Windows 10. It has another section of Home folder.

After doing the changes as per your choice, click the Ok button and implement the changes.
How to Create a User Group in Windows 10
Now, we will see how to create a user group. And to make it happen open Computer Management followed by a click on Local Users and Groups and again on Groups folder.
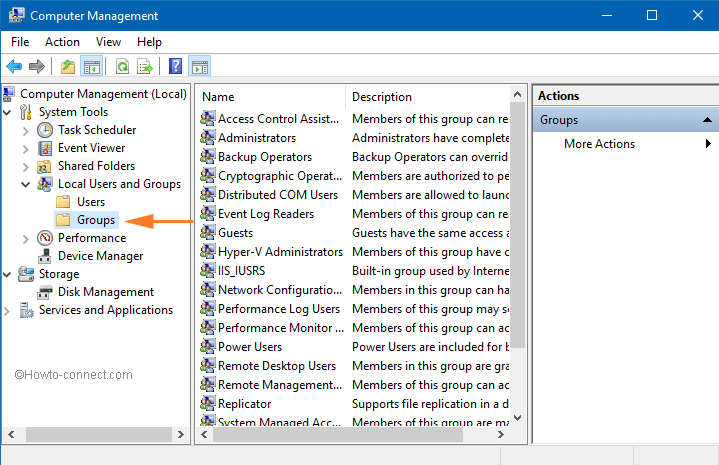
The center area will have a list of groups represented with their names along with their description. Make right-click on a vacant space of the central area and choose New Group.

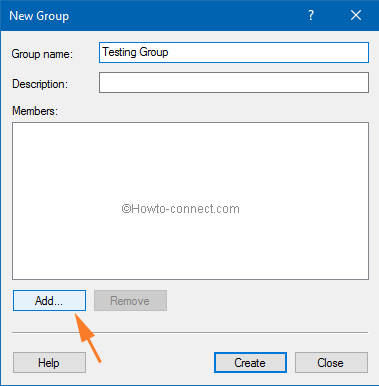
This opens up a New Group window. Provide a name for the group in the Group Name field and its explanation in the Description box (the description box is optional).

Now, you have to add the members. Click on the Add button.
You will see the Select Users window on your screen. Here, click on the Advanced button.

Another window of Select Users appears on the screen with a variety of options to choose the user accounts. Click the Find Now button and scan the arrival results to find the user account (s) that you wish the user group to be a part of it. Finally, click the Ok button.

On the Select Users window, you will notice the selected user account(s). Click Ok to affirm the step.

Again you are back to the New Group window. You will see the added member(s) here. Once you complete the procedure, click Create button followed by the Close one.
You can even provide particular permissions to the created user group and its added members will follow them. We will soon bring you an article describing the procedure of how you will change permissions.
Previously we’ve written s guide and steps to switch to Local account you can read.
Closure
Expecting that this article will be of great use to you, we have penned down the basics of the Local Users and Groups. Following the steps mentioned above, you can easily create a local user account and also set up a user group. You can even do the modifications of the user account and set things as per your preference. This is the most useful segment of the Computer Management tool. To learn more about Computer Management, you can see our related posts. If you face any trouble while setting up the user account or user group, feel free to ask us. Also, if you hold any user accounts whose properties you wish to edit then give it a try.
Thomas Erskine
says:I don’t have “Local Users and Groups” either. Maybe this is only part of some exotic (more expensive) version of Windows 10?
Joyce
says:The Path Local Users and Groups is not in my Computer Management
sunita
says:Welcome Jim, Run the command “sysdm.cpl”. Check the users missing. On elevated command propmt run the command
Jim Miller
says:“If you face any trouble while setting up the user account or user group, feel free to ask us.”
What do you do if Users and Groups is not on the tree as an available choice in Computer Management?
It is missing on both of my Windows 10 machines.
Mike Wilson
says:The Path Local Users and Groups is not in my Computer Management