Here, you will find a collection of solutions to fix all Network Connection Problems in Windows 10 on a single platform. You know getting Internet access is the most crucial part of this Windows version. We have already covered multiple guides such as Network Icon Red X and Flyout Missing, Limited Network Yellow Mark, IPsec Negotiation Failure is Preventing Connection, and other but we are providing the fixes of all the issues inclusively here.
When you try to connect to the internet you encounter Network Icon Missing, Sluggish WiFi Connections, IP Address Conflict, and multiple other problems. When you follow the sequential solutions all these issues will be solved.
All Network Connection Problems in Windows 10 Solutions
Here are how to fix Network Connection Problems in Windows 10
Before going deep into the fixing mode, it is better to start with some simple checks. Some network problems are minor and are resolved while checking. If not, these checks will definitely narrow down the Network Connection Problems in Windows 10.
Check WiFi
First of all, try to check your WiFi connection.
Step-1: Press “Win + I” shortcut keys simultaneously to Open Windows Settings application. Select Network & Internet category from the main interface of the app.
Step-2: Go to the WiFi section on the left pane of the following page.
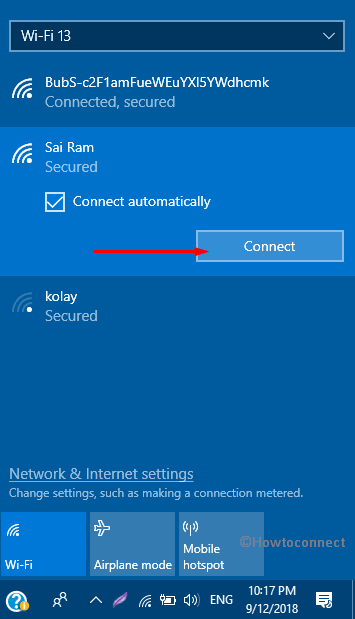
Step-3: Switch to the corresponding side and make a click on Show available networks.
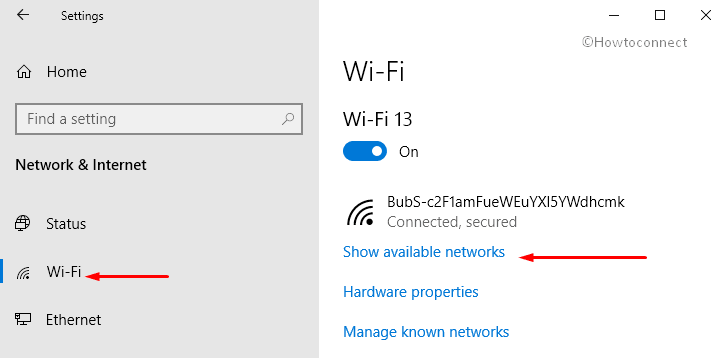
If the network you are expecting is present in the list, select it and click on Connect.
Step-4: Now, check whether the laptop’s physical Wi-Fi button is on or off. Usually, an indicator light shines when Wi-Fi is on.
You may like to explore more 4 Ways to Connect to WiFi.
Examine Airplane Mode
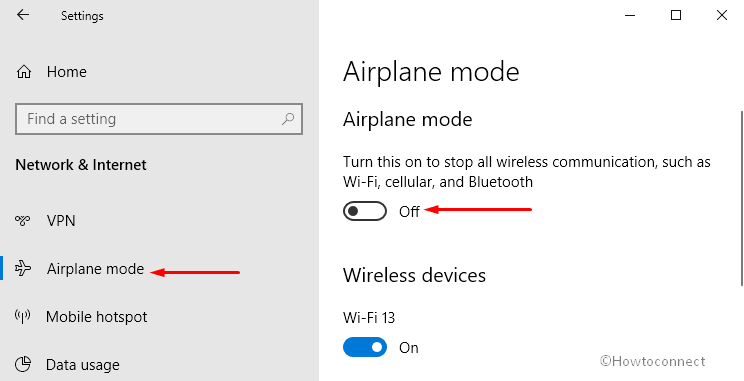
Another thing to check is airplane mode. Make sure it is off and to check, follow the below series of steps.
Here also, launch Settings program and advance to the Network & Internet category. Locate and select Airplane mode section on the left column.
Move to the adjacent pane, check and if you find that airplane mode is on, turn it off.
Read the ways to Fix Airplane Mode Issues in Windows 10.
Determine Cellular Connectivity
Make sure that your computer is within the network range. If not, move near to the access point or router. So, another way to connect to a network is cellular. If you access the internet via a cellular network also, check it by going through these sequence of steps.
Get access to the Setting app and navigate to the Network & Internet category.
Here, on the left side of the next page see if Cellular is there in the list.
For reference, read our article to Use Cellular Instead WiFi Network Automatically in Windows 10.
Restart your modem and router to detect the availability of a network
After checking all these, the first major action you should take is to restart the modem & wireless router. It will lead to the creation of a new connection with your “ISP” (Internet Service Provider). While resetting, all the devices connected to the modem will temporarily disconnect.
The method to restart a modem depends upon its make and modem but some general steps are as follows.
Unplug the router’s power cable from the source of power. There are some modems with a backup battery. If your modem also has a battery and despite unplugging if its lights remain on, detach the battery from the modem.
After plugging out, wait for approximately 30 seconds. In case, if you have removed the battery from the modem, connect it back.
Now supply the power back to the modem by plugging it into a power source. Its lights will blink and then after a few moments, they will stop. You should wait till they end blinking.
Now, it’s time to supply power back to the router. It is better to wait for a few minutes, and by observing the status lights of both the devices, you will know whether a network is present or not.
Turn on your computer and again connect to the network.
Generate Wireless Network report
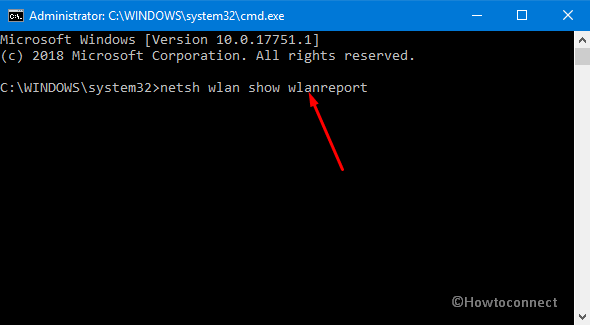
When you generate a WiFi history report, it will help you to diagnose the problem, as well as provide you with more information about the issue. You can share this report with someone who can help you overcome network connection problems in Windows 10.
This will create an HTML file which can be opened in the web browser from a location mentioned under Command Prompt.
In the Cortana Search box, type CMD. Then, right-click on Command prompt and click on “Run as administrator” option. Moving ahead, click Yes on the UAC dialog to access elevated Command Prompt.
When the black panel opens up, type in or copy-paste the below command and hit Enter.
netsh wlan show wlanreport
See the entire article to To Create WiFi History Report in Windows 10.
Check with Internet Service Provider
Check if the basis of the problem is not your ISP (Internet Service Provider) or cable modem.
In the taskbar’s Search box, type CMD and conduct a right-click on Command prompt in the Best match list. Select Run as administrator and click on Yes upon the prompt of UAC.
Now, type in or copy/paste the given command to retrieve the details of the connection.
ipconfig
Once the details appear on the Command Prompt, note down the IP address written in front of the Default gateway. For example, 192.168.1.2.
Proceeding forward, in the same Command Prompt window, type or copy-paste the following and hit Enter.
ping (Default gateway)
For example, type ping 192.168.1.2 and hit Enter. You will get the results as:
Reply from 192.168.1.2: bytes=32 time=5ms TTL=64
Reply from 192.168.1.2: bytes=32 time=5ms TTL=64
Despite the ping results being positive, appearing same as the above-mentioned ones, if you still fail to connect your computer to the internet, maximum chances are that the problem is with the ISP (Internet Service Provider) or the modem.
Lastly, make sure that your router broadcasts the intended network.
To do so, first, connect the router to your computer with the help of an Ethernet cable.
Now, access any web browser and in its address bar, provide the wireless router’s “IP address”. It will be something like 192.168.0.0 or 172.16.1.1; check your router’s documents to get the standard IP address.
A login window will appear where you have to sign-in by providing the login credentials in the respective fields. After that go to Wireless Settings page and make sure that the option Wireless SSID broadcast, Enable SSID broadcast or something alike is ON.
Perform Network Troubleshooter
Running the Network troubleshooter will help you diagnose moreover resolve the commonly occurring connection problems. Most of the times, a few networking commands after the troubleshooting are enough to get rid of network connection problems in Windows 10.
To start the Network troubleshooter, follow these steps –
Go to Cortana search box, type Network troubleshooter. A list will appear and you have to choose Identify and repair network problems.
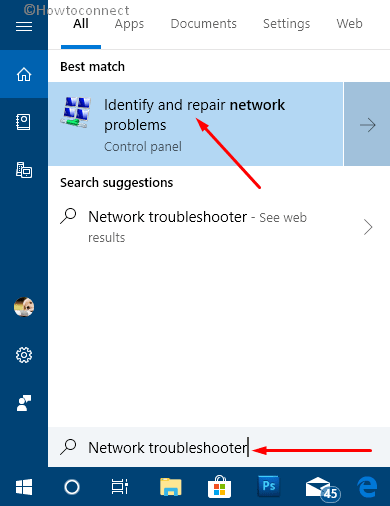
Now, you just have to move as guided by the troubleshooter.
Run Networking Commands
Many common network issues are resolved by troubleshooter. But if it doesn’t bypass the connection issues, try these –
Resetting the TCP/IP stack,
Releasing the IP address,
Renewing the IP address,
Flushing and resetting the DNS cache.
For running the networking commands, go through these series of steps –
Simultaneously press “Win + R” hotkeys to open Run dialog box. Type cmd and hit “Ctrl + Shift + Enter” to access it with administrative rights.
Hit the Yes button when you come across the UAC prompt.
In the Command Prompt window, run the below-mentioned commands in the same order will bypass most of the common connection problems. Type or copy-paste them and hit Enter after each command.
netsh winsock reset
netsh int ip reset
ipconfig /release
ipconfig /renew
ipconfig /flushdns
Roll back the Network Adapter Driver
Sometimes after installing the latest network adapter driver, you may lose access to the network. This also happens when you update Windows 10 to the newest version because occasionally, a comprehensive update contains an updated network adapter driver.
If your case is the same, roll back the network adapter driver to the previous version will eventually bypass the network connection problems in Windows 10. Below are the steps to roll back –
Do a right-click on Start icon to launch Win+X menu. From the list of visible options, click Device Manager.
The Device Manager will open, navigate to Network adapters and then, select the name of your network adapter.
Make a right-click on the network adapter and select Properties.
In the Properties window, go to the “Driver” tab and choose Roll Back Driver. Now, go through the on-screen guidelines to finish the procedure. If this button is unavailable, it indicates there is no previous driver present on the system to roll back to.
Finally, restart Windows 10 PC to make the changes effective.
If the network connection problem was because of the new updated driver, it will surely bypass after these steps.
Update the driver of your Network Adapter
If the driver for your network adapter is incompatible or outdated, you may encounter certain connectivity issues. Also, if you have recently upgraded the system to Windows 10, there is a possibility that your previous “network driver” might not be compatible with this new version.
If you also confront network connection problems in Windows 10 because of this reason, so there arises a need to update the Network driver right away.
Launch and type devmgmt in its text field. In the results’ list, click on Device Manager.
The Device Manager will open. Here, go to Network adapter and then, select the name of your network adapter.
Now, right-click on the network adapter and click on Update driver. Then, make a click on the option namely “Search automatically for updated driver software”. Follow the necessary steps and lastly, click on Close.
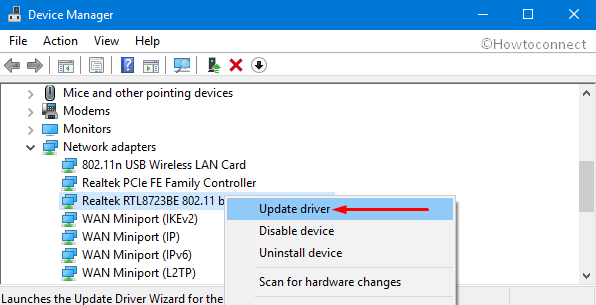
Once you completely update the driver, reboot the system.
If you face network issues because of an outdated driver, then this workaround will definitely work for you. Just update the network driver, and hopefully, this will resolve Network Connection Problems in Windows 10.
In case, Windows is unable to update the network adapter through the above procedure then you need to carry out the task using another way. Go to the website of your PC manufacturer and download the latest version from there. When you can’t connect to the internet on this PC, download the “driver” on another computer and manually install it on your problematic PC.
How to Manually Install your Network Adapter’s Driver
There are two kinds of files you can download from the website of your computer manufacturer. On the basis of the type of file, do the following –
If you have the “executable” (.exe) file, execute a double-click on it and it will install the necessary driver on the computer.
For individual files with the extensions such as “.inf” and “.sys“, you need to go through these steps.
Access Device Manager using any of the preferred procedures. In the Device Manager window, go to Network adapters and select the name of your network adapter. If you can’t find it here, search in Other devices.
Now, execute a right-click on the network adapter, and choose “Update driver” option. Then, click on “Browse my computer for driver software“.
Click on the Browse button and go to the place where driver files are located. Click OK.
Now, click on Next and follow the installation steps to successfully install the driver. Once the installation gets over, restart Windows 10. After the reboot, network connection problems in Windows 10 will eventually resolve completely.
Temporary Turn off Firewall
Sometimes the Firewall software in your computer is responsible for not connecting to a network. To ensure that the network connection problems in Windows 10 are not because of the firewall, temporarily turn it off and try to open a trusted website.
To “turn off the firewall”, you need to go through the documents of your firewall software and learn the way to turn it off. And, don’t forget to enable it after you are done because a firewall is necessary to protect your computer from viruses, hackers, and worms.
Some people find it difficult to turn off the firewall, even after going through the documents of their firewall software. They can turn it off via Command Prompt.
How to turn all the firewalls off by using Command prompt
Access Run command and type “CMD”. Press “Ctrl + Shift + Enter” shortcut keys all together to launch Command Prompt with admin privileges.
See our full article on How to Open Command Prompt as Admin From Run Dialog in Windows 10.
In the Command prompt window, type the following command and hit Enter to execute it.
netsh advfirewall set allprofiles state off
Open a web browser of your choice, then visit a trusted website and see if it opens.
If the website opens, the time is to turn on the firewall. And to do so, in the Command prompt window, type the given command and hit Enter.
netsh advfirewall set allprofiles state on
If the network connection problems in Windows 10 is because of “firewall software”, contact the customer care of the manufacturer. Moreover, you can also visit its website to find out if any update is available.
Turn off the Antivirus Software Temporarily
Sometimes the malware-protection or antivirus software is the major cause of network connection problems in Windows 10. To check if these are the culprit, turn them temporarily off and try to open a trusted website. If the connection problems are caused by antivirus software, contact their customer care or visit its website to find any latest software update.
Like firewalls, the method to turn off the antivirus also varies from software to software. So, read the documents of your antivirus software and learn the way to disable it. After getting success, do not forget to enable the antivirus because a ‘malware-protection’ or ‘antivirus software‘ safeguards your PC against worms, hackers, and viruses.
How to Find which Malware-Protection or Antivirus Software is Installed on the Computer?
Go through these sequence of steps to find out which antivirus software or malware protection is present on your computer.
Launch Cortana, type cp and hit Enter. Once you open Control Panel, go to System and security category. Then click Review your computer’s status and resolve issues.
There will be a down arrow adjacent to Security, click on it. If Windows is able to detect the antivirus software, you will find it under Virus protection.
For newer versions, navigate to Windows Security => Virus protection and on the right pane, you can notice the antivirus.
If the malware-protection or antivirus software in your computer is on, refer to its documents and learn the way to disable it.
Again, don’t forget to enable the malware-protection or antivirus software once the network connection problem is solved.
Uninstall the Driver for the Network Adapter and Restart
If all the above-mentioned steps fail to settle down the network connection problems in Windows 10, uninstall the driver of the “network adapter”. After that, ‘restart your PC’ because now, Windows will automatically detect and install the most recent driver. Consider this step when the network connection stops working effectively after the recent update.
Before uninstalling, always create a backup of the network adapter driver. Visit the website of your PC manufacturer and download the latest available driver for your network adapter. When you are having network connection problems, it’s obvious that your computer can’t access the internet. So, download the driver from a different computer and save it in a USB flash drive.
How to Uninstall the Network Adapter Driver
It is quite easy to uninstall the network adapter driver. You just need to follow these steps:
On Cortana search box, type Device Manager. The results’ list will appear and you have to click on Device Manager present in that list.
Expand Network adapters and then select your network adapter.
Now, conduct a right-click on the network adapter, then make a hit on “Uninstall device“.
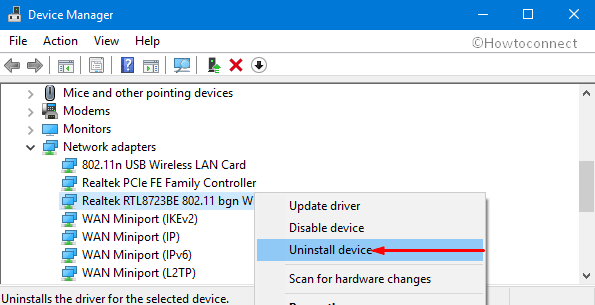
Moving ahead, select the box Delete the driver software for this device and click Uninstall.
The driver will uninstall, so you should restart your computer.
When the computer reboots, Windows will detect moreover install the driver for a network adapter. It will most probably bypass all the network connection problems in Windows 10. However, if Windows fails to automatically install the driver, install it from the backup you created before uninstalling.
Reinstall the Network Devices with the help of Network Reset
This is the last workaround to try. So, consider this if all the above-mentioned solutions fail to resolve the network connection problems in Windows 10. Here are all the benefits this method will provide –
– If the network connection problems emerge after upgrading to a newer version of Windows 10, it will fix them.
– If you are able to access the internet but not the shared network drives, this step will fix it.
– This method will remove all the previously installed network adapters and their respective settings as well.
Note: After your computer restarts, the network adapters will reinstall automatically with default settings. However, ensure that for efficiently using the network reset, your computer needs to run on at least Windows 10 version 1607. You can detect which Windows 10 version is running in your system and to do so navigate to Settings => System => About.
Explore various ways to Find the Version of Windows Installed on System.
Here are the two simple actions you should take one by one to reinstall the network devices with the help of network reset.
Go to Settings application and Network & Internet. Stay on the Status section and click Network reset on the adjacent right side.
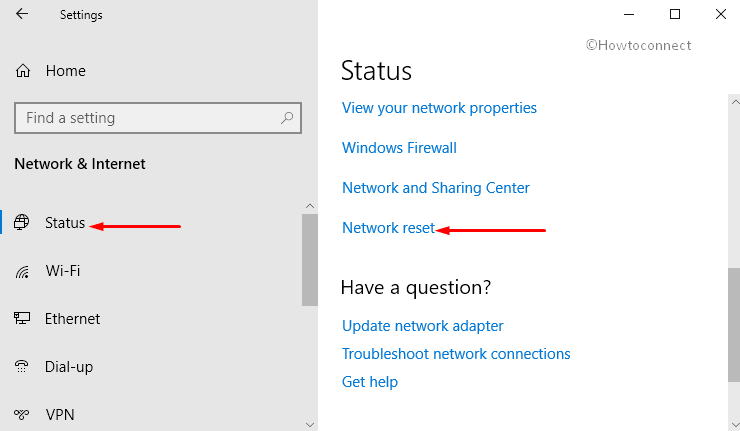
In the Network reset window, click on Reset now and then on Yes for confirmation.
Now, restart your computer and hopefully, there will be no network connection problems in Windows 10.
Some vital notes to consider after network reset
If you were previously using any additional networking software like VPN client or Hyper-V’s virtual switches, you should reinstall them after the network reset.
A Network reset usually sets your identified network connections as the public network where other computers can’t discover your computer. This makes your PC more secure. But if your computer belongs to a workgroup or you use it for sharing the files or printer, you should make it discoverable again by changing its preference to the private network by following this path:
Settings => Network & Internet => Wi-Fi
Now, the Wi-Fi screen will open. You should click on Manage known networks.
Click on to be changed network connection, and then on Properties. On the following page, under the Network profile, choose Private.
So, these are some simple yet significant workarounds to bypass all the network connection problems in Windows 10. If these suggestions fail to fix the issue, contact Microsoft via their Feedback Hub.
While informing Microsoft, provide the problem’s description, log files, screenshots, or any other helpful information. Remember to select the relevant category moreover subcategory in Microsoft Feedback Hub.