Methods to Run Offline Scan from Window Defender Security Center in Windows 10 with steps. – When your Windows 10 PC gets infected by malicious software or malware, you immediately take action against it. But when you remain online, removing these infections becomes quite difficult because certain websites constantly send malicious data. So, Windows Defender Security Center provides an Offline Scan that sends your Windows 10 PC offline, identifies, and trashes threats.
So, in this guide, you will learn the instructions to Run Offline Scan from Window Defender Security Center in Windows 10. Once you run Offline Scan, the PC reboots and takes about 15 minutes to scan and delete infections. This feature quickly removes viruses on Windows 10 and all kinds of complex threats including malicious software, ransomware, rootkit, and so on. Offline Scan is an essential part of Windows Defender Antivirus and was available in the OS previously also. But the steps to perform it has changed with the advent of Creators Update. Now, Offline Scan is available in the built-in security app Windows Defender Security Center.
How to Run Offline Scan from Window Defender Security Center in Windows 10
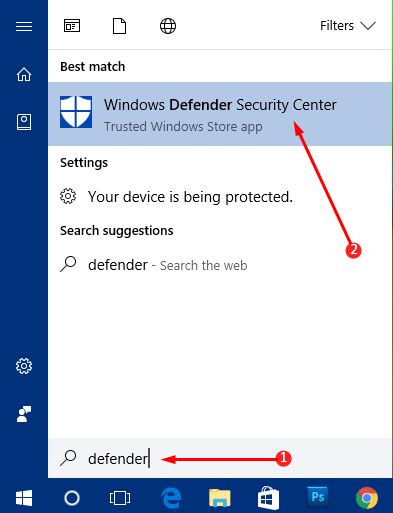
Step 1 – Open Start Menu, type defender and Windows Defender Security Center comes into view as the best match, press Enter.
As an alternative, you can Create Shortcut to Windows Defender Security Center on Windows 10.

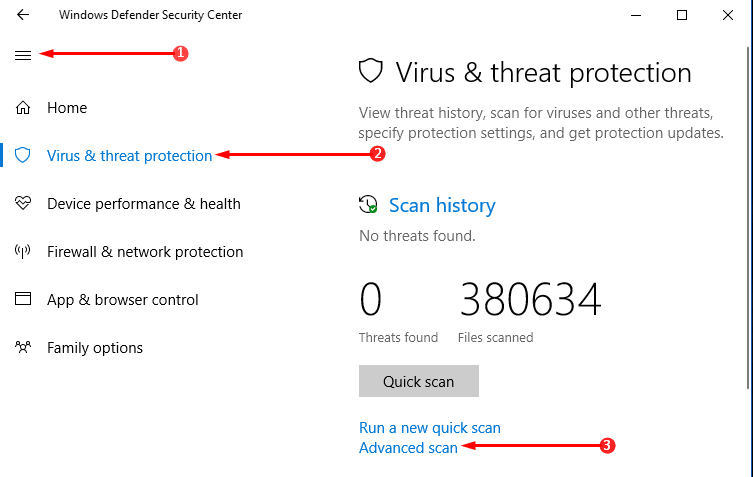
Step 2 – When the security app opens up, click hamburger menu on the top left. This will display the names of all security tools, click Virus & threat protection.
Step 3 – Click Advanced scan.

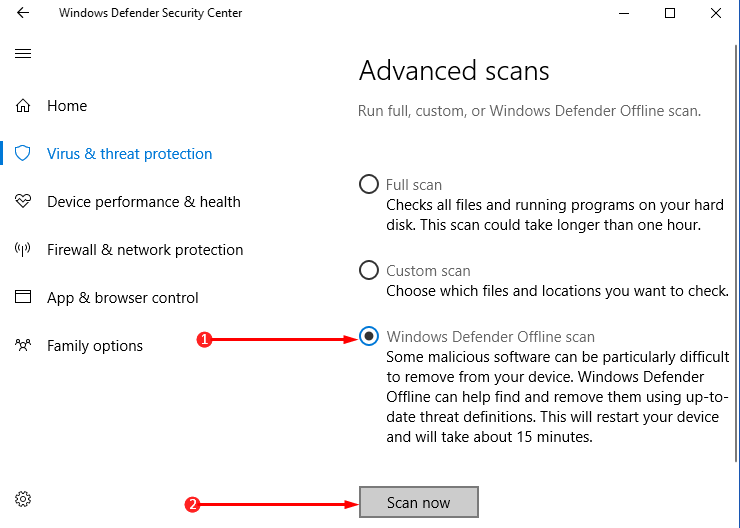
Step 4 – On the following page, click Windows Defender Offline scan, the last one. After choosing the option, click Scan now button.
Note – Before clicking Scan now, make sure to save all the ongoing work as this will restart the device. This will save you from losing unsaved data. Moreover, the entire scan will take about 15 minutes to complete.

Step 5 – This will instantly reboot the machine and boot into Windows Defender Offline. The scan will start immediately and in case it detects any malware or suspicious elements, it will remove them.
Step 6 – Once the scan gets over, close the tool and restart Windows 10 as you always do.
You can also Check Protection Updates for Threat Definitions in Windows 10.
Conclusion
Hopefully, this will make you able to Run Offline Scan from Window Defender Security Center in Windows 10 pretty much easily. Offline Scan is necessary as most of the PCs use the internet and as a result are they are open to threats. When you frequently opt for this mode of cleaning, then your PC will be free of viruses and malicious software. If you know more about this scan, do share it with us.
