Visual Notifications for Sound in Windows 10 often creates annoyance before you as it starts to popping up too frequently in your notification area. This might not even be really such a huge problem. It might happen one day that you start receiving continuous notifications about some apps and all it shows is that they (apps) are not working well or are taking too much time while start-up of OS. You might have faced similar situations. The frequency is sometimes very high and always extremely annoying.
The time for which they pop up varies greatly. Sometimes it could be 5-10 per minute. Visual notifications keep on popping up in a sizeable cloud in the action center on the taskbar and stay there for far too long. The moment you close them, they come back immediately. If it is one or two a day, it is bearable. However, receiving Visual Notifications for Sound in Windows 10 in a short time visually as well as aurally not only frustrate one but also diminish your work. If one is listening to music or watching a movie, it also gets affected.
Related:
How to Selectively Disable App Notifications in Windows 10
There is a solution out there which we are going to let you know in this article. Therefore just calm back and start following this article and you will never be hindered by such annoying notifications. You can always control their intensity, frequency, size and shapes of pop-up boxes etc.
Let’s see how to turn on or off visual notifications for sound in windows 10 in a simple but effective way. Follow the below written steps. Screenshots are provided along with the texts for your effective understanding of the article.
How to Turn On or Off Visual Notifications for Sound in Windows 10
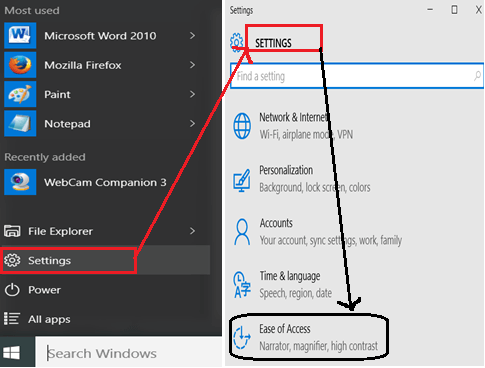
Step 1: To turn on or off Visual Notifications for Sound in Windows 10 At first, click on the start menu. Here in the start menu, click on Settings option which is present at the bottom of the start menu as indicated below. This will open the Settings section of windows 10.

Step 2: Scroll down to the bottom and you will find the Ease of Access link. Follow the arrows shown in the above screenshot on how to do this. Clicking on this will open a new window which is shown in the screenshot below.
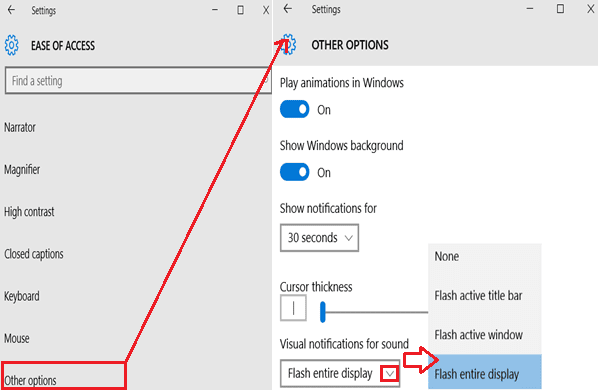
Step 3: Scroll down to the bottom in Ease of access window. Here, you will find other options link which is present at the last in the menu of Ease of Access. Clicking on this will open up a new window which is shown in the second slide of the below screenshot. This is the main section where you can perform various tasks related to Visual Notifications for Sound in Windows 10.

Step 4: To change the Visual Notifications for sound, you need to click on the down arrow key. Clicking on this will open up a box having four different options. If you don’t want any notification, click on “None” otherwise select the one among three which suits you the most. These are Flash active window, Flash active title bar and Flash entire display.
There are other things too which can be performed directly from this section. If you are interested, follow the below written steps which are in aid to the above mentioned steps.
Step 5: At the top of the second slide, you have two options. These are to select whether you want your windows background to be seen while working on some other files or play animations on your windows. You can select either “On” or “Off” for this.
Step 6: If you are frequently disturbed by Visual Notifications for Sound in Windows 10, you can simply increase the timing gap after which it displays the notification again. This can be done easily by clicking against the arrow of Show notifications for and the selecting the time in the drop-box menu.
Step 7: If you want to change the way cursor look on your monitor or PC, just slide the cursor to the right in Cursor Thickness option and this will change the cursor thickness.
That’s it. I hope you got what you were looking for. With the help of the tips you can easily turn on or off Visual Notifications for Sound in Windows 10
