Here you will find simply a 10 handy PowerShell Commands Windows 10 Collection to mitigate your the botheration of performing tasks. This command line shell helps to accomplish diverse works on a machine such as list drives, Find the active services, Uninstall and restore built-in apps, check system uptime, Scan PC for threat and several others. So don’t go anywhere as what we are going to start here will give you enough knowledge to command PowerShell in your own way.
Command prompt, no doubt, is the most effective tool in Windows OS, especially in Windows 10. This is because it lets you quickly access and change various Windows administrative functions at the expense of cmdlets. PowerShell is one analogous substitute for the original Command prompt. It is, in fact, superior to CMD in the context that you can execute more advanced functions. .NET framework-based PowerShell also allows you automate tasks, and organize configurations even by feeding commands remotely via other machines also. But it is hard to operate than the CMD as it needs you to memorize hundreds/thousands of confusing commands to be operational.
Important: PowerShell becomes most powerful when running as an administrator. First of all, follow the steps to open this shell with administrative authority –
Step 1 –Right click on the Taskbar and select “Taskbar settings”. In the right pane, drag the on/off switch “Replace Command Prompt with PowerShell in the menu when I right click the Start button or Press Windows key+X” towards On or toggle.
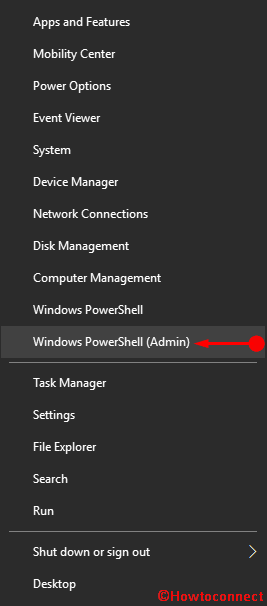
Step 3 – Now launch it from the Start menu by selecting “Windows Powershell (Admin) ” from the menu.
That’s it. Now let’s see PowerShell Commands Windows 10 Collection in detail.
10 Handy PowerShell Commands Windows 10 Collection
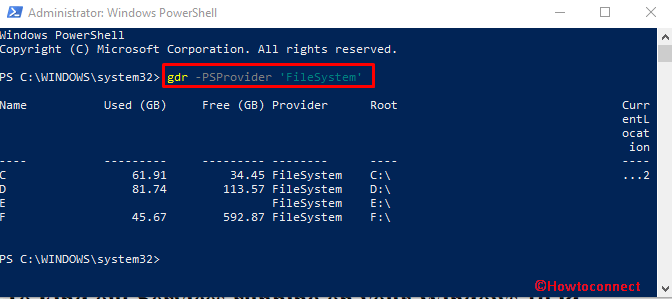
1. List your Drives using PowerShell
PowerShell can be used to obtain a list of all the drives that are active on your system, along with the details like; space used, free space and the Root folder for each drive. The command looks like as follows:
gdr -PSProvider ‘FileSystem’
2. To Find out Services running on your Windows 10 PC
Windows 10 is such a bulky operating system that it carries a lot of residual programs along itself while executing even the lightest program. There are many unwanted services which keep on running in the background. Powershell lets you find these services and to stop them at will (using Task Manager). The command for the same goes like:
Get-Service | where status –eq “Running” | Out-GridView
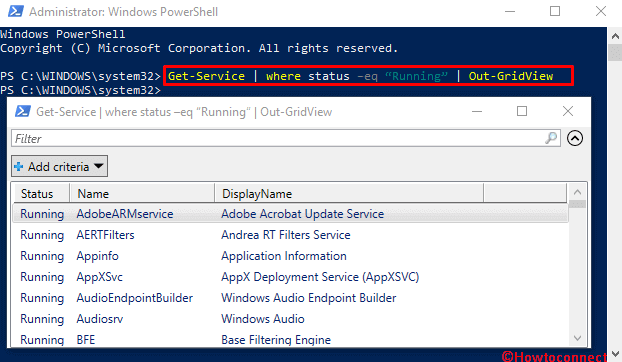
Executing this will open up a wizard. It’ll have the list of all the unnecessary services. Also, to check the services those have stopped, the command goes like:
Get-Service | Where-Object {$_.status -eq “stopped”}
3. Create a System Backup Image using PowerShell
The command lets you start the backup procedure to a drive fed at the input. In other words, you’ll have your system image stored on a point/drive where you choose it to go. The command involves listing the source drive and the destination drive. The command is:
wbadmin start backup-backup target: D:-include: C:-quiet-allCritical
Here, drive “D” is the destination drive and drive “C” is the source drive. The destination and source drive are likely to vary in your case.
4. To Back-up your Installed Drivers
Drivers are very much essential to ensure a smooth functioning of any OS. To obtain a thorough list of these installed drivers on the machine you need to run a specific command into the shell. Moreover, this command also lets you take their backup.
Get-WindowsDriver –Online
This PowerShell command will showcase you a list of entire available drivers. This “command”, also assists to take a backup, so execute:
Export-WindowsDriver –Online –Destination D:\DriverBackup
Here, D is the Destination drive where you want your gather. This is the fastest command to take heavy backups within seconds.
— PowerShell Commands Windows 10 Collection
5. To uninstall apps in Windows 10 (For Single User)
Built-in Unnecessary apps that come previously installed in Windows 10 make it an extremely heavy and bulky OS despite its awesomeness. You can easily wipe out such applications with the following command at the input: Prior to this you would want to view these type of application using the below command –
Get-AppxPackage
You’ll experience a list of all the Installed applications on your Windows 10 PC after this. Simply, find the app that you want to uninstall and copy its “PackageFullName” with the help of “Ctrl + C” key combination. After this, type the following command:
Remove-AppxPackage -confirm
After this, PowerShell will ask you to provide a final affirmation to delete the specified Windows 10 app. Press “Y” to confirm.
That’s it. The selected command will be uninstalled.
6. Find all the Disabled Features using PowerShell
There are times when you need to check missing/disabled features on your Windows 10 machine. This is done to ensure that all the essential features have been enabled or not. The only PowerShell command that lets you accomplish the needful goes like:
Get-WindowsOptionalFeature –Online | ? state –eq ‘disabled’ | select featurename | sort -Descending
This will show you all the disabled features and find the running features by replacing “disabled” with ‘running’.
7. To find out the System Uptime
In case you want to know how long is it that your system is awake, you can know this at your very fingertips. Just one command is sufficient to retrieve and break the entire information into Days, hours, minutes, seconds, milliseconds, etc. The command is:
(get-date) – (gcim win32_OperatingSystem).LastBootUpTime
8. To check if the Developer Mode is Enabled/Disabled
To find out if the Windows is actively using the Developer mode or not, use the following command:
Show-windowsdeveloperlicenseregistration
In case it’s not, click on “settings for developer” which is displayed on the same wizard and enable it from there.
9. To Reinstall all the built-in Windows 10 Apps
Windows 10 arrives with numerous preloaded applications. Some of these may be useful to you but not entire so you just remove these unessential apps with time. But it gets hard when you find no way back. PowerShell gives you a chance to restore the mistakenly wiped out inbuilt applications on your Windows 10 PC. The command for the needful is:
Get-AppXPackage | Foreach {Add-AppxPackage-DisableDevelopmentMode –Register “$($_.InstallLocation)\AppXManifest.xml”}
10. To Scan your system for Threats
With the passage of time, the system acquires a lot of viruses and other malware. These can badly harm your system files and data. So it is very important to scan for these malware threats. This is a significant and handy PowerShell Commands Windows 10 Collection.
Start-MpScan –ScanType [QuickScan/FullScan/CustomScan]
This one is the complete command. Breaking it into specific pieces seems like:
1: Start-MpScan –ScanType QuickScan
2: Start-MpScan –ScanType FullScan
3: Start-MpScan –ScanType CustomScan
To scan just one drive, the command will be:
Start-MpScan –ScanPath “C:”
Where, “C” is the drive which you want to scan.
Final Words
So this was the compilation of accomplishing very hectic procedures within seconds on Windows 10. PowerShell Commands Windows 10 Collection is not the only collection, but you’ll find a lot other on the web which might be more awesome to you depending upon your needs and situations.