Command prompt (CMD) is a tool designed especially for the Windows Operating System which gives you a direct approach to complete tasks, which otherwise, needs a lot of effort and time. It’s so useful that even today we apply it to fix multiple errors and to enable/disable various Windows user settings. The tool works with certain commands.
As we can’t remember each one of them individually, we have come here with a list of 30 Best Commands (cmd.exe) in Windows 10 that you simply can’t ignore working with.
So just buckle up and enjoy the ride.
Compilation of 30 Best Commands (cmd.exe) in Windows 10
1: ipconfig: To find your IP Address within Seconds

If you waste a lot of time figuring out the “IP” (Internet Protocol) then this is one of the best commands meant for you. It permits easily trace out system’s IP address details. Moreover, the tool also displays info about the gateway as well as Router’s pre-specified web interface. After the execution of this command, you view a list of all the networks your system is connected to. The command looks like:
ipconfig /all command
2: shutdown: To create Shutdown shortcuts
This command lets restart or turn off PC within seconds which makes it very effective. The “shutdown” command line is a relief to all the latest versions where it’s very hard to search and execute the shutting down functionality. Using this, you can easily create shortcuts and can effectively place them wherever want, say at the desktop, taskbar or at the Start menu-list. In the advanced versions, you are able to use “cmd.exe” like a switch to turn your PC on/off taking into consideration many advanced options for the startup. For this, just type:
a) shutdown /r /o: To start the PC into various advanced options.
b) shutdown /s /t 0: To perform a regular power off
c) shutdown /r/t 0: To Restart your PC
3: ping: To test if there is no packet loss
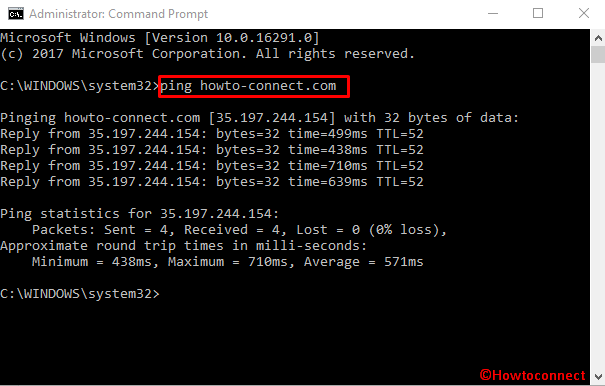
You can run this command as: “ping howto-connect.com”. Here, “howto-connect.com” is the name of the server that we want to test. After hitting the Enter key, Windows will start sending packets to the address fed to the input (here, howto-connect.com). IP address will also work for the same in this utility. The server in return would inform that it has received those tiny data packets. This way you check if any of the data packets were not received by the server or if the server is saturated (can no longer hold the data packets).
4: ipconfig /flushdns: To Flush the DNS Resolver Cache
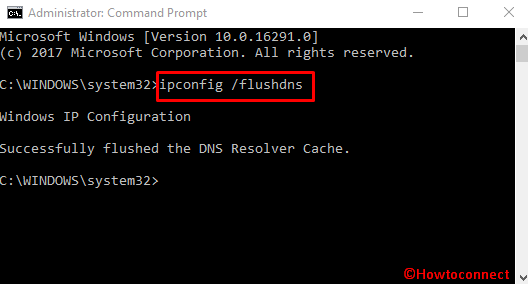
When you change DNS settings, they don’t just take place immediately. Instead, they take time for a complete setup. Meanwhile, if you’ll try to visit a particular site (changed DNS server settings for) time and again, the Windows in return will use the “cache” which retains the record for all the previous responses from that specific address. So this cache ensures that the Windows is fetching Data from the new DNS server by running “ipconfig /flushdns” command even after changing the DNS settings. It looks like:
ipconfig /flushdns
5: sfc /scannow: Scans your System files to fix Errors
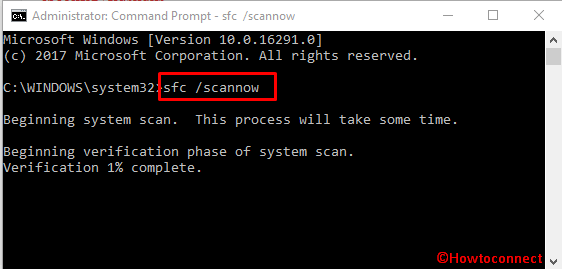
Do you know that Windows 10 has an (SFC) System file checking tool as well following its predecessors? Yes, it does. This tool scans all system files and finds out errors in them moreover, replaces if any file is corrupt automatically. To use this “tool” via command prompt, just open up and type:
sfc /scannow
then, press Enter.
6: telnet: Connects you to the Telnet servers
Windows versions also carry a Telnet client approved by the Microsoft itself and this comes uninstalled. So you have to install manually from the Control Panel first. After installing this, use the telnet command to connect to the various telnet servers without needing to practice a 3rd-party software.
It is primarily advised to avoid using the telnet client but certain programs require this in the first place, to set up. This is where you’ll need Telnet. The syntax follows as:
telnet
7: cipher: To Overwrite or to permanently delete a Directory
Cipher has a lot of functions to perform. It is primarily used to manage encryption and write data to a drive and to clear instantly as well. When you run cipher command no deleted data can be restored. So The command allows to directly wipe a drive’s data without seeking for any permissions prior to the execution. This command is:
cipher /w:D:\ (assuming that D is the drive that you want to wipe here).
8: nslookup: To find the IP address of a Domain
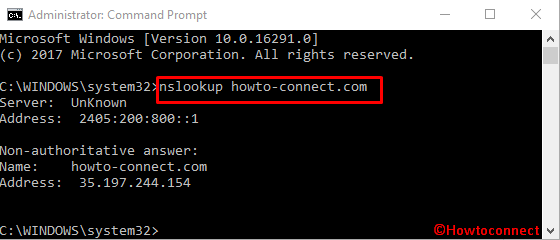
Nslookup tells the IP address of the desired server. The same thing takes place when you type a domain name into your browser’s address bar as doing this tracks the IP address of the server first and accordingly, takes to the destination. This is a very passive process. But with “nslookup”, you can directly obtain this IP from your Command prompt within seconds. Furthermore, it can also tell you the server name if you type in the IP address. The syntax is as follows:
nslookup howto-connect.com
here, the server name is “howto-connect.com”.
9: netstat –an: Lists all your Network Connections and Ports
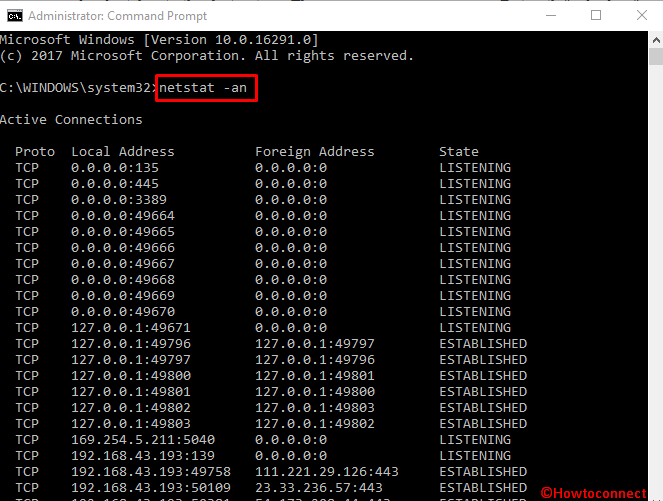
Netstat command allows you see a list of all the network connections along with the name and the details of the port they are operational with. This also informs you about the foreign IPs connected to these ports. The syntax is:
netstat -an
10: fc: To compare two files
You can exercise “fc” to compare certain parameters between 2 given files. It is very useful for those who face a hard time in finding out the differences in the text of two files. But not now, as this command does all within a matter of time. Straightway type ‘fc’ followed by the directory path and the file name to compare them real quick. Type:
fc /l “C:\Program Files (x86) \ABC1.doc” “C:\Program Files (x86) \ABC2.doc”
Here, ABC1 and ABC2 are the files names respectively. C is the drive which contains these files. The above command juxtaposes ASCII (text) in these two documents/files.
Note: Use, ‘/b’ to compare binary output and ‘/c’ for the case of text in the two specified documents.
11: sigverif: To Verify the File Signature
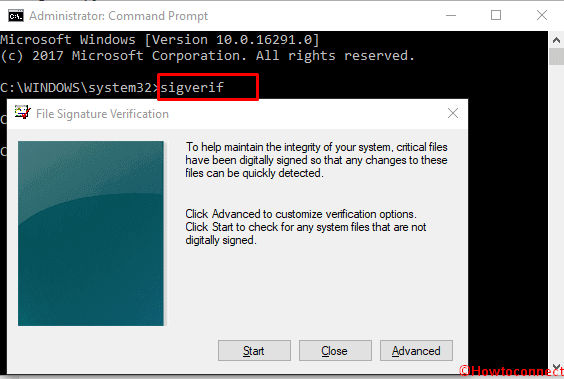
This command works to check if all the system files are digitally signed or not. Windows 10 and all other versions carry the tool popular as File Signature Verification tool. It uses a GUI interface and tells you accordingly that which system files are signed and which remain unsigned. The command performing to launch this signature verification tool is as follows:
sigverif
12: driverquery: Displays all the Installed Drivers
Windows 10 gives you Driver Query as a complementary tool to test your drivers. This tool works to identify the drivers that are being used with an entire list showcasing the installed drivers. If you need some additional information for these drivers, you can modify this command as follows:
driverquery -v (to know details regarding each driver)
driverquery -si (displays the signature information about each driver)
13: repair-bde: To recover the Encrypted data
Now retrieve data from your drive using “repair -bde”command. This is very handy when your drive is protected by the BitLocker. To run this command, you’ll need to have a destination drive, recovery key or the password for BitLocker. The basic format/syntax for this command is:
repair-bde -rk | rp
Here, you’ll need to specify the source and the destination drive along with the key/password followed by the path leading to the key/password. Here are some examples to run this command:
repair-bde c: d: -rk e:\recovery.bek
repair-bde c: d: -rp 111111-111111-111111-111111-111111-111111
14: tasklist: To list all the running tasks on a system
Tasklist, as the name suggests, provides a list of entire tasks active on your PC. This command is also compatible with multiple switches like –m and –svc. The –m switch displays all the DLL modules related to a task while -svc switch lists the services that support each task listed in the prompt. It looks like:
a) tasklist
b) tasklist –m
c) tasklist –svc
15: taskkill: to terminate a task
Taskkill performs the termination of the desired task taking help from its process identification code or the Image name. The syntax of the command includes taskkill followed by –pid or –im, of the task which you want to kill. Here is how this command looks like:
taskkill –pid 4104
taskkill –im iexplore.exe
16: Attrib: To change attributes of a file
Attrib command works to identify attributes of a file within the directory that you are executing the command from. You can use switches like: +a, -a, +h, -h, +I, -I, +r, -r, +s, -s, +v, -v, +x and, -x with this command. When apply with these switches, the command performs different functions as operated.
The syntax is as follows:
attrib [the switch: as listed above] [drive:][path][filename] [/s][/d][/l][/?]
For Example:
attrib +r c:\windows\system\secretfolder
17: bcdboot: To copy boot files
“Bcdboot” can definitely help if you are experiencing problems with the Windows boot-up functionality. This command lets you rebuild BCD inventory (for data) and also repair the existing one. The syntax is like:
bcdboot [/l][/s][/v][/m]
18: XCOPY: To copy files between drives
Now copy your files between drives using the “XCOPY” command. The command-line to copy photos from drive C to the drive F will be:
XCOPY c:\photos f:\photos /s /e
19: CD: To quickly switch between directories
CD command lets quickly access the directory of choice. For example, let’s just say that you are way too far from the C drive and quickly want to reach there. Then the syntax would follow:
cd c:\
This will take you to the C drive.
20: DIR: To see the contents of a directory
Navigating through the Windows Explorer to check data on your directories is very hectic. CMD gives you a power to quickly go through the contents of a directory with just 3 simple alphabets i.e “dir”. The syntax goes like:
dir
21: Assoc: Displays file name extensions
The Assoc command displays all the relevant file extensions and program associations on the system. You are capable of even extending this command to change file parameters like its associations and so on. For e.g. “assoc .txt=” will change the text files to whatever format you enter after the “=” sign in the command line. The syntax to change text files to pdf would be:
assoc .txt=.pdf
22: pathping: Advanced version of Ping
Pathping command is useful if you have a no.of router installed between a system and the device and want to test. This is a Post-established version of the “ping” command. It displays a little information about the routes which the packets take while traveling between multiple nodes. The syntax looks like:
pathping
23: powercfg: To manage your systems power consumption
You can run this command to track PC’s power consumption resources.To manage hibernation type:
powercfg /hibernate on
powercfg /hibernate off
and,
“powercfg /a” (to check power saving states)
Similarly, “powercfg /lastwake” will tell the programs/processes that woke the system from sleep. You, therefore, execute this command to troubleshoot a system if it wakes from sleep too often.
24: recimg.exe
The recimg.exe is the best command helps to design a custom recovery image for Windows 10 operating system. This image contains all the installed apps and Windows system files in their current state. It does not contain documents, user profiles, personal settings, etc. and is a highly sophisticated program. Simply type:
recimg.exe
and it will form a custom recovery image for your Windows version.
25: tracert: To track path of the transmitted packets
The Tracert command traces the path through with the packets are transferred to a known server. It’ll show the information about how each node packet interacts while moving to the destination. So if you are having any issues with the server, simply run this command line:
tracert howto-connect.com
(“howto-connect.com” is the name of the server here)
26: Tree: to obtain a tree structure of a Directory
This is among the best commands and represents the components of a directory/sub-directory into a Tree structure format. Simply open the Command Prompt and type “tree” followed by the drive or any sub-directory you want to see. This will showcase your entire user profile within that directory/path name. The syntax for checking constituents of the C drive (assume) will be:
tree c:/
Note: To zoom in, right-click the top bar of the prompt and go to Properties > Layout tab and change the default height parameter from 300 to something bigger, like 500 or so.
27: netsh interface: To check WiFi Connections
You can also catch the real culprit (in Windows 10) if your system is connected to a wifi network or not using this very effective command line. To know this, type in the following command into the command prompt:
netsh interface show interface | findstr /C: ”Wireless” /C: ”Name”
Executing this command will show the things like Admin State, State, Type moreover the Interface Name.
28: Move: To move files and directories to another location
This is one of the best commands lets change locations of a file. Just type in the simple command in CMD and that’s it. The file will successfully move to the desired location. The syntax for this command goes like:
move <filename> <destination folder>
For example, to move a file named “howto-connect.docx” to the folder “d:\backup\folder”; the command would be:
move howto-connect.docx d:\backup\folder
29: /?: To find the usage of a command
A few commands are very hard to understand, in this case, you will simply type the doubtful one, followed by this argument i.e. “/?”. For example, to see what “shutdown” does through CMD, simply type:
shutdown /?
And, this will show the list of all the switches that could be used with the “shutdown” command to perform numerous functions.
30: net share: To disable administrative shares
Windows shares automatically share some specific folders once it connects to a network. You can easily disable this, or can even eliminate this using a special command line. It is also one of the Best Commands in Windows 10. First of all, to view these shared folders and their locations, type:
net share
Now run the command to disable these shares. Type:
a) net share C$ /delete
b) net share IPC$ /delete
c) net share ADMIN$ /delete
and all other folders who you don’t want to display shares from.
Final Words
Command lines make it very easy to execute really hectic tasks within seconds. These, obviously, are hard to remember but you can easily learn a few of these to impress those tech-geeks and freaks around you. Commands mentioned above are no doubt very effective and functional. So just hold on to these Best Commands (cmd.exe) in Windows 10 and you’ll never ever be going through those very bulky procedures of executing functions within Windows OS.
Feel free to share more commands, which you feel could be important for Windows 10 users. Till then, share this article to lend a helping hand to others.