Commonly when you progress towards making a Pendrive Bootable for Windows 10 OS numerous applications are readily available. But a handful of them are the real winner as they help to convert an ISO file to bootable file in few steps. Here we pick the easy working software for the same purpose you can use prior to installing Windows 10. In addition, you will find here a thorough method to use command prompt for the task.
You might have known .ISO file of Windows 10 includes a solitary uncompressed file and requires making bootable before installation on a computer. It is 4GB plus file so you need to have the Pen drive containing minimum empty space meeting with the size. Once you copy the file to the device it becomes ready for the installation.
How to Make Pendrive Bootable for Windows 10
First of all, ensure to arrange a Pendrive having more than 4 GB space and insert into the port of your PC. If it has important data take a backup because they will be completely erased in the process.
Using Rufus
By the way, we have already presented How to Use Rufus to Install Windows 10, but here we are going to elaborate the process to make Pendrive Bootable.
Step 1 – Start with downloading the application from this location – https://rufus.akeo.ie/. As its size is less than 1MB so it will instantly present on your computer.
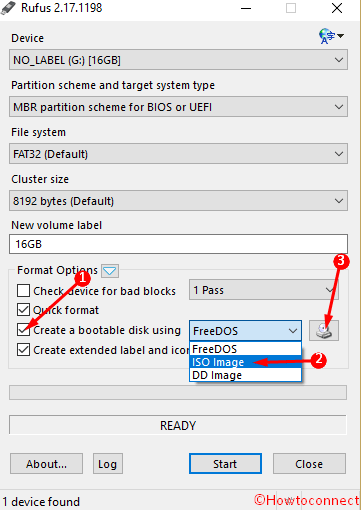
Step 2 – Rufus doesn’t require installation, hence, only double click on it moreover select YES on UAC prompt to open. Click on Device drop down and opt the Pendrive (generally with NO_LEBEL suffix).
Step 3 – Tick the square shaped box before “Create a bootable disk using” on the interface. Select “ISO Image” from the dropdown. Click on the Disc icon then choose the ISO File you have stored.
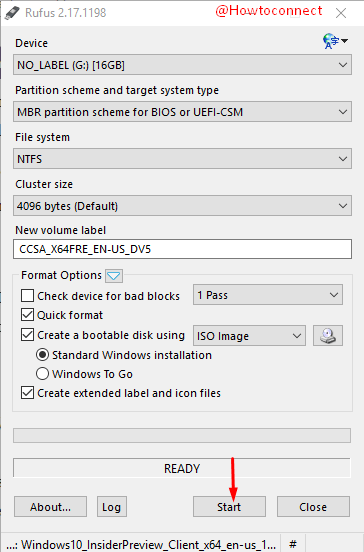
Step 4 – Finally, click on the Start button. This will ask you to format the Pendrive so allow it and wait for approx 15-20 minutes the complete the whole work.
Through Windows USB/DVD Download Tool
This is the most popular application that lets you Make Pendrive Bootable for Windows 10. The tool is recommended by Microsoft and works super easy. Let’s see the process –
Step 1 – Go to this location furthermore click on download to grab the tool. Install the same by double clicking and following online instructions. You might be asked for .Net Framework 2.0 during installation; download it from here.
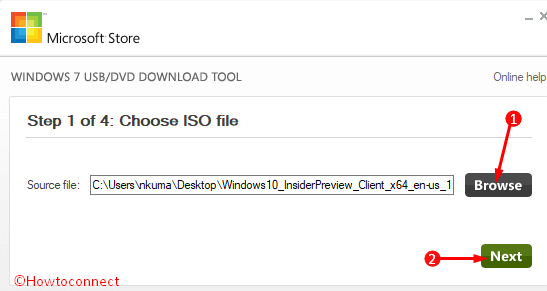
Step 2 – Open Windows USB/DVD Download Tool from start menu list view Click on Browse button located after the source file and look around the .ISO File from on hard drive of your computer. Once you identify the file, select it and click on Open from the lower part of the window. Click Next.
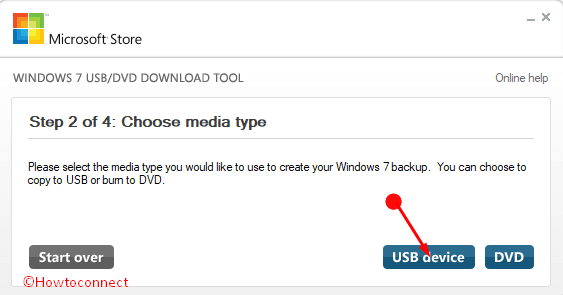
Step 3 – Since you are using Pendrive, hence, click the “USB Device” option in the next wizard.
Step 4 – Click on the drop down list, select the incased pen drive and click on Begin Copying. A dialog box will prompt looking for confirmation from your side to wipe out the data from the Pendrive. Click on Erase USB Device.
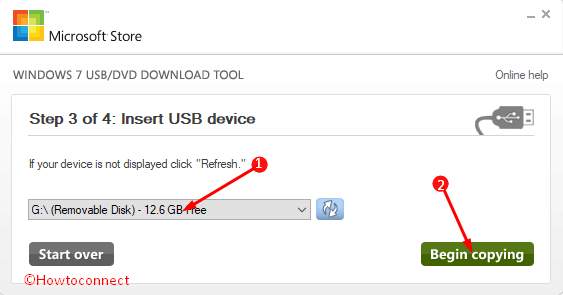
Step 5 – Finally, on the next message box choose Yes to proceed for copying. After a short period of time, the bootable pendrive for Windows 10 will welcome you.
With help of UNetbootin
This software allows making pendrive bootable pretty easily for a variety of operating systems. Windows 10 is also among these which takes only a few clicks for the same. See how –
Step 1 – Navigate to https://unetbootin.github.io/ furthermore click on Download (Windows) from the upper part. The software also doesn’t require installation so once the downloading ends, double click then open.
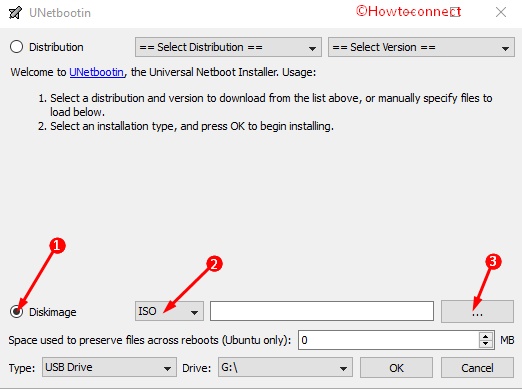
Step 2 – Check the round cell before Diskimage moreover choose ISO from the drop-down list. Click on “Select disk image file” button, browse the location where you have placed the .ISO of Windows 10 and Open.
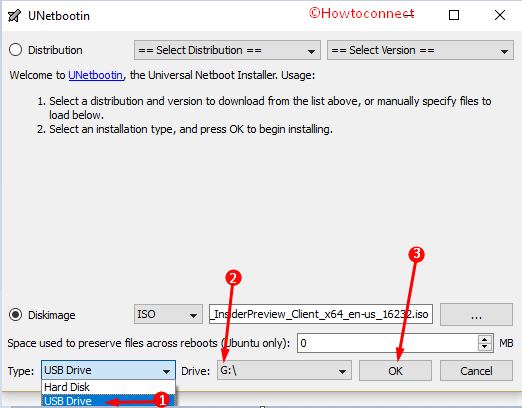
Step 3 – Select the USB drive then lastly, click on OK and within few moments you will obtain the bootable pendrive.
No software, just use Command prompt
You can make Pendrive Bootable for Windows 10 straightforwardly in 3-4 moves by bringing the command prompt into play.
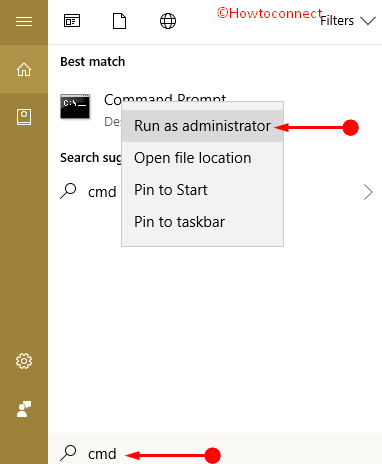
Step 1 – Write cmd in the Cortana search bar, and locate “Command Prompt” (Desktop app) under the Best match section. Perform a right click on this result at the top moreover select “Run as administrator”.
Step 2 – Plug the Pendrive into a port of system, write “diskpart” on the Command prompt then Enter. Subsequently, type list disk furthermore, press “Enter” to view all the hard drive together of your computer and externally inserted.

Step 3 – Before going ahead, note down the disk number of the pendrive, (for example, 1) from above. Now type select disc y (y is the disk number, therefore, replace it with your noted) then Enter.

Step 4 – In order to erase the data of the pendrive, write clean plus hit #Enter key.

Step 5 – Type “create partition primary” and Enter. This will make a bootable partition on your machine.
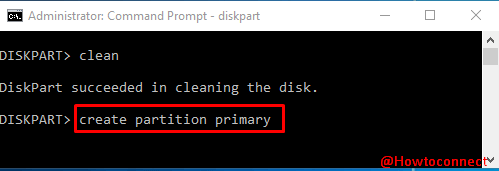
Step 6 – Write select Partition 1 hit “Enter”. The newly created partition is chosen now.

Step 7 – Type format fs=fat32 quick moreover, strike on the Enter key. It will take few seconds.

Step 8 – For activating the partition, jot down active followed by pressing Enter.
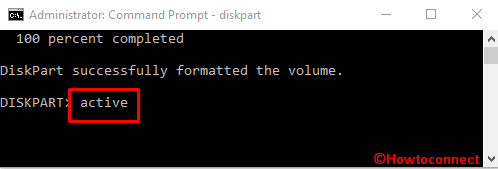
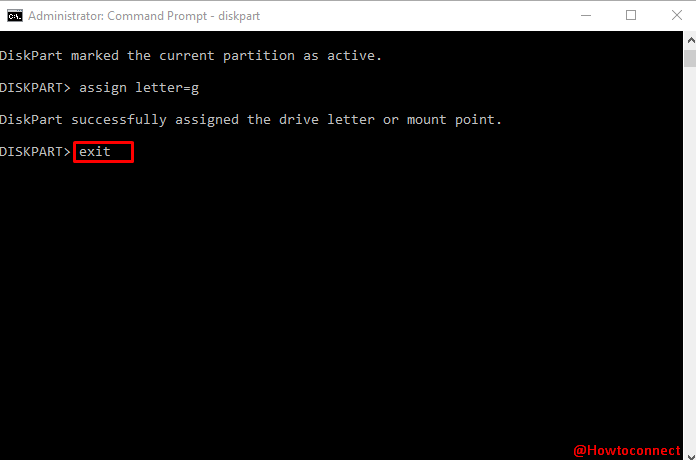
Step 9 – Now type assign furthermore “Enter”. This will successfully accomplish to assign drive or mount point.
Step 10 – Now write exit and subsequently press Enter.
Step 11 – This is the final task and you need to cut the ISO file from your computer moreover paste into the pendrive. Wait until the process ends to make Pendrive Bootable for Windows 10.
Eject the device and enjoy installing Windows 10.
Conclusion
Therefore, these are the different procedures to make Pendrive Bootable for Windows 10 with the help of 3rd party applications and command prompt as well. The last one is useful for tech savvies who don’t want to take help of applications. But the with starting 3 methods you can create the same in moments.

It is really great that a solution of regarding the issue with bootable pen drive for Windows 10 users has recently solved. Users can now capable to create a bootable pen drive easily.
Hello Stephen, first of all, you need to enable fast startup and update display adapter driver.
How about an article telling me what services should be set which way. I had an unwanted miserable “upgrade” to Windows 10 over my perfect Win 7 and it just is a mess. My external drives would not work and I needed the backups. Somehow a friend started me changing services start and stop, etc. This had the happy result of allowing the USB external drives to all work again. Now, I am dealing with an even slower Win 10 if that is even possible. I’m guessing that, since I had no idea what I was doing, I may have messed up services. Windows today took 30 minutes to start. I find lots of info how to mess with services, but nothing telling me what services to set in what way. This is vital information and it would be helpful if you did list that info or directed me to a site that does.