This article throws light on the workarounds against Battle.net Error Messages in Windows 10. Those of you who are very much into gaming would probably have- or at least know about this program. It is an application that is used for installing and patching Blizzard Games. There obviously are many other apps serving the same purpose, but Battle.net does it the best- and the fastest. The software moreover downloads the updates for it automatically too. Therefore, naturally, getting error messages from the same wouldn’t be the best news for the gamers.
Users have frequently reported issues while the program attempts to install or patch the Blizzard game modules or updates. The thing is, Battle.net depends upon its process called Agent for performing its functions, almost entirely. So, getting an error means Agent is unable to receive the data for your system. While confronting such a scenario, you can try out the fixes as given in this article to try and resolve the situation.
Battle.net Error Messages in Windows 10 Solutions
Here is how to fix Battle.net Error Messages in Windows 10 –
1] Simply Reboot the System
Battle.net error messages resolution method takes an action so simple as a system reboot. This potentially works in solving the issue as this would reset and restart the Agent process helping fix some discrepancies. Upon boot up, the process might start downloading and installing the data and game updates just usually as it did earlier.
To restart Windows 10 PC, simply hit the Start icon and then select the Power button. Thereafter, from the options, select Restart.
2] Disable Background programs
Some applications may block the Battle.net launcher from initiating. Often this part is pointed out by Blizzard support. They, therefore, recommend disabling those background apps if possible. Now, doing this yourself may take quite a lot of time of yours to turn off each of them one by one. There is a quick way to handle the same- the selective startup mode. To do this, follow the below steps –
- Type “msconfig” in the taskbar search and hit Enter to open System Configuration.
- The General tab will be open up by default. There, you must select the Selective Startup option.
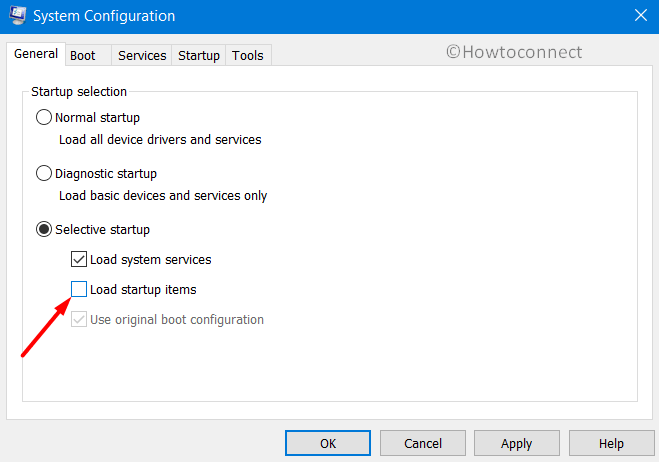
- Thereafter, you need to uncheck the box corresponding to “Load startup items”.
- Hit the Service Tab. There, check the “Hide all Microsoft services” box.
- Finally, hit Disable all and hit OK before restarting your Device.
3] Run the launcher as Admin to Avoid Battle.net Error Messages
Lack of administrative privileges can also be a reason for Battle.net Error Messages you are facing. Try launching the program with admin rights. Here is how you do that –
- Head to the following location –
C:\Program Files (or Program Files x86)\Battle.net - Right-click on the application saying “Battle.net Launcher.exe”.
- From the fly-out, select Properties and head to the Compatibility tab.
- Simply check the box corresponding to “Run this program as an administrator”.
- Confirm when prompted and that’s it!
4] Temporarily Turn Off Third-party Antivirus
There have been countless instances where a third-party security/antivirus interrupts with the gaming software. The codes or programming of these anti-malware tools often clashes with the processes of these type of applications. Ultimately, it results in some sort of Battle.net Error Messages.
So, in case you have an active firewall or security app intruding with Agent, you might want to temporarily disable them. Depending on the software you use, the steps of the app may vary.
If the tool you use does not have a disable option, or if it still seems to interrupt Agent Processes, try uninstalling the program. To remove third-party security software, here are the steps that you need to follow –
Step-1: Right-click on Start icon and from the Win+X menu, perform a click on “Apps and Features“.
Step-2: On the subsequent interface, you will be able to see the list of apps, programs, etc. that you have in your system. Locate and select the third-party security tool.
Step-3: Click Uninstall button.
Step-4: Go through the instructions on the wizard and finish the procedure.
5] Update the Operating System
Keeping your operating system up to date goes a long way in managing a lot of errors. So if you start experiencing sudden incompatibility issues, it would be worth checking for any pending updates by the given below steps –
- Go to Windows Settings by making a joint hit on “Win + I” hotkeys.
- Navigate to the Update & security category.
- By default, you will be into Windows Updates subsection. Switch to the right pane and click on Check for updates button. If there is any patch, hit Download button corresponding to them. PC would require to restart in order to install the patches, allow when prompted.
6] Use a Wired connection during the installation process
WiFi’s are notorious for being shaky and troublesome when it comes to getting some heavy updates or game files. So if you are a serious gamer, it’s anyway a good idea to switch to a wired one. If you get any hint that the file downloads are being interrupted due to poor connectivity, try using an Ethernet to get updates and game files again. This might potentially stop the Battle.net Error Messages.
7] Avoid the use of game add-ons to get rid of Battle.net Error Messages
In a few cases, it has come to notice that using certain game add-ons interrupt with the functions of Agent and its processes. Therefore, it must be worth it to check whether you have any of them that aren’t absolutely necessary. If you have any such like World of Warcraft, then get rid of it right away.
8] Remove Agent and then reinstall the same
It’s like a fresh installation of an application or tool that is not functioning. Especially in case of Battle.net, this trick of force-reinstalling the Agent has worked in resolving whatever issues the users are facing.
To delete Agent, all you need to do is –
- Close Battle.net app if it’s open.
- As you would already know, there is a ‘Tool’ folder that comes with it. Simply delete it. (It’s the Agent).
- Now, launch the Battle.net application.
This process would force it to reinstall automatically the Agent. This should hopefully get rid of the issue you are facing.
9] Check the functionality of Windows secondary Logon
The “Windows Secondary Logon” is a service which is supposed to disable the initialization of the various processes with alternate credentials. Also, for the Agent tool to do its thing or to even just start, this needs to stay enabled and active. Here is how you can make sure that the Windows Secondary Logon service is enabled –
- Open Run dialog box by altogether pressing the “Win logo + R” shortcut keys.
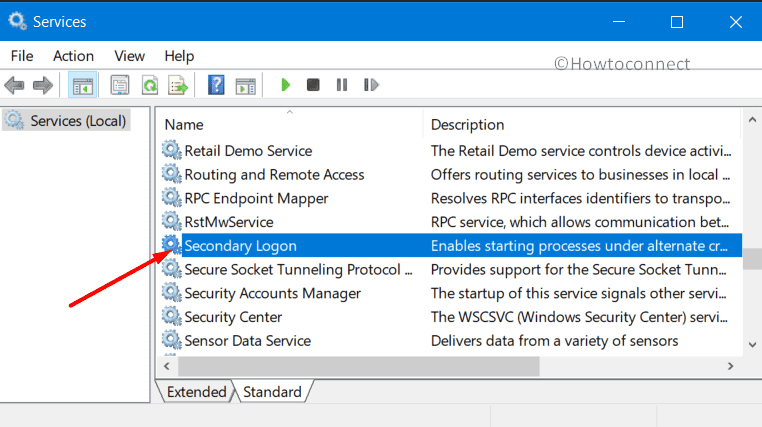
- Write the command “services.msc” and hit Enter to access the Services Manager.
- Now, in the window, scroll down through the list of services, locate the Secondary Logon and double-click on the same.
- Hit the dropdown menu before Startup type.
- Click to select “Automatic“.
- Ensure that this service is running, if not, click on Start to activate it. If the service is running, you can skip to next step.
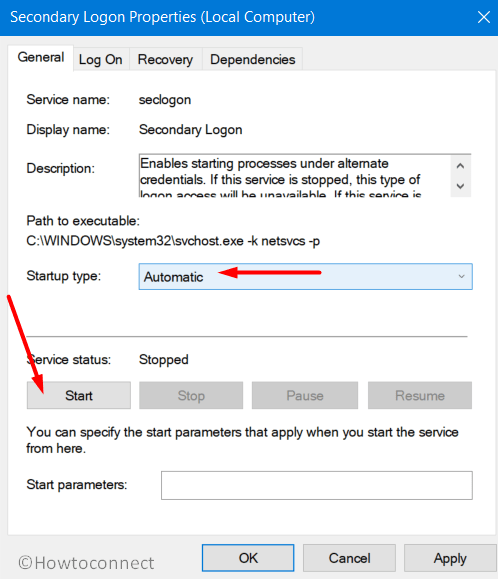
- Click on Apply and then on OK to save the modifications you did to the service.
- Close all the running applications and reboot the device.
Once the system boots up, check and see if you have stopped getting the Battle.net Error Messages. If you have, then the Agent’s ability to install game files or successfully download data has been restored.
10] Keep the browsers as well as the Flash Player updated
It is given that there are obstructions in downloading Blizzard updates or related. There is a good chance, in this context that the Battle.net error messages that you are getting are resulting from some trouble in the browser or Flash Player. So, it would certainly be a good idea to ensure that they’re kept up to date. Make sure that you have the latest versions of them.
11] Get the latest version of Battle.net
Everything starts creating trouble as they get obsolete and that could be the thing with your Battle.net too. If you had been postponing the upgrade or update for Battle.net, take the trouble and do it right away.
12] Reinstall Battle.net
If no fixes given here works for you, the last option will be uninstalling Battle.net completely and then reinstalling the same.
Methods:
1] Simply Reboot the System
2] Disable Background programs
3] Run the launcher as Admin
4] Temporarily Turn Off Third-party Antivirus
5] Update the Operating System
6] Use a Wired connection during the installation process
7] Avoid the use of game add-ons
8] Remove Agent and then reinstall the same
9] Check the functionality of Windows secondary Logon
10] Keep the browsers as well as the Flash Player updated
11] Get the latest version of Battle.net
12] Reinstall Battle.net
That’s all!!