Procedures and Steps to Boot Windows 10 From USB Flash Drive. – Multiple utilities exist on the Web that allows you to create a bootable USB for Windows 10. At the same time, a quite simple technique also occurs using that you can arrange a USB flash drive, turn into bootable, and install Win10.
Here, you will follow the process detail and steps with regard to Boot Windows 10 From USB Flash Drive via Command Prompt. This method is easy to proceed with the handful of commands. In addition, another important aspect of using Command Prompt is that it is free of errors if commands are correctly entered. But before you move towards the steps, there are some basic things that you will need to complete the process.
Boot Windows 10 From USB Flash Drive
Requirement –
1#. Proper internet connection
2#. Windows 10 ISO
3#. A USB Flash Drive with more than 4 GB capacity.
4#. Properly working Windows 7/8/8.1 computer in order to create bootable USB.
5#. Please verify the version of Windows 7/8/8.1 before you proceed to generate a Windows 10 bootable media. This is important to check because you cannot use a 32-bit installation of Windows to generate a bootable USB with 64-bit Windows.
Step 1 – First and foremost, connect the USB flash drive to your PC (Windows 7 or 8.1) and transfer all the significant data to a secure location on the PC. This is necessary to perform as the drive will be cleared off completely during the process.
Note – Another small suggestion is to unplug the external hard disk if any, in order to avoid any confusion while selecting the correct drive in the future steps.
Step 2 – Now, after cleaning the pen drive in Step 1, it’s time to launch Command Prompt with admin authorities.
For Windows 7 – Click Start Menu => All Programs => Accessories. Now, right-click on Command Prompt. Select “Run as administrator” from the list of few options that show up.
For Windows 8 – First of all, press Windows key and start typing cmd. The result will show Command Prompt, right-click on it. Select “Run as administrator” from the few options that pop-up.
Step 3 – Click Yes button on the UAC prompt.
Step 4 – Now, copy the following command, paste on the Command Prompt that appears. After you insert the command, press Enter.
DISKPART
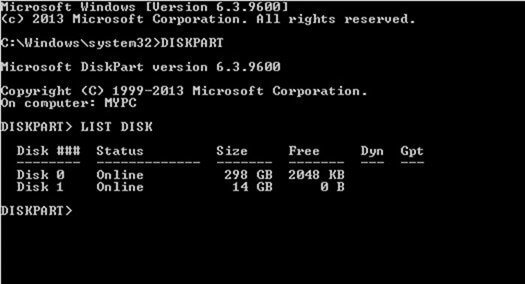
Step 5 – Next, type the following command to get all the connected disks –
LIST DISK
Note – In this step, properly note down the disk number of your hard disk as well as of connected USB drive respectively.
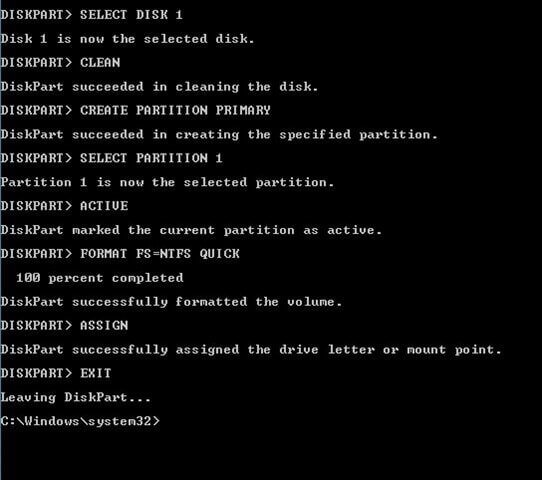
Step 6 – Moving ahead, insert these commands one after another. Also, don’t miss to press Enter after you type each command.
SELECT DISK 1
Important – Kindly substitute “1” in this command with the disk number of your USB Flash Drive that you have obtained in Step 5.
CLEAN
CREATE PARTITION PRIMARY
SELECT PARTITION 1
ACTIVE
FORMAT FS=NTFS QUICK
Note – In case, your computer supports UEFI, use FORMAT FS=FAT32 Quick command to format the drive.
ASSIGN
EXIT
Note – Please do not close the Command Prompt as the steps are not over yet. You will need it again, so, for the time being, just minimize it and follow the next step.
Step 7 – Now, in this step, you have to mount the ISO image of Windows 10.
For Windows 8 or 8.1 – Perform a right-click on the Windows 10 ISO image. From the list of options that pop-up, select Mount. Once the mounting is over, launch This PC and note down the drive letter of it.
For Windows 7 – Take the help of an image mounting software – such as Virtual Clone Drive for mounting. Once the mounting is over, take note of the drive letter.
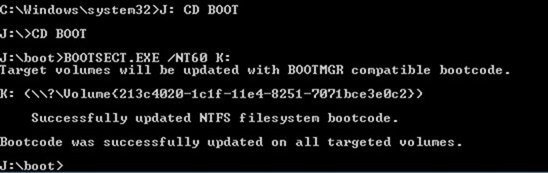
Step 8 – Next, restore the Command Prompt that you have minimized after Step 6 and write these commands one after another. Mind to press Enter key after typing each command.
K: CD BOOT
Note – Substitute the letter K and insert the virtual drive letter that is containing Windows 10 installation file.
CD BOOT
Step 9 – In the end, type the below command –
BOOTSECT.EXE /NT60 S:
Note – Please substitute “S” with your USB drive letter.
Step 10 – Finally, a note “Bootcode was successfully updated on all targeted volumes” will show up on the Command Prompt. After you see this note, close Command Prompt.
Step 11 – Now, copy all the contents of the ISO file in the USB drive and make it bootable.
Step 12 – Insert the above-generated USB drive on your computer. Turn on or reboot the computer.
Step 13 – Moving ahead, press the “Boot Menu” key. Usually, the Boot Menu key varies for different motherboards. However, the boot screen will show up which key to press to launch the Boot Menu – such as F11.
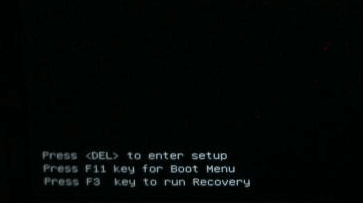
Step 14 – Lastly, in the Boot Menu screen, the name of your USB drive will show up, click it.
Step 15 – Finally, follow the on-screen guidelines and Boot Windows 10 From USB Flash Drive.
Conclusion
So, to Boot Windows 10 From USB Flash Drive is not that difficult but however, you have to take care of certain things to make it work perfectly. In case, you have more on this subject, write to us in the comments form.