In Windows 10, the facility to operate a file per permission and ownership varies per user differently. There are times when you want to use the files or folders created by some other user account which is no more functional. Since you don’t get the access to change these files, it is very important to find a gateway to Change File Permission to Grant Ownership in Windows 10.
Taking ownership pertaining to a file or folder is very easy. These permissions grant extra access to operate items which are not even created by you. This document will instruct you the procedures to change a Change File Permission to Grant Ownership in Windows 10. Or, in simple words here is how you can take ownership of a file in Windows 10.
So here we go.
A Brief about a File’s Ownership and Permissions
Each file stored in a system has its determined set of permission protocols moreover ownership. The Parent folder assigns the earlier to these files and it usually has at least 3 users namely SYSTEM, Administrators group, and the currently logged in account. You can easily reach these by right-clicking a folder/file, moving to its Properties then to the Security Tab. Furthermore, you have to work with either the Inherited Permissions or the non-inherited permissions.
Permissions are classified as:
- Full Control
- Modify
- Read & Execute
- Read
- Write, and
- List Folder Contents
Each of these permissions has its own meaning for files and folders severally. Now since you have found out what these are, let’s move further on how can be changed.
How to Change File Permission to Grant Ownership in Windows 10
Taking Ownership via Fila Explorer
Just like what the experts have said, File Explorer is a very important tool in the Windows operating system. Apart from performing a number of complicated functions, it can also be used to access an estranged file per permission including ownership in Windows 10. This procedure includes 2 segments – 1. Add User, Group or Built-in security principal and 2. grant permission to it. Here is how.
1. Add User, Group or Built-in security principal
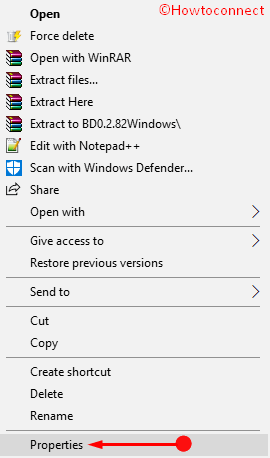
Step 1 – Open “File Explorer”, and look out for the file or folder you want ownership for. Execute a right-click the desired file then select Properties in the list.
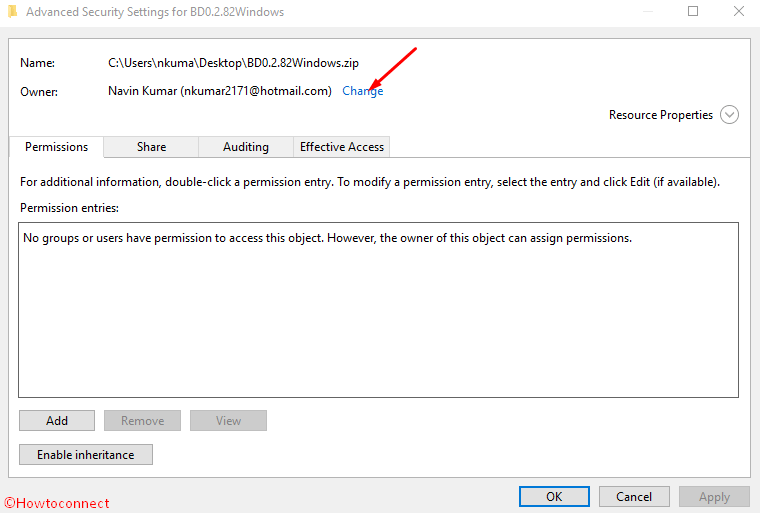
Step 3 – Once the File properties come up on the screen, switch to Security tab. Now click on “Advanced” button to open the “Advanced Security Settings” of the respective file. The window will give you an option to change the owner settings.

Step 4 – Click on the link Change displayed next to the Owner label. This will launch “Select User or Group” in a small size window.
Step 5 – Type a User, Group or Built-in security principal under the box of title Enter the object name to select and then click on Check button to ensure its exactitudeness. If it is correct then you will see in link form so in this case click on OK.
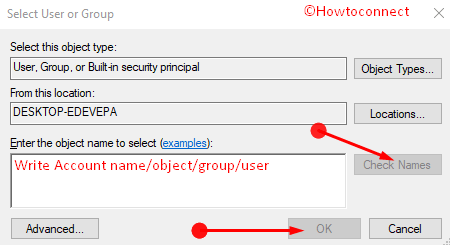
Alternatively, select the desired user account by clicking the ‘Advanced’ button at the lower part. If you experience bother in typing and checking click on Find button to see all the User, Group or Built-in security principal list. Select one thereafter click OK to assign the account name.
Step 6 – In case you want to undertake the ownership of every file and folder on your system, check the box called “Replace owner on subcontainers and objects”.
Step 7 – Click Apply furthermore OK to save the new account.
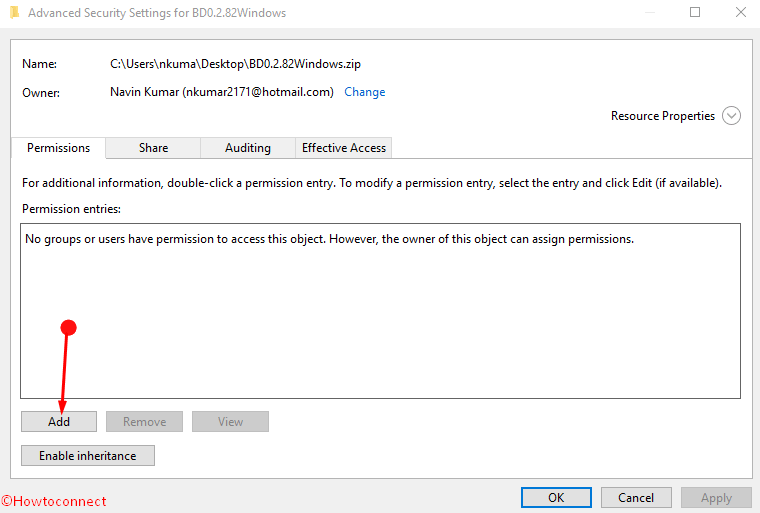
Grant Permission
Now, you’ll need to provide a complete access so that they can interact with your account. To do so, follow the steps given below:
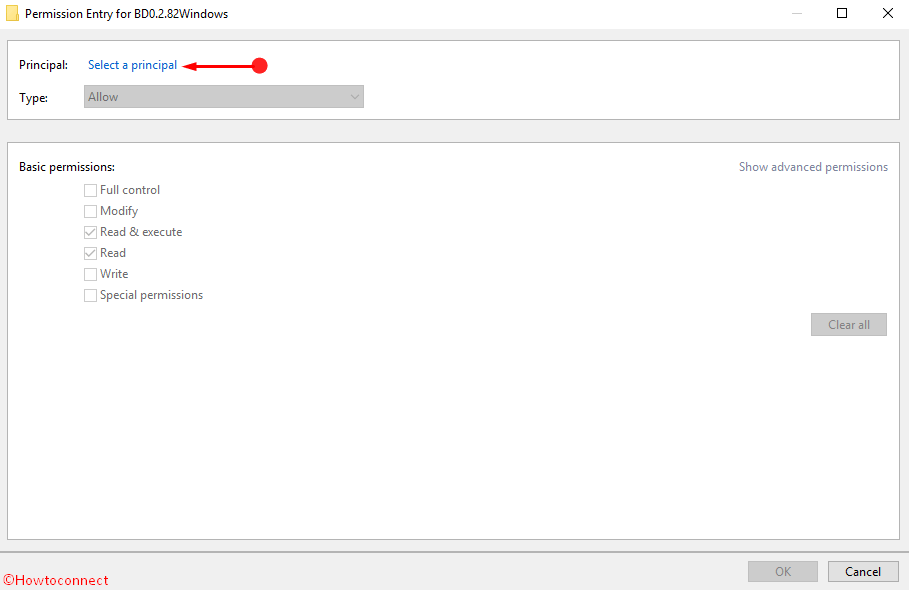
Step 9 – Click the Add button to open the “Permission Entry” wizard on your screens.
Step 10 – Click the blue link next to the Principal label and then once more type the account name you have added during the previous steps. Select OK.
Step 11– Check the box for Full Control at the Permission Entry wizard furthermore choose OK. Doing this will permit the parent object to replace the settings on all its descendants.
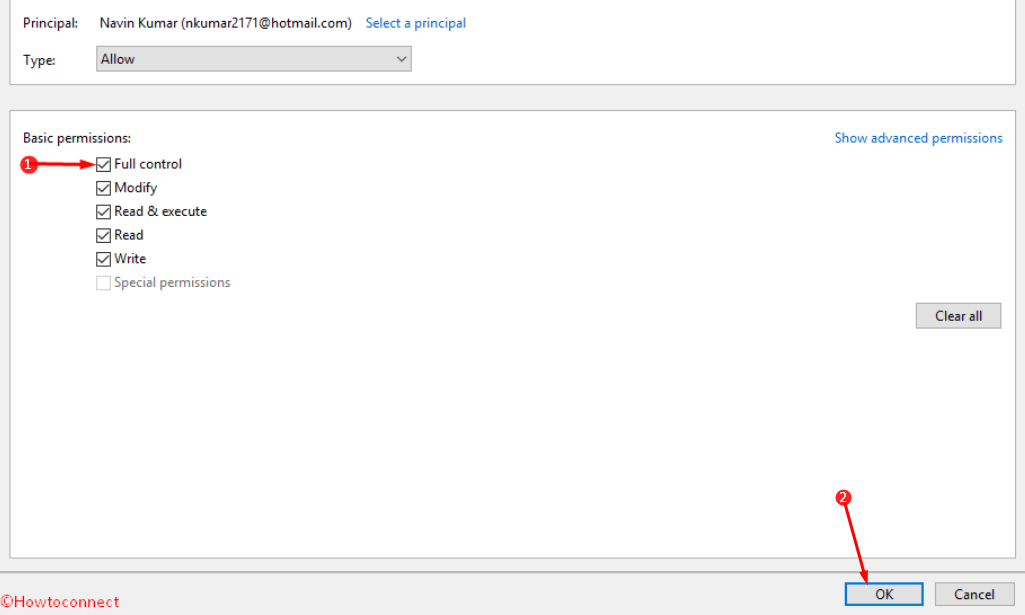
Step 13 – Click Apply then save permission by selecting OK.
Alternatively, grab TakeOwnershipEx to Change File Permission to Grant Ownership in Windows 10
This is a free software program designed to save your time. TakeOwnershipEx lets you change file ownership and rights within seconds. This is the method you can gain access to any file per permission moreover ownership in Windows 10 using this utility:
Step 1 – Download the tool then determine either a file or folder that you want ownership for.
Step 2 – Click the Take Ownership button and a wizard will tell you that you’ve got a complete access to the target.
You can even send all the permissions to default by pressing the “Restore ownership” button.
This application will not just save your time but will also make the entire procedure easy to handle.
Final Words
The file permissions are very crucial as this limits the ease to access important data casually by anyone. These must be changed/edited being very careful as it ensures the security of the stuff. If you experience inconvenience with the entire procedure given in Method 1 to change File Permission to Grant Ownership in Windows 10, you can always pursue the second one. This will surely help us to serve you better.