Today, in this article, we will see the procedure on How to Configure IPV6 / Internet Protocol Version 6 on Windows 10 and 11. Loaded with many features, Internet Protocol Version 6 basically deals with many issues such as address depletion, extensibility, restoration of end-to-end conversation, and so on. Furthermore, it also expands the capabilities of the Internet that lets you enable new kinds of applications. However, the main reason for configuring IPV6 is, it provides a larger address space for us when compared to IPv4.
Another advantage of IPv6 is that it supports source as well as destination addresses of 128 bits (16 bytes) in length. This provides a better network layer security which makes the internet more secure. Moreover, Internet Provider 6 provides other features such as multi-casting and Mobility support. So, let us head towards the ways to enable and disable IPv6 and also its configuration details.
Ways to Configure IPV6 / Internet Protocol Version 6 in Windows 11 or 10
Through Network Adapter Properties
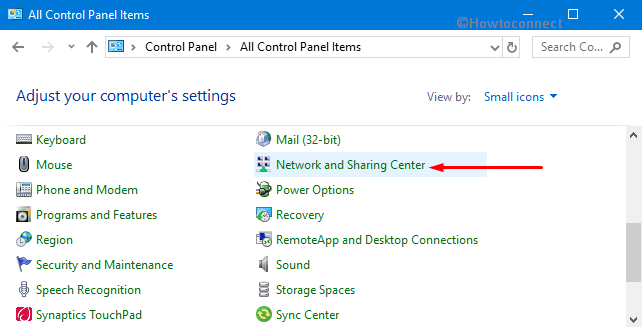
Step-1: Open Control Panel by typing ‘control’ in Taskbar search and pressing Enter key. Make the icons view into a small size, choose the applet Network and Sharing center (see snapshot).
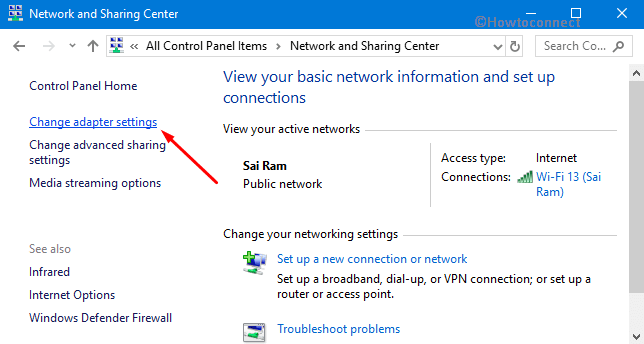
Step-2: Proceeding forward, make a click on Change adapter settings that appear on the left pane of the following screen.
Step-3: In the “Network Connections” window, perform a right-click on your active network. From the list of options, click on Properties.

Step-4: This will launch the Properties dialog of the active network which displays a list of items that the connection is using. Here, locate and select “Internet Protocol Version 6 (TCP/IPv6)” and further click the Properties button as shown in the given picture.

Configure IPV6
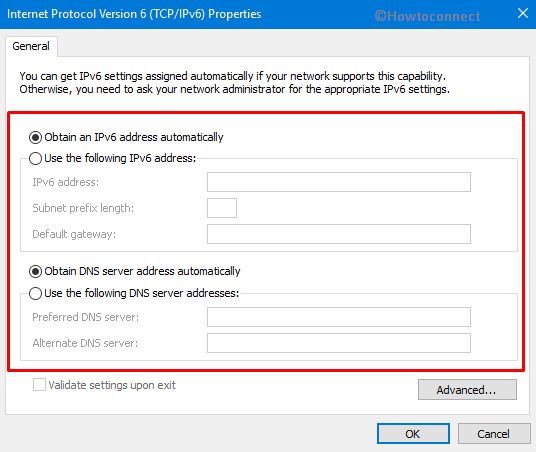
Step-5: When the General tab of the “Internet Protocol Version 6 (TCP/IPv6)” comes up, you will see the underneath options to Configure IPV6 / Internet Protocol Version 6 in Windows 11 or 10.
Obtain an IPv6 address automatically: This option specifies that the Internet Protocol Version 6 addresses this particular connection or adapter are automatically determined stateful address autoconfiguration.
Use the Following IPv6 address: It allows you to specify an IPv6 moreover default gateway for the connection or adapter manually.
IPv6 Address: Provides you a space to input IPv6 unicast address.
Subnet prefix length: Lets you specify Subnet prefix length for the IPv6 address that you use above. Generally, the default value is always 64.
Default Gateway: Type in IPV6 unicast address of the default gateway in this field.
Obtain DNS Server Address Automatically: The IPv6 for DNS servers are automatically driven by “stateful address autoconfiguration” (DHCPv6).
“Use the following DNS Server Address“: Determines that the IP version 6 of the preferred, as well as alternate ‘DNS servers’ for your connection, can be manually addressed.
Preferred DNS server: This allows you to mention the IPV6 unicast address of the preferred DNS server in the respective field.
Alternate DNS server: You can specify Internet Protocol version 6 unicast address of the Alternate DNS server in this space.
Step-5: After choosing the preferred options, click OK to successfully Configure IPV6 / Internet Protocol Version 6 in Windows 10 or 11.
Use Windows PowerShell to Configure IPV6 / Internet Protocol Version 6 for Specific Network Adapter
This is another way which will help you in enabling or disabling IPv6. All you need is to execute certain commands in Windows PowerShell. However, ensure to hold admin rights before you advance with the steps.
Open elevated PowerShell and to do so, first conduct a right-click on Start icon. When the WinX menu shows up, locate and select Windows PowerShell (Admin).
Once, the window appears, copy/paste or type the command written below and hit Enter to run it.
Get-NetAdapterBinding -ComponentID ms_tcpip6
Executing the above command will immediately display the current status of your “IPv6”. In the result, ensure to note the adapter name.
Moving ahead, input the following command line in order to enable the IPv6.
Enable-NetAdapterBinding -Name "Adapter Name" -ComponentID ms_tcpip6
Now, to disable the IPv6 you need to execute the below-given command.
Disable-NetAdapterBinding -Name "Adapter Name" -ComponentID ms_tcpip6
Note: Ensure to replace “Adapter Name” with the name that you copied earlier.
Configure IPV6 in Windows 11 or 10 across All Adapters via Windows PowerShell
In this method, you need to follow the first two steps of the previous method but with different commands.
First of all, launch PowerShell with administrative privileges.
Copy and paste the below command in the blue window of PowerShell to enable all of your network adapters.
Enable-NetAdapterBinding -Name "*" -ComponentID ms_tcpip6
To disable the IPV6 across all of the adapters, you need to use given -below command.
Disable-NetAdapterBinding -Name "*" -ComponentID ms_tcpip6
Then hit enter. Voila! Everything is done. This is to Configure Internet Protocol Version 6 in Windows 11 or 10 across all adapters.
Hopefully, you will be able to Configure IPV6 / Internet Protocol Version 6 in Windows 10 and 11 pretty easily. However, along with Windows 10/11, you can also use them in Windows 8 and 7 respectively. In addition, advanced users can also deal with IP version 6 details using Registry Editor. For basic users, dealing with the registry may lead to misconfiguration. But with the above-mentioned ways, you can easily manage IPv6 on Windows 11 or 10.