Methods to Customize Closing Lid Settings on Windows 10. – For closing the lid, Windows 10 provides 4 preferences – Do nothing, Sleep, Hibernate, Shut down. These 4 options are available in both the states for your PC – On battery and Plugged in. You can customize this Setting through power options quite simply.
This guide will show you various procedures for the customization of closing lid settings on Windows 10. See ahead –
Ways to Customize Closing Lid Settings in Windows 10
Way 1 – Customize Closing Lid Settings through Taskbar
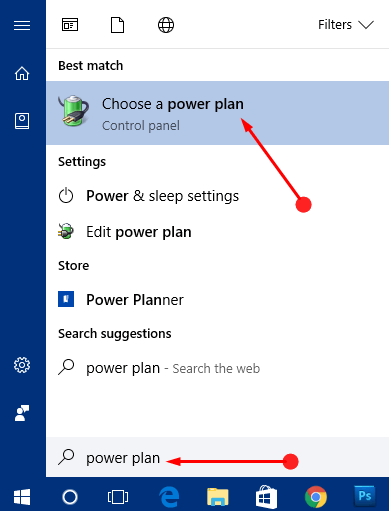
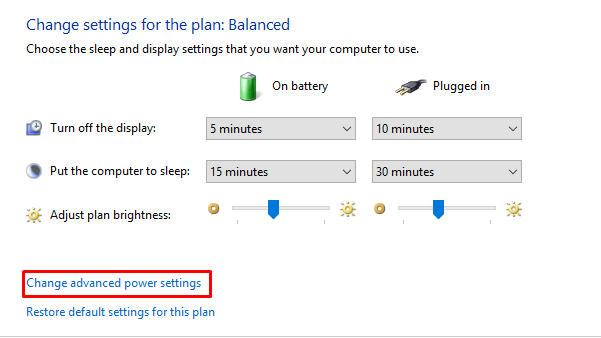
Step 1 – Start the procedure by opening Power Options Window. To do so type power plan and when search result displays click Choose a power plan, click it.
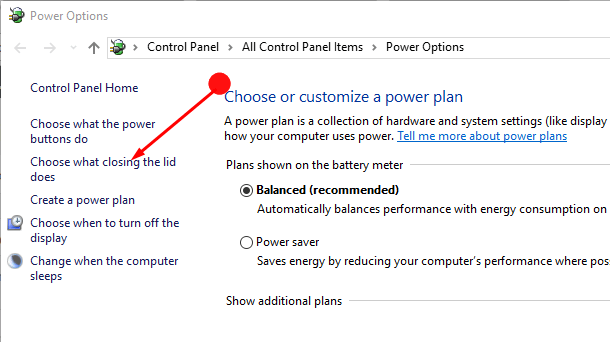
Step 2 – In the next screen, press the option Choose what closing the lid does from the left pane. Now final settings will arrive.
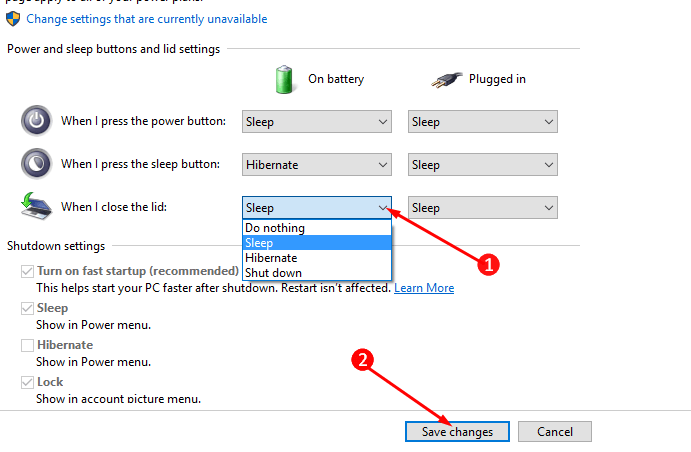
Step 3 – When I close the lid option displays a drop-down comprising 2 columns – On battery and Plugged in. Each of the columns includes 4 options in drop-downs – “Do nothing, Sleep, Hibernate and Shut down”.
So, choose your preferences from the drop-down menu next to When I close the lid option. Do not forget to tap the Save Changes button in order to register your choice.
Way 2 – Customize Closing Lid Settings through Advanced Power Options
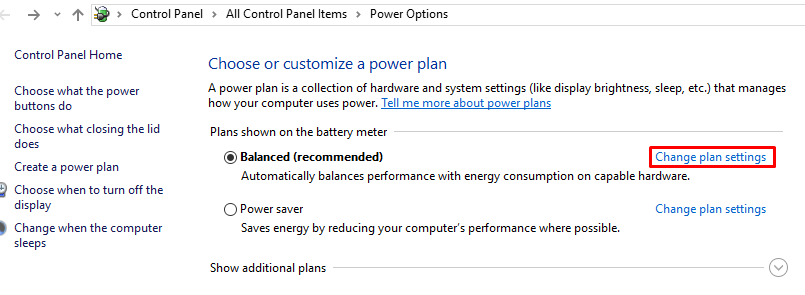
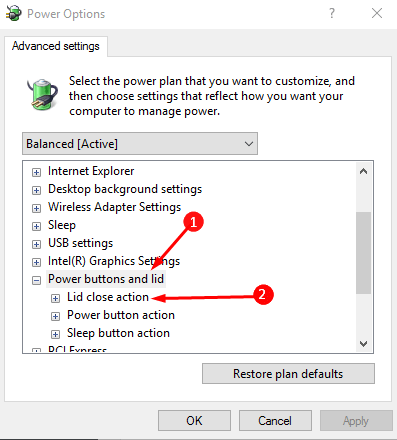
Step 1 – In this option, you first need to reach the Advanced power Options. To go there follow Step 1 in the previous method. From the Power Options window, press Change Plan Settings adjacent to the functional plan.
Step 2 – Now tap the Advanced Power Settings link on the bottom of the screen.
Step 3 – In the box that comes in view locate Power Buttons and Lid, double click on it to expand. And then double click on Lid Close Action to see the further features under this option.
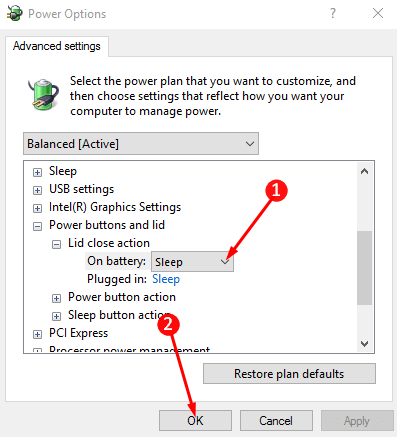
Step 4 – Click on the On battery option and find a drop-down menu with a few preferences. Choose the one that suits you the best and then continue with the same for the Plugged In option.
Step 5 – Once done tap on the OK button at the bottom of the box. You can now close the box as your chosen action is already saved.
Way 3 – Customize Closing Lid Settings for Current Power Plan through Command Prompt
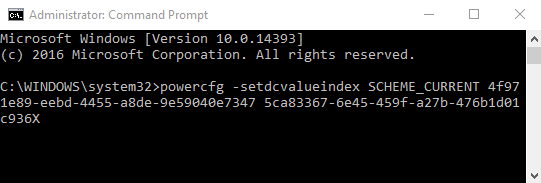
Step 1 – In the Cortana search, box type Command Prompt and then choose the same under the Best match section.
Step 2 – In the Command Prompt panel type or copy-paste the following command. Kindly remember to copy – paste the command of the correct option.
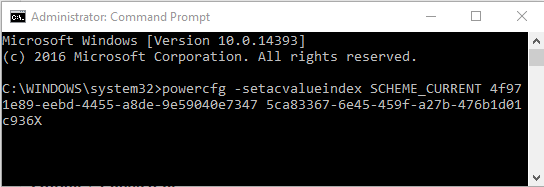
Option 1 – On battery
powercfg -setdcvalueindex SCHEME_CURRENT 4f971e89-eebd-4455-a8de-9e59040e7347 5ca83367-6e45-459f-a27b-476b1d01c936 X
Option 2 Plugged in
powercfg -setacvalueindex SCHEME_CURRENT 4f971e89-eebd-4455-a8de-9e59040e7347 5ca83367-6e45-459f-a27b-476b1d01c936 X
You need to replace the alphabet X with the value of your choice of action –
0 – Do Nothing ; 1 – Sleep ; 2 – Hibernate ; 3 – Shut Down
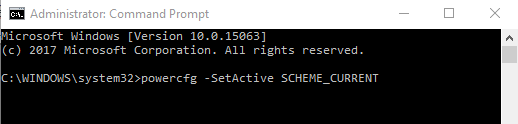
Step 3 – For both above options, type the next command to complete the action
powercfg -SetActive SCHEME_CURRENT
Way 4 – Prompt in Customize Closing Lid Settings for Specific Power Plan with Command prompt
Step 1 – Follow Step 1 of method 3 to open the Command Prompt panel.
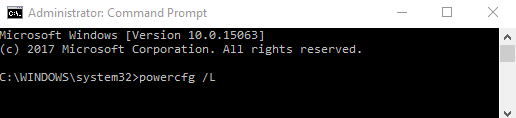
Step 2 – Type the command to know the GUID number. The asterisk sign after the GUID number specifies the current power plan in use.
powercfg /L
Step 3 – Now just like the previous method type the command of the option that you want to change.
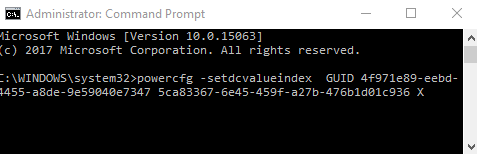
Option 1 On battery
powercfg -setdcvalueindex GUID 4f971e89-eebd-4455-a8de-9e59040e7347 5ca83367-6e45-459f-a27b-476b1d01c936 X
Option 2 Plugged in
powercfg -setacvalueindex GUID 4f971e89-eebd-4455-a8de-9e59040e7347 5ca83367-6e45-459f-a27b-476b1d01c936 X
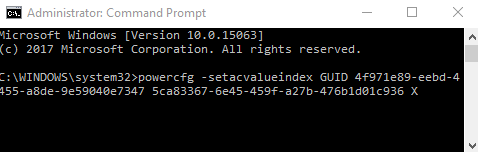
Replace the word GUID with the GUID number of the power plan which you will know after step 2
Change X with the value of the option number you prefer.
0 – Do Nothing; 1 – Sleep; 2 – Hibernate; 3 – Shut Down
Step 4 – Finally type the given command and press Enter so that your option is registered by the device.
powercfg -SetActive GUID
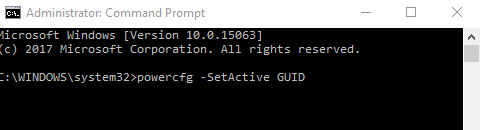
Replace the word GUID with the original number that you will find from Step 2.
Final Words
So, to Customize Closing Lid Settings in Windows 10 is pretty easy. After you change the power option, then the device will apply as default settings. But whenever you want to go back to the previous settings, simply revert back the modifications.