Windows 10 simply lets you Disable Microphone for Individual Apps. Nowadays almost all modern laptops and PCs come with a built-in Mic. The peripheral becomes very helpful when you often use certain applications like Skype. But some users don’t prefer to use Microphone for all the supported applications. Fortunately, Windows 10 includes an option that gives you the ability to select which apps can actually access your Microphone.
When you want to restrict the usage of the Microphone to certain apps, then Privacy setting includes an option for it. Sometimes, unwanted apps access the tool which may hinder your other ongoing work. So, if you are using Windows 10 version 1607 and higher, you will be able to disable Microphone for specific applications. From this update, the OS includes Windows and Apps Permission sections that provide you a way to control the use of Mic. The settings here allow to toggle off or on the application simultaneously or individually.
Way to Disable Microphone for Individual Apps in Windows 10
Here is how to disable microphone for individual apps in Windows 10 –
Step-1: Open Windows Settings, the built-in application by hitting “Win logo + I” keyboard shortcut keys.
Step-2: Go to the Privacy category on the interface of the Settings app.
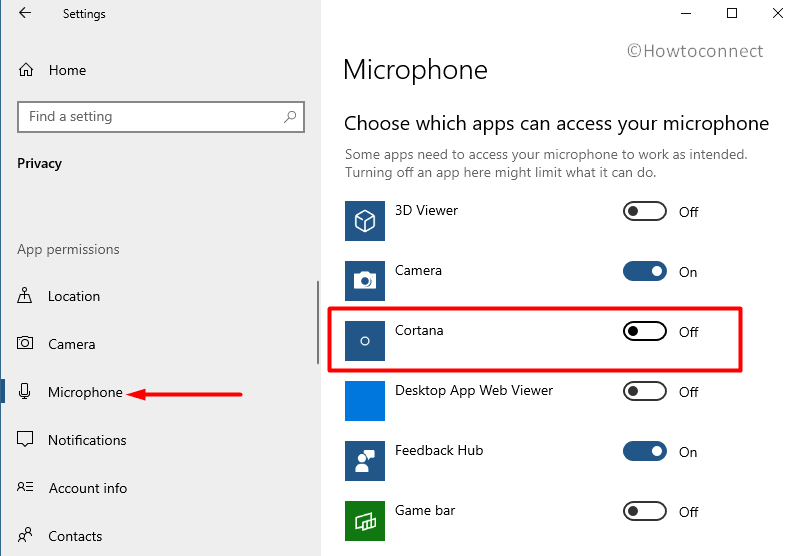
Step-3: Navigate to the sub-item Microphone on the left hand side of the following page. Now, switch to the adjacent right pane and locate the section Choose which apps can access your microphone.
Step-4: Here, go through the list of applications and choose the one for which you prefer to disable Microphone. Once you see it, simply toggle OFF its corresponding switch. For example, to disable the Microphone for Cortana, turn OFF its switch (see screenshot).

You may also like to read the way to Disable and Enable Microphone in Windows 10.
That’s all!!!
