Corrupt .exe File Association in Windows 10 is one of the most annoying as well as the nagging issue. You may come across a situation where you are completely unable to access any of the .exe files on your device. The file will either launch through another program or you will get Open with dialog on the screen. This problem occurs specifically when the .exe file associations become corrupt because of various reasons.
When a certain malware attack or by a bad software corrupts the registry, then it often prevents Windows from opening a particular file type. In some cases, Windows Firewall affinity with certain applications can also be the possible cause behind this issue. However, to bypass the problem, you need to modify the registry, change the location of the “Program Files” folder, disable Windows Firewall, a slight change in the Sound Scheme, etc. Let’s see them one after another in details.
Corrupt .exe File Association in Windows 10 Solutions
Here is how to fix Corrupt .exe File Association in Windows 10 –
Before continuing to any of the fixes mentioned here in this post, try to enter Safe Mode on your PC. This could help you to evade Corrupt .exe File Association issue. Following the workarounds will eventually help you to open corrupt .exe files on your system in an easy manner. So, go through these sequence of steps in order to enter Safe Mode on your device.
Step-1: At first, open Start Menu and henceforth make a click on the Power button.
Step-2: Long press the Shift key on the keyboard then hit the Restart option as shown in the below snapshot. Automatic Repair tool will soon get activated on the system.

Step-3: Choose “Troubleshoot => Advanced options => Startup Settings”. In the “Startup Settings” screen, you will come across the Restart button, do a click on it.
Step-4: A list of options will appear on the screen. Press the key mentioned for entering Safe Mode on the device. Now you can follow the below-given workarounds one by one.
Modify Registry Values
Registry Editor holds the set of keys which you can change in order to fix different types of problems on the PC. The registry values get modified from default for certain unknown reasons which does not allow the EXE files from launching. So, let us go through the steps –
First of all, press “Windows logo and R” hotkeys jointly to open Run dialog box.
Type regedit on the text field and click OK to access Registry Editor.
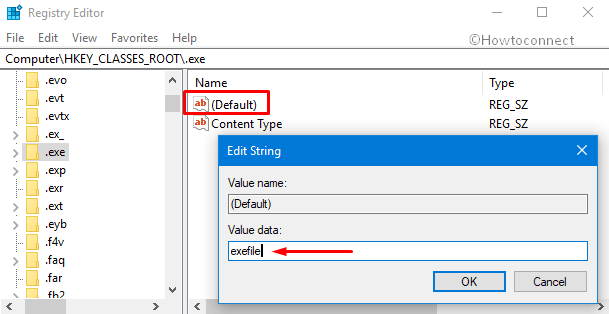
On the left sidebar of the Registry, navigate to the following path.
HKEY_CLASSES_ROOT.exe
Thereafter, switch to the right pane and double click on Default. Assign the Data value as exefile and click OK.
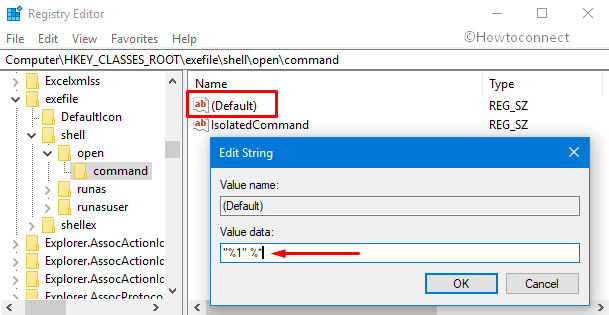
Again move to the left pane and go to the given location.
HKEY_CLASSES_ROOT\exefile\shell\open\command
Here, in the right pane, double-click on the Default to open and set its Value data to “%1” %*.
Finally, Restart Windows 10 PC and check if the issue Corrupt .exe File Association persists or continues to occur.
Change the Location of Program Files Folder to Default
The Program Files keep the third-party information of applications that are installed on the computer. By default, it is located in your System drive along with Windows 10 installation. Several users change its location in order to enhance efficiency and save space, but it might be the root cause of not opening the .exe file in the computer. So change its location to its original place using Registry Editor which in turn could prevent this issue from ever happening on the system. Here is the way to proceed:
Go to the Cortana search box, type regedit in the text field. On the Best match result, select the same.
Click Yes on the User Account Control to sign into the prompt.
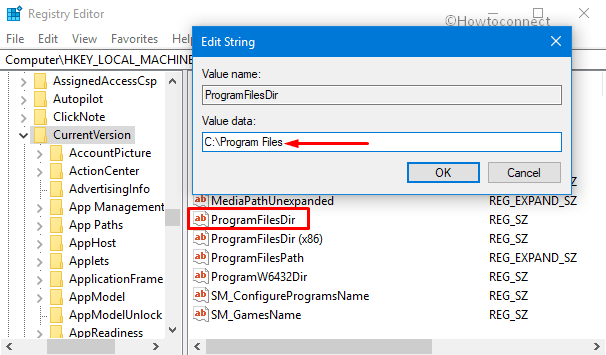
Once the Registry Editor pops-up, navigate to the path mentioned below on the left column.
HKEY_LOCAL_MACHINE\SOFTWARE\Microsoft\Windows\CurrentVersion
You will get a list of entries on the right pane. Locate and double-click on ProgramFilesDir. Change its Value data to C:\Program Files.
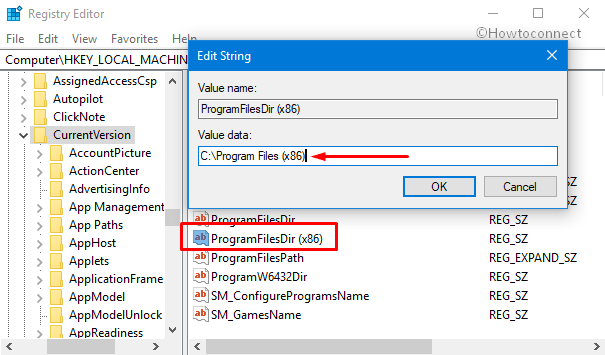
Moving ahead, if you see ProgramFilesDir (x86), you need to modify it as well. So, double-click on it and set its Value data as C:\Program Files (x86).
Finally, reboot the PC and hopefully, this will bypass the Corrupt .exe File Association issue.
Turn off Windows Firewall
Firewall works as a Windows protecting software from any harmful attack. In addition to this, Firewall also prohibits some applications which seem to be incorrect as per its own guidelines which result in error Corrupt .exe File Association. If you are sure that the application at hand doesn’t contain any malware and is genuine then disabling Windows Firewall feature for that specific app can solve the bug. Let’s see how to take this into effect.
Jointly press Windows and S hotkeys to open Cortana.
Type firewall and when the Best Match displays Windows Defender Firewall, click on it.
Here in the left column hit Turn Windows Firewall on or off (see snapshot).
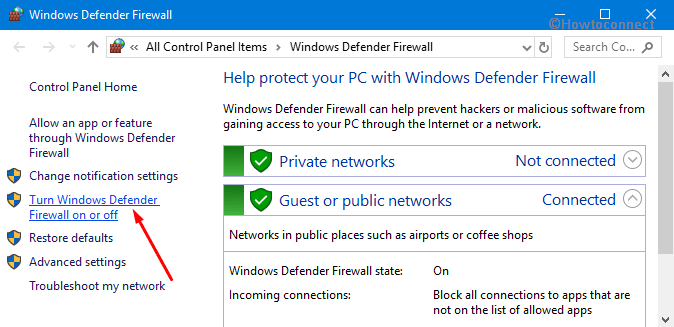
In the new window, you will see two sections – Private network settings and Public network settings. Activate the checkbox “Turn off Windows Firewall (not recommended)” for both the sections and click OK to confirm the changes as shown in the below picture.

Close all the open windows and check for the occurrence of the problem.
Change Sound Scheme and Disable User Account Control
As per the report of different users, it has come to our notice that change in the sound scheme or turning off User Account Control might be fruitful to fix Corrupt .exe File Association in Windows 10.
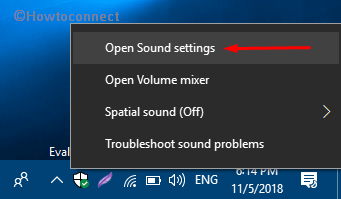
Go to the taskbar and conduct a right-click on the Volume icon. From the menu that shows up, click Open Sound settings (see snapshot).
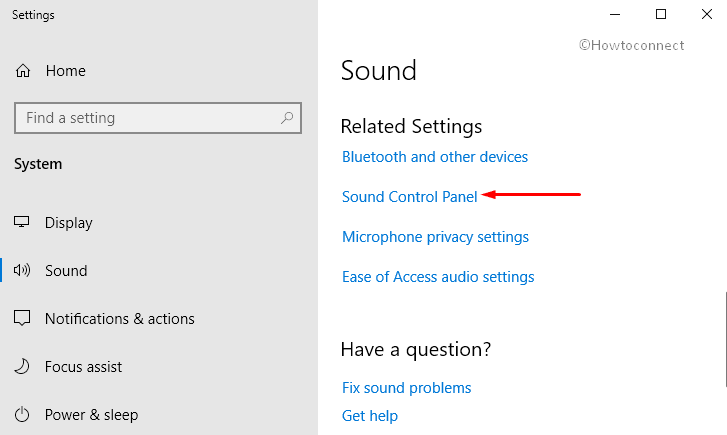
On the Sound settings page, click Sound Control Panel.
Under the Sounds tab, make a click on the arrow under the section namely Sound Scheme. Select No Sounds option.
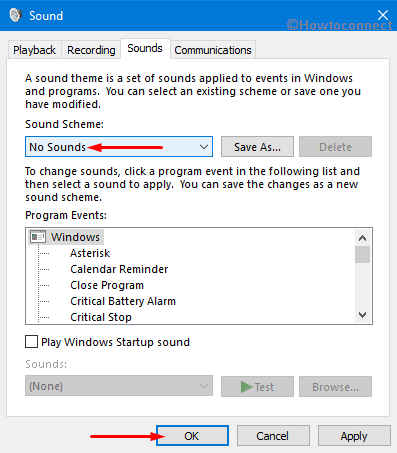
Henceforth click Apply followed by a hit on the OK button to save the changes made so far.
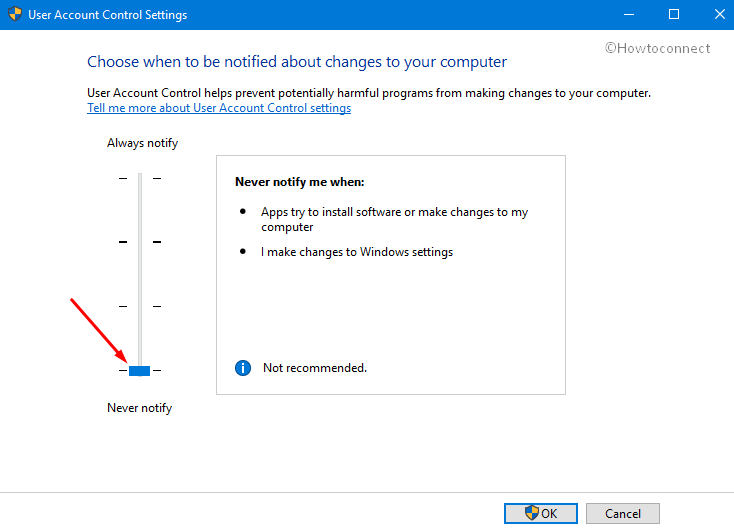
Go to the search box, type “user account” and hit on the “Change User Account Control settings” option.
In this window hold the slider and pull down at the bottom most to activate Never notify option. Press Enter key to save changes.
Again perform a right-click on the Volume icon and click Open Sound settings => Sound Control Panel. In the Sounds tab, select Windows Default underneath the section Sound Scheme as shown in the given picture.
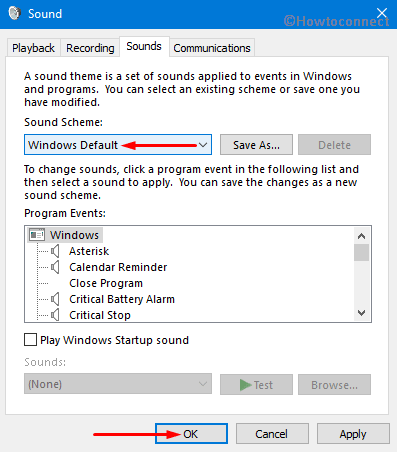
Click Apply and OK buttons to implement the changes.
After performing this process, try to access the problematic file. Hope doing this will open .exe files without occurring any issue.
Create your own .reg file
If the above fixes are not that useful in solving the bug and you are yet not able to open the .exe files then create your own .reg file and add this one to the Registry Editor.
To complete it, first open Notepad through Cortana.
Copy the below-mentioned code lines and paste it in the Notepad exactly as it is.
Windows Registry Editor Version 5.00
[HKEY_CLASSES_ROOT.EXE]
@=”exefile”
“Content Type”=”application/x-msdownload”
[HKEY_CLASSES_ROOT.EXEPersistentHandler]
@=”{098f2470-bae0-11cd-b579-08002b30bfeb}”
[HKEY_CLASSES_ROOTexefile]
@=”Application”
“EditFlags”=hex:38,07,00,00
“FriendlyTypeName”=hex(2):40,00,25,00,53,00,79,00,73,00,74,00,65,00,6d,00,52,
00,6f,00,6f,00,74,00,25,00,5c,00,53,00,79,00,73,00,74,00,65,00,6d,00,33,00,
32,00,5c,00,73,00,68,00,65,00,6c,00,6c,00,33,00,32,00,2e,00,64,00,6c,00,6c,
00,2c,00,2d,00,31,00,30,00,31,00,35,00,36,00,00,00
[HKEY_CLASSES_ROOTexefileDefaultIcon]
@=”%1?
[HKEY_CLASSES_ROOTexefileshell]
[HKEY_CLASSES_ROOTexefileshellopen]
“EditFlags”=hex:00,00,00,00
[HKEY_CLASSES_ROOTexefileshellopencommand]
@=””%1? %*”
“IsolatedCommand”=””%1? %*”
[HKEY_CLASSES_ROOTexefileshellrunas]
[HKEY_CLASSES_ROOTexefileshellrunascommand]
@=””%1? %*”
“IsolatedCommand”=””%1? %*”
[HKEY_CLASSES_ROOTexefileshellex]
[HKEY_CLASSES_ROOTexefileshellexDropHandler]
@=”{86C86720-42A0-1069-A2E8-08002B30309D}”
[-HKEY_CURRENT_USERSoftwareMicrosoftWindowsCurrentVersionExplorerFileExts.exeUserChoice]
Henceforth click on the File and choose Save as option.
Under File name, put restore.reg hit the Save as section and select All Files.
Go ahead and choose the path where you want to save this file and hit on the Save button.
Navigate to the location where you have saved this file and launch the restore.reg file.
Doing this will add this document to Registry Editor. Once the procedure is over close the window and check whether the issue still occurs or not.
Note: Once the file is saved, go to the specific location and double-click on the restore.reg so that this file could be added to the registry.
Create a new user account
Creating a new user account is another workaround to bypass the Corrupt .exe File Association issue on your Windows device. You can pretty easily add a user account by going through these simple series of easy steps.
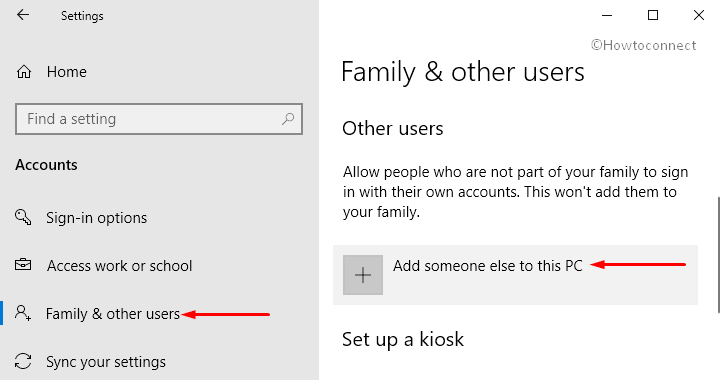
Press Windows & I hotkey altogether to open Settings application.
Under the list of categories, make a click on Accounts. Select Family and other users at the left pane of the following page.
Thereafter go to the right-hand side and click on "Add someone else to this PC" button located under Other users section.
On the further popup window do the click on I don’t have this person’s sign-in information link to go ahead.
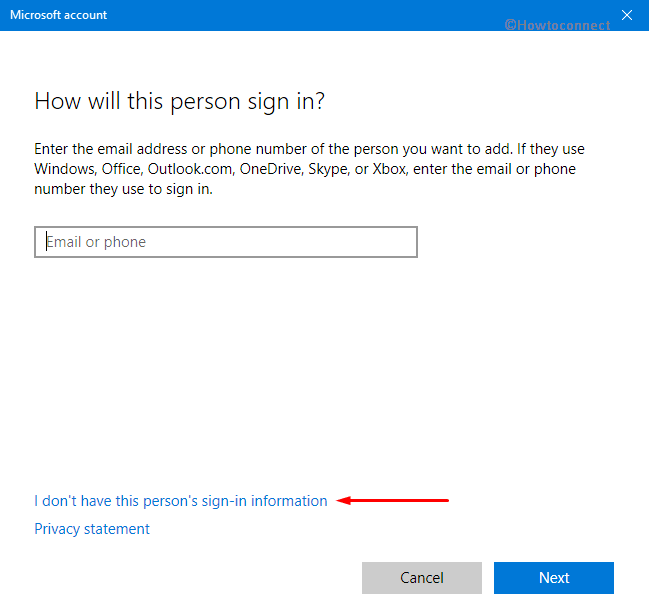
Now come back on the screen and hit the Add a user without a Microsoft account option.

Here put the username in the New User field and hit the Next button. After creating a new user account, close all the windows and check if the trouble persists or not.
Repair File Association with Command Prompt
If the fixes mentioned above were not that compatible then most probably this workaround could alternate the situation and cure the PC of Corrupt .exe File Association Error Message. Let’s go to see this method.
Open the Run command using the shortcut keys "Win+R". Here type "cmd" in the text area and click OK. Press "Ctrl + Shift + Enter" keys all together to launch elevated Command Prompt.
Note: Click Yes on the UAC prompt to grant permission.
Here write assoc .exe=exefile in the blank area and press Enter to execute this particular code.
If the command runs successfully then reboot your system. Once the system restarts, try running Windows Security for once so that it could search for potentially corrupt files or malware.
Hope the solutions provided above have helped you out with solving Corrupt .exe File Association issue on your PC. If you are still struggling with this issue or have any other query, ask us in the comment box.