Do you encounter corsairvbusdriver.sys BSOD reboot loop in Windows 10? This stop error leads system to crash suddenly and returns with System Thread Exception Not Handled blue screen. PC having Corsair hardware finds this issue because of mostly old or buggy driver.
What failed: corsairvbusdriver.sys BSOD error appears with System_Thread_Exception_Not_Handled after the first time restart of the computer. Next time the stop error might be different such as Critical Process Died or some other. The main reason behind this problem is the recent Windows update that has damaged the corsair device driver.
Corsairvbusdriver.sys System Thread Exception Not Handled in Windows 10
Here is how to fix corsairvbusdriver.sys System Thread Exception Not Handled in Windows 10 –
1] Change the name of Corsair driver
Most working solution to this issue is the rename of the driver file through Automatic Repair environment. Some Windows update seems to break the driver software resulting in the Stop error. So when you change the file name the rebooting process doesn’t call the corrupted one and everything works fine.
- From the Automatic Repair screen, click – Advanced options.
- Next, select – Troubleshoot.
- Now choose – ‘Advanced options’.
- Click on – Command prompt.
- Type diskpart and press – Enter.
- Write list vol and hit – “Enter”.
- A list of your disks should now appear; identify the drive letter that is your OS drive.
- Type exit and press Enter and it will take you out of diskpart.
- Now just type your OS drive letter into the CMD window – so if in diskpart, your OS drive was F, just type F:
- You should now have F:> in the CMD window, now type in –
cd \windows\system32\drivers
- After then, type – ren corsairvbusdriver.sys corsairvbusdriver.bak and hit Enter.
- Now click the X on the command prompt to bring back the options, click the Shutdown option, and reboot.
This will rename the driver file so Windows can’t call it on boot, but it won’t delete it. Now the blue screen issue should be no more.
2] Uninstall the recent Windows update to fix corsairvbusdriver.sys BSOD
Once you boot to desktop, remove the recently installed update to ensure that the issue may not occur in the future.
- Click the – Search.
- Type – updates.
- Press – Enter.
- Select the – View update history.
- Click – “Uninstall updates”.
- Go to the Microsoft Windows section, right click the most recent update.
- Select – Uninstall.
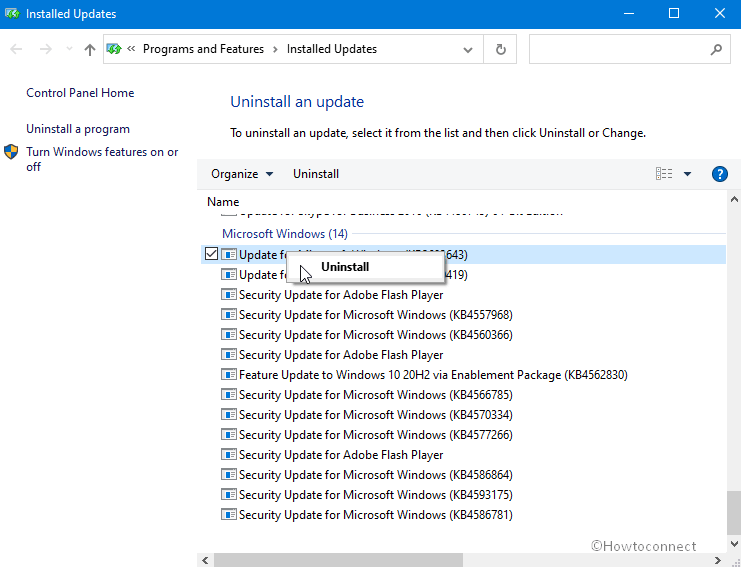
- Follow the directions coming on the screen till the end.
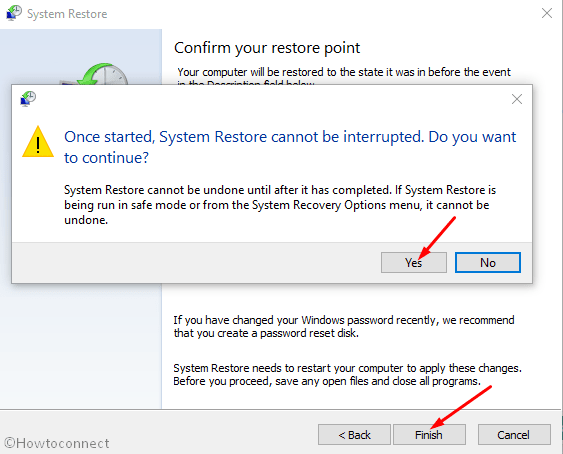
3] Perform System Restore
System restore may also help you to fix corsairvbusdriver.sys System Thread Exception Not Handled in Windows 10. This method will bring your PC back to the state where the Corsair driver was not corrupted or broken. So follow the steps –
- Press the – Win key.
- Type – rstrui.
- Hit – Enter.
- When System Restore wizard prompts, check the radion button for – Choose a different restore point. Click – Next.
- On the coming window, click the box for – Show more restore points.
- Select the date when you wouldn’t have encountered corsairvbusdriver.sys BSOD and click Next.
- Hit – Finish.
- A warning pop up will appear; click – Yes.
Methods list
1] Change the name of Corsair driver
2] Uninstall the recent Windows update
3] Perform System Restore
That’s all!!