Executable files are represented by .exe extension in Windows and they play a vital role in running various processes. But in certain cases, users encounter a situation where DTUHandler.exe consumes all the internet automatically. This issue in the specific executable file indicates that it used up all the data even when the Network is set to a metered connection.
There are several errors that users come across with the DTUHandler.exe process. Though they may seem to be different, all of them point to the huge impoverishment of internet data. If you experience any of the below mentioned DTUHandler.exe Issues in Windows 10, then explore the below section of this article and try out the effective solutions.
DTUHandler.exe Issues
Here is How to Fix DTUHandler.exe Issues in Windows 10 –
See the list of issues first you commonly encounter because of this exe file –
- DTUHandler.exe is not running.
- Faulting Application Path: DTUHandler.exe
- DTUHandler.exe is not a valid Win32 application
- DTUHandler.exe has encountered a problem and needs to close. We are sorry for the inconvenience.
- DTUHandler.exe failed to initialize properly.
- DTUHandler.exe could not be launched. Class not registered.
- The file DTUHandler.exe is missing or corrupt.
Now follow the solutions –
1] Clear all Browsing Data from Microsoft Edge
As the executable file is basically responsible for the bulk of data loss, wiping out browsing data from the built-in browser, i.e. Microsoft Edge might help. Here is how to accomplish the task –
- Press the Windows key to have access to Start menu.
- Reach out to Microsoft Edge proceeding to the app list alphabetically and click on it.
- Once the browser shows up, click on the three-dotted icon (Settings and more) located at the top right-most corner.
- From the appearing menu, hover over History option. You can simply navigate to the desired location by pressing Ctrl+H when on the Homepage as well.
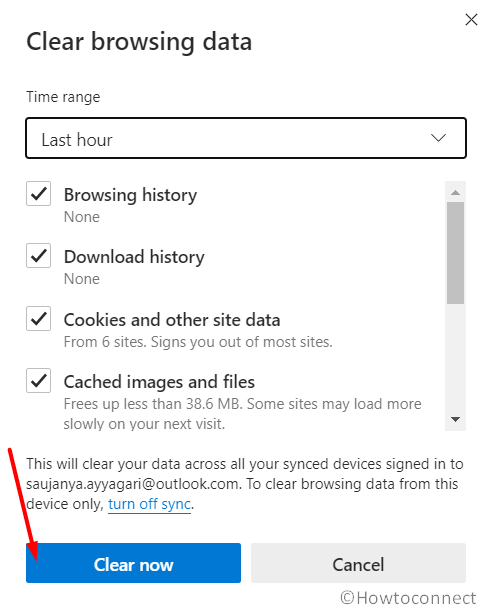
- On the expanded pane click on Clear browsing data.
- Upon unveiling more options, check the boxes reads as “Browsing history”, “Cookies and other site data” and “Cached images and files”.
- Finally, perform a click on Clear now to eradicate all the data from browser.
See Best Microsoft Edge Tips for Windows 10.
2] Create New User Account
Some experts also suggest that creating a new user ID may resolve the DTUHandler.exe Issues in Windows 10. The guidelines are as follows –
- Press Win+I hotkeys at once to open Windows Settings app.
- Click on Accounts category from UI to pass forward.
- When the new page opens, click on Family and other users from left pane.
- Move to the adjacent right and do a click on Add someone else on this PC located in Other users area.

- After a new window floats up, enter a user name, and hit Next.
- From the succeeding window, click on Finish.
- Now, sign out from the current account and log into the new account.
3] Use a Different Network to Fix DTUHandler.exe Issues
Since, DTUHandler.exe Issues in Windows 10 is attributed to network problems, using a different data provider might be helpful. Try doing the same if the above resolution process fails to resolve the setback.
4] Run System File Checker
System File Checker is a handy tool for rectifying corrupted Windows components and stands out to be the best for resolving issues with executable files as well. We can use this default utility in case of DTUHandler.exe Issues in Windows 10 also. The tool activates in Elevated Command Prompt after moving through below steps –
- Open the Run dialog box pressing “Win+R” hotkey.
- Type cmd in the provided text area of this wizard.
- Press the Ctrl+Shift+Enter key combination at once.
- When the UAC prompt for permission, select Yes to pass forward.
- When in the Elevated Command Prompt window, enter following text at the base of blinking cursor –
sfc /scannow
- Press Enter key now and the tool will start looking for problematic system files in Windows.
It will also rectify them accordingly and the process might be a little lengthy. Wait patiently until finished and Restart Windows 10 PC upon completion. Hopefully there will be no more issues regarding the executable file when the new session begins.
5] Update the Windows 10 when it arrives
An outdated Windows 10 is prone to get affected by various bugs and issues while in operation. In the same way, DTUHandler.exe may show up as well and cause severe data loss. So you need to keep the Operating System up to date always in order to maintain it in a healthy condition.
Microsoft also releases patches and updates regularly to facilitate the process. It’s a dire need to install them after being available for the system and to accomplish the task, follow the below guidelines –
- Launch the Settings app by clicking the gear icon from Start menu.
- From the appearing layout, choose Update & Security tile.
- On the next page by default Windows Update gets highlighted.
- Jump to adjacent right and click the button Check for updates.
- Upon all the update files being visible, hit Download.
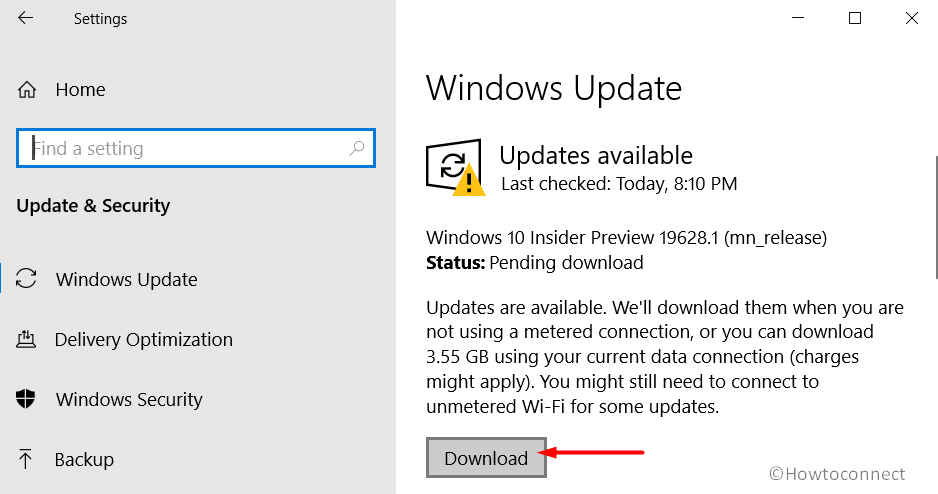
- The installation will begin right after the downloading finishes.
- Keep on following the guidelines displayed to complete the process.
6] Fix DTUHandler.exe Issues by Eliminating Malware
Malware is available everywhere on the internet and they can sneak through the defense of a device anytime when a user accidentally clicks suspicious links in websites or spam mails. Once these bugs manage to enter into the system, they steal sensitive data to cause the utmost harm to the Windows components. This is how, corruption in the system files takes place and DTUHandler.exe Issues in Windows 10 may show up as well.
The best way to avoid these cases is to defend or resolve them once affected already. Microsoft introduced Windows Security giving robust construction to protect the system every time. We will now proceed to run this utility to scan and eliminate the malware using below instructions –
- Click the Windows Security icon on the system tray.
- Once transferred to the app UI, select Virus & threat protection from left pane.
- Jump alongside and click on the Scan options link available here.
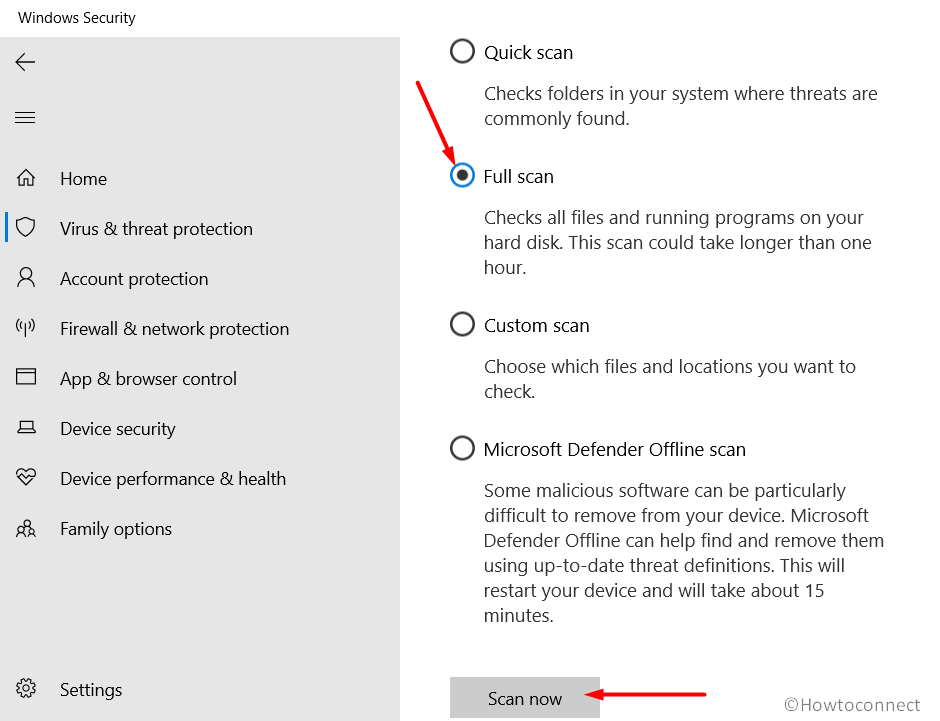
- After all the options are visible, click on the radio button against Full scan.
- Hit the Scan now button to begin the scanning process.
- After the searching finishes, the list of vulnerabilities will be presented on display.
- Now, click the Clean threats option from there.
- When the succeeding page unveils, choose Remove first and then Start actions to eliminate them all.
- Finally, restart the device to save all these changes.
Methods:
1] Clear all Browsing Data from Microsoft Edge
2] Create New User Account
3] Use a Different Network
4] Run System File Checker
5] Update the Windows 10 periodically
6] Eliminate Malware using Windows Security
That’s all!!