Do you confront error 0x80070057 when “Auto Account Setup Process” on Outlook in Windows 10? If yes, then we have brought a perfect solution for this bug. There are several error codes which are being faced by different users while opening their Outlook account.
With the appearance of 0x80070057 error on Windows device, you won’t be able to send/receive any emails. Furthermore, in certain cases, Outlook crashes whenever you make an attempt to open it. There could be various reasons behind this problem like “Outlook improperly installed on the system”, “Misconfiguration of Outlook Profiles”, change in the registry editor, PST file corruption or entry of malicious virus. Let’s see on how to solve this bug from your Windows Desktop.
Error 0x80070057 When Auto Account Setup Process Solutions
The 0x80070057 error message generally pop-up on computers running Outlook 2013, 2010 or 2007 versions. In addition, there are certain situations narrowed down under which this issue will appear on your Desktop. They are:
“Connecting Outlook Account to Microsoft Exchange Server”
“Clicking on Send/Receive option while exchanging mails with other client”
“Creating New Profile in Outlook 2010 on Exchange Server 2003”.
Here is how to fix error 0x80070057 When “Auto Account Setup Process” on Outlook in Windows 10 –
Manually Create New Profile
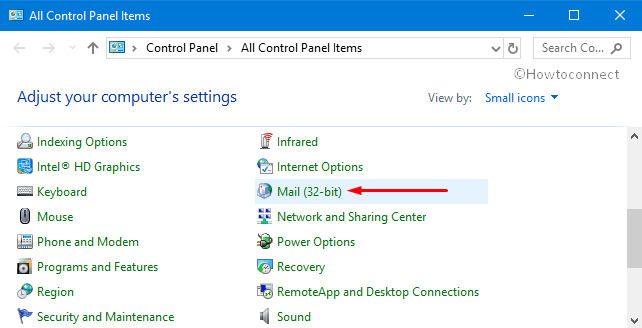
Step-1: Type cp on Cortana text box and hit Enter to open Control Panel. Keep the icons in small view and click Mail.
Step-2: When the Mail Setup wizard shows up, click Show Profiles button under the ‘Profiles’ section.
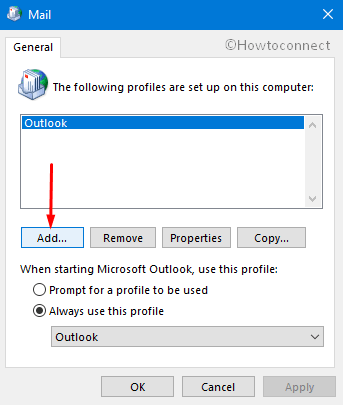
Step-3: This will launch the Mail dialog box, hit the Add button as shown in the below screenshot.
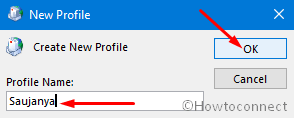
Step-4: In the “New Profile” window, provide a name under the Profile Name option. Click OK.
Step-5: Now, ensure that your display name and email address shows up in the “Add New Email Account” pop up. Henceforth, put a tick mark against the option namely Manually configure server settings or additional server types. Then, hit Next.
Step-6: Advance and select “Microsoft Exchange” option followed by a click on the Next button.
Step-7: In Microsoft Exchange settings pop up, type the Exchange Server name, prove yourself with the username and then hit Next. Once successfully creating the profile, hit OK to exit mail wizard. At last reboot your PC and then Start Outlook.
Use of Autodiscover.xml file in the Registry
In the “Auto Account Setup” process, when you click the Next button in order to connect the server as well as to create a profile, Outlook uses some extra codes. These ensure that you don’t get successfully connected with the same Exchange Account twice using its internal codes.
The codes are found in the newer version of Outlook (2010 onwards). This new code believes that Autodiscover succeeds. And if it fails to proceed, it assumes that you are trying to add a duplicate Exchange Account. That’s why in almost all the configurations which incorporate Exchange Server 2003 when “Autodiscover” don’t succeed you will get the Error 0x80070057 When Auto Account Setup Process on Outlook.
In that case, use Registry to force Outlook so that it uses a locally saved Autodiscover.xml file for Autodiscover queries.
Note: Use this workaround only if you know how to deal and edit in Registry Editor. If you are a novice it may cause some serious problems if you modify the values incorrectly. So, to be on a safe side, see the way to Import and Export Registry Editor on Windows 10.
First of all, create the Autodiscover.xml file in your system. If you don’t know the procedure, just read it at the last of this article. While creating, put the Exchange Server 2003 server name within the <Server> tag.
Save this file somewhere locally on your PC or hard disk from where you can access it quickly.
Press hotkeys “Win+R” together to open Run dialog box. Here in the void space, type “regedit” and hit OK to access Registry Editor.
Now on the left sidebar of the Registry, go through this path.
“HKEY_CURRENT_USER\Software\Microsoft\Office\14.0\Outlook\AutoDiscover”
Switch to the right pane of AutoDiscover and create a new DWORD. Name the DWORD as PreferLocalXML.
| DWORD | PreferLocalXML |
| Value | 1 |
| String | the name of your domain |
| Value | the path of the Autodiscover.xml file that includes the file name |
Finally, simply create Outlook Profile by using the “Auto Account Setup” process.
If any of the above-mentioned workarounds fails to work, then give a shot to any third party software which would repair “PST files” on the system. There are ample of free applications available on the internet which would help you in resolving this problem.
How to create Autodiscover.xml file on your PC?
First and foremost, open Notepad on Windows 10 based device and copy/paste the following code. Again save this file with .xml extension somewhere on your computer.
<Autodiscover xmlns="http://schemas.microsoft.com/exchange/autodiscover/responseschema/2006">
<Response xmlns="http://schemas.microsoft.com/exchange/autodiscover/outlook/responseschema/2006a">
<Account>
<AccountType>email</AccountType>
<Action>settings</Action>
<Protocol>
<Type>EXCH</Type>
<Server>E2K3.wingtiptoys.com</Server>
</Protocol>
</Account>
</Response>
</Autodiscover>
There is no doubt that Microsoft Outlook is considered as the prodigious email client for PC. It synchronizes all the messages from a different account at the same place and that too in a well-planned way. It provides different tools to manage mail account details like Calendar events, Journals, contacts, tasks and some other features effectively in the absence of internet connectivity. That’s why many users, as well as organizations, avail this application on their PC for managing home and office data. Hence, follow the above-mentioned workarounds and you will definitely get rid of Fix: Error 0x80070057 When Auto Account Setup Process on Outlook.