While upgrading your Windows there are several issues troubling people on a general basis. 0xC1900101+some prefix is the most common among them that occurs failing the installation process. Here, we are putting forward the solutions to 0xC1900101 – 0x50016 error code that may appear in Windows 11 or 10 when you upgrade.
The issue might occur in any case whether you are upgrading through Media creation tool, Upgrade assistant, or Windows update. Installation gets stuck at a certain percentage of installation before the error code appears. The issue, in most situations, occurs due to scantiness of space in the hard disk but sometimes other factors may also be a give rise to this problem. These are the presence of malware, 3rd party tool, corrupt or missing system files, obsolete or incompatible drivers, and other.
Error 0xc1900101 in Windows 11 and 10
Here is how to Fix Error 0xc1900101 in Windows 11 and 10 –
Way-1: Free up space
The root cause of this installation error is insufficient space so you must first ensure that your system has enough room. A successful installation of 64 bit OS requires 20GB. If you find your system lacking space then evacuate some using the following method –
Check the disk space –
- Press – Win+E.
- Select This PC from the Quick action navigation pane.
- Check out the space of the Local Disk (C:).
In case there is not enough –
- Click Search and type cleanmgr.
- Press Enter to launch Disk Cleanup pop up.
- Drive (C:) will be automatically selected; click OK.
- On the next window, select – Clean up system files.
- Again select “OK” on the Drive selection pop-up.
- When the Disk Cleanup for (C:) wizard appears, check all the boxes.
- Click on OK.
- From the confirmation dialog, click on – Delete files.
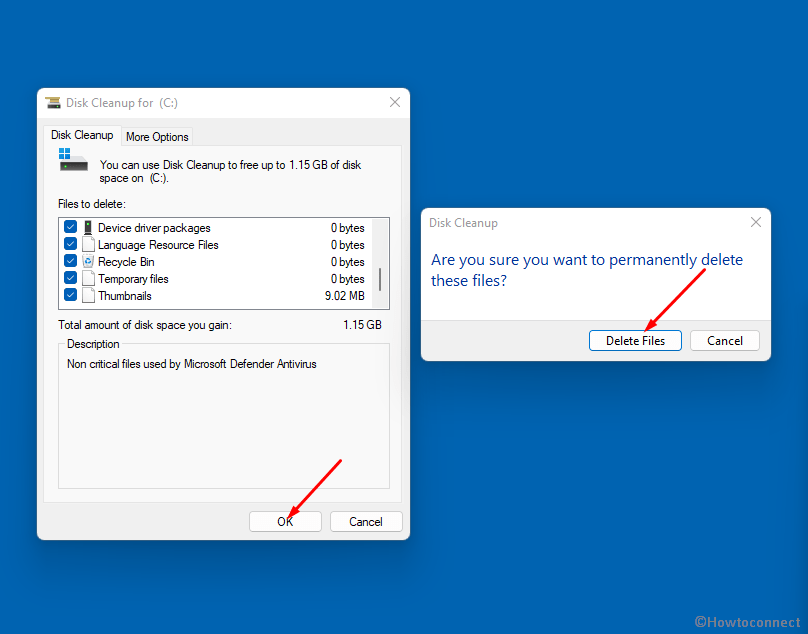
- After running this tool the space will obviously increase. Check if it can now fulfill your need, otherwise, seriously think about replacing or adding a hard drive.
Once there is enough space, the error 0xc1900101 might be resolved.
Way-2: Check Windows update multiple times
This is a tricky solution but many users confirm that running the update multiple times worked for them when they were trying to install Windows 11. As the installation failed with error code 0xC1900101 – 0x50016 don’t stop but be ready with another effort to start the process. Running the setup multiple times might help you to fix the install error.
Way-3: Run Windows Update troubleshooter
This utility is going to be the handiest If you are trying to upgrade the Operating system to Windows 11 through Windows update. The fix it tool will diagnose the reasons for the failure of the upgradatiion and repair them automatically. Move on with the steps –
- Go to settings (Win+I).
- Select the Troubleshoot option from the right pane.
- Click the Other troubleshooters.
- Locate – Window update.
- Finally, click on – Run.
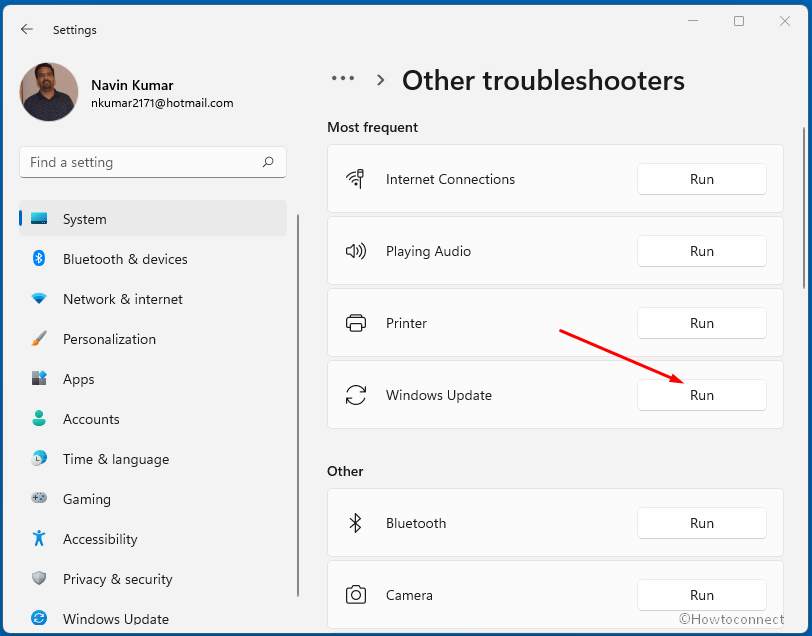
- After then go to Settings > Windows update and click – Check for updates.
Way-4: Disable third-party security software
Third-party security suites play the role of villain when installing Windows 11. They often cause conflicts and incompatibility issues that fail the upgrading process. Before starting the installation it would be a good idea to uninstall all third-party programs including the security suites.
- Press – Windows + I.
- Type appwiz.cpl.
- Hit – Enter.
- Program and Features window will be launched showing all the third-party programs within a list.
- Right-click on one and select – Uninstall.
- UAC pop up might prompt for confirmation, click – Yes.
- Now go with the suggestions given by the uninstallation setup of the software.
- Repeat the same for other programs if installed.
Way-5: Use Setupdiag and Error lookup tool
In case you are a pro user then Setupdiag and error lookup tool will help to fix this installation error. These are diagnostics and command line utilities that decode log files and find the reason what is causing the nuisance on Windows 11. Furthermore, the error lookup tool will store its own log file which could simplify the resolution process. Follow the steps –
- Download Setupdiag tool and Error lookup tool.
- Double click the SetupDiag.log to open it decipher the logs to find the factor.
- Follow the process relevant to required in the log file.
- Similarly use the Error lookup tool.
Way-6: Remove peripheral devices
Sometimes this method will work as a quick fix when getting 0xC1900101 – 0x50016. Remove all the extra peripherals like printers, scanners, storage devices, mouse, external keyboard, and whichever are connected then restart the computer. Only this action maiy make you capable to install the Windows 11. Once installed you are free to reinsert the peripherals.
Way-7: Update driver
Oftentimes, outdated drivers may lead to installation error 0xC1900101 – 0x50016 in Windows 11. But don’t worry Device Manager will help you to update the obsolete driver in only a few steps. Actually, the software creates messes and conflict in the middle of with the installation. Follow –
- Click the – Start.
- type – devmgmt.msc.
- Hit – Enter.
- Once Device Manager appears, go through all the devices and drivers in the list by expanding them using double click.
- If you find the mark of exclamation before anyone right click on that.
- Select – Update driver.
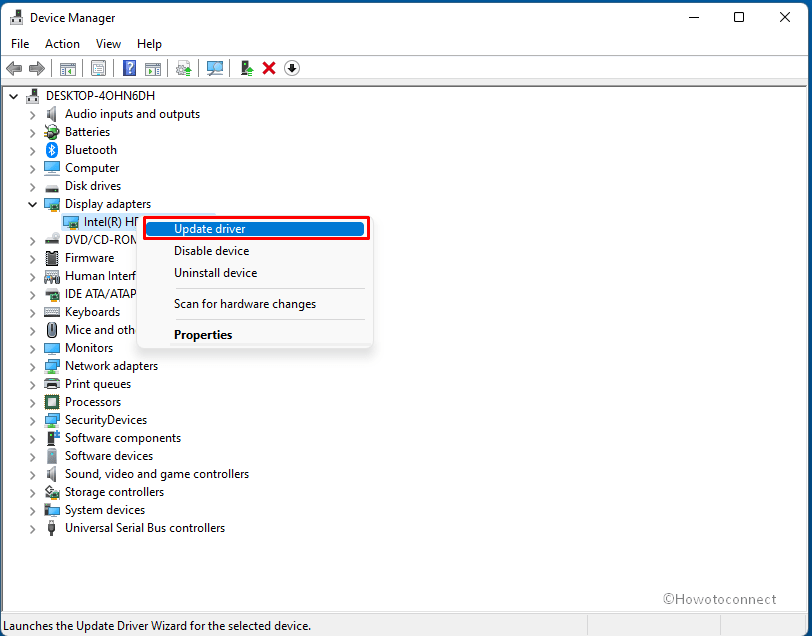
- From the separate window, select – “Search automatically for drivers”.
- Repeat the same process for every device showing the mark of exclamation.
- Restart your PC and check if Error 0xC1900101 – 0x50016 in Windows 11 and 10 is fixed.
Way-8: Fix hard drive errors
When install or upgrade error in Windows 11 occurs hard disk malfunctioning might be a thinkable reason for that. Hard drive or disk, being core hardware accommodates entire files and folders of Windows which the processor allows passing through different areas. Thankfully, Windows 11, as well as 10, provides some command-line tools to credibly deal with the troubles with the hard drive. This is called CHKDSK and once executed it detect and repair the hardware in 2 rounds of restart of the computer. It is pretty easy; follow the steps –
- Click on the Start.
- Type “CMD”.
- Press Ctrl + Shift + Enter.
- Select Yes on User account control.
- Once the command prompt window pops up, type
CHKDSK /F /R /X. - Next, press – enter.
- This command starts to repair the hard disk and a pop-up comes up prompting you to restart your computer.
- It is important to note however that you would require administrative privileges on your computer in order to run this command.
Way-9: Clean boot Windows
A clean boot works a curative when encountering installation error 0xC1900101 – 0x50016 on Windows 11. Starting with the least set of drivers and startup programs this functionality will minimize the chances of conflicts and bugging. In order to perform a clean clean boot of windows, you must –
- Click the Search.
- Type – msconfig.
- Hit – Enter.
- Once the system configuration window opens, head over to the Services tab and click on Hide all Microsoft services.
- Click – Disable all.
- Go to the Startup tab and
- Click on – Open Task Manager.
- Select one item at a time and click on Disable. Thus Disable all the located in the Startup tab of Task Manager.
- Close the Task Manager.
- Return back to System Configuration, and click on OK.
- Select – Restart.
Way-10: Fix corrupt system files and Windows image
When there is 0xC1900101 – 0x50016 error with upgrading Windows 11 installation Corrupt or missing system files might be a big factor. This issue happens due to third party software, potential threat, or manipulation of registry entries. However, you are able to deal with these problems easily via System File Checker as this tool has the capability of thoroughly detecting the components and repairing them. Let’s follow –
- Open command prompt as administrator.
- Type
SFC /Scannow. - Press Enter to run the tool and once completed reboot the PC.
- Now, type
DISM.exe /Online /Cleanup-image /Restorehealth. - Hit the – Enter.
- Restart your system and check if Error 0xC1900101 – 0x50016 in Windows 11 or Windows 10 is solved.
Methods list:
Way-1: Free up space
Way-2: Check Windows update multiple times
Way-3: Run Windows Update troubleshooter
Way-4: Disable third-party security software
Way-5: Use Setupdiag and Error lookup tool
Way-6: Remove peripheral devices
Way-7: Update driver
Way-8: Fix hard drive errors
Way-9: Clean boot Windows
Way-10: Fix corrupt system files and Windows image
That’s all!!