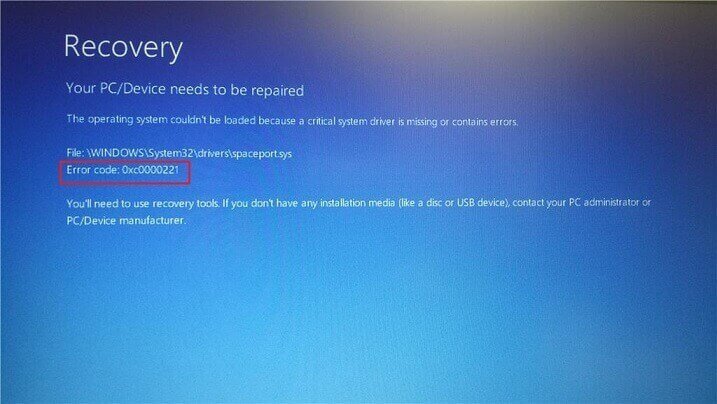
Error Code 0xc0000221 in Windows 10 commonly occurs when your system fails to boot. Sometimes you might be able to pass through this BSOD error and get into the login screen as this does not happen on every boot. But in certain cases, the Blue Screen of Death continues to appear with error 0xc0000221 and the system gets stuck in the Automatic Repair Loop.
There are various potential culprits that lead to this issue. It can be the hardware problem, Secondary GPU trouble, system file corruption, interruption of 3rd party applications and so on. This type of error code generally indicates the system level corruption. However, insufficient power or newly inserted RAM can also be the possible reasons. So, in this article, we will deal with various commands which will help you to trace out the problematic area and fix it automatically. Let us walk through all the workarounds in details and see which one is helpful.
Error Code 0xc0000221 in Windows 10 Solutions
Here are how to fix Error Code 0xc0000221 in Windows 10 device.
Boot into Safe Mode
The first and foremost thing you need to ensure that the problem is not facilitated by any third-party program. After you boot into the Safe Mode, you can ensure that there is no interference of the 3rd party app. But if it comes out that a certain software is a reason behind this, uninstall it right away.
Note: You will need basic files and drivers while being logged in Safe Mode.
If the BSOD Error Code 0xc0000221 does not show up the sign in screen, then use the “Windows installation media” such as DVD or USB Flash drive. So, insert the one that you have in its respective port.
Note: If you are able to pass through the sign in screen, then you can navigate to Settings Recovery through Run. Press Windows and R hotkey together and type ms-settings:recovery in the blank box. Click Restart and thereafter the system will get into the Advanced Startup menu.
For reference, see the way to Boot into Safe Mode from Login Screen.
Now consecutively press any of the keys such as Esc, Delete, F2, F8, F10, F12 or Backspace as per your computer’s manufacturer.
On the BIOS settings screen choose your favorite language followed by a click on the Next button.
After this move to the bottom left and select Repair your computer option.
In the Advanced Startup screen, go ahead with Troubleshoot. Click Advanced options.
Proceeding ahead, select Startup Settings. From the list of options, choose Enable Safe Mode.
Finally, make a click on Restart option and have patience until your PC starts in Safe Mode.
After successfully going into Safe Mode, try out the below-mentioned workarounds and see which one works for you.
Uninstall Recently Installed Program
The recently installed third-party applications might be the main factor to instigate Error Code 0xc0000221. It’s likely that the service from that specific application leads to the BSOD issue. So you need to identify this program and uninstall it right away to bypass the error.
Note: Ensure to have admin authorities to carry out these changes.
Step-1: Press Win and I hotkeys in order to open the Windows Settings application on the screen.
Step-2: Here, make a click on the Apps category. Go to Apps & Features section on the left pane of the following page.
Step-3: Switch to the corresponding side, locate and select the recently installed program.
Step-4: Hit the Uninstall button and go through the onscreen guidelines to completely remove the program.
Lastly, Restart Windows 10 PC and check whether this has wiped out Error Code 0xc0000221 or not. If not then try next workarounds.
Perform an SFC Scan
Another important thing to settle Error 0xc0000221 is to unearth the fault in your System files. The missing Windows files could be the culprit behind this issue. Therefore scan the system accuracy and repair the corrupted file. For this, you need to execute a System File Checker command.
Hit “Win + R” keys simultaneously open Run dialog box.
In the void box type cmd. Press “Ctrl + Shift + Enter” keys to access an elevated Command Prompt.
If the UAC prompts up, click Yes to give consent.
Henceforth on the black panel, type or copy/paste the given command and hit Enter key to run it right away.
sfc/ scannow
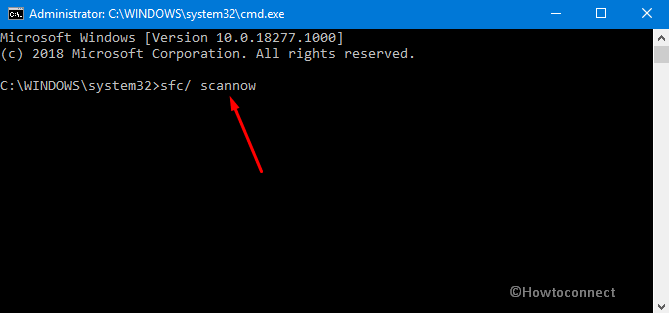
This will take a few minutes to complete the scan, so wait patiently.
After the successful execution of the command, reboot your Windows device and check whether the Error Code 0xc0000221 persists to occur or not. If you still receive the error, given an attempt to other fixes as well.
See more on this tool here – SFC /Scannow, DISM.Exe, CHKDSK.
Run CHKDSK Utility
If trying above steps does not find useful to rectify the Error Code 0xc0000221 then the issue lies in your hard disk drive. So the solution is to scan the disk’s bad sector and identify the real offender as well as repair the problem immediately. Here is how to proceed.
Go to Cortana and type Command Prompt in the search box.
Right click on the same result then select the option namely “Run as administrator” from the context menu.
Hit Yes on User Account Control to authenticate.
On the visible prompt, insert the following code followed by a hit on the Enter key.
chkdsk /f /C:
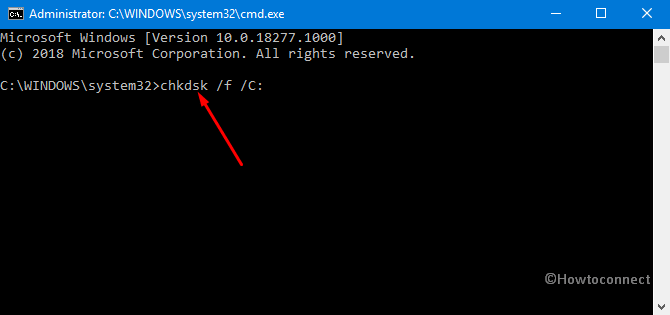
Note: In the above-mentioned command, chkdsk will work to check the disk. Whereas f denotes to fix the problem and C: is the disk drive where the operating system is installed. However, you can substitute the drive letter in which OS is installed on the PC.
Wait until the task is finished. Lastly, Reboot the PC and hopefully, this will overcome this BSOD issue.
Execute DISM scan
If the Error Code 0xc0000221 continues to stick in your PC then the DISM command might be a possible solution to fix this trouble. This utility command identifies the faulty Windows file and exchanges it from a new one which is downloaded from Microsoft’s official website. Here are steps to follow –
Right-click on the blank area of the taskbar and select Task Manager.
On the window that pops up, hit the File menu and choose Run new task.
Here, type cmd and ensure to tick mark the box against the option Create this task with administrative privileges. Click OK.
On succeeding window click Yes to permit the tool.
dism /online /cleanup-image /restorehealth
Note: Ensure that the internet connection is running while you execute the scan.
This command will take some time to complete scan, so wait patiently without interrupting the procedure.
Once you reboot the PC, check for the error.
Verify RAM for issues
If the above commands do nothing to overcome the Error Code 0xc0000221 then the problem might be in your RAM. It is complicated to scan the memory device but here we will discuss “Windows Memory Diagnostic” tool. It will test the whole RAM at one go easily and find the bad sectors on this device. Here is how to move ahead.
First of all, save and close all the active apps.
Thereafter go to Start and type Windows Memory in the search box.
Once the result comes up, make a click on Windows Memory Diagnostic. Moving on, select the option namely “Restart now and check for problems (recommended)”.
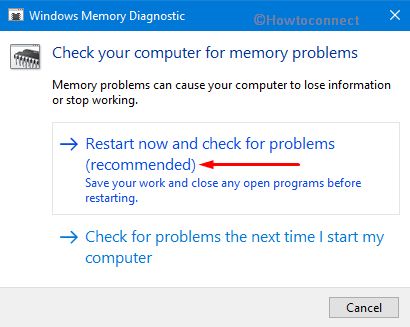
In just a moment you will see a blue screen window on the screen which will detect memory issues. Once the memory testing gets over 100%, the system will automatically restart itself.
You can see the test result in the notification area of the taskbar after signing up on your PC.
The same outcome could be carried out by navigating to the path: Right-click Start Menu => Event Viewer => Windows Log => System.
Hope this time it has managed to fix the Error Code 0xc0000221 on your Windows 10 device.
Remove Secondary GPU and External HDDs or SSDs
Several users on Windows forum have mentioned that the Error Code 0xc0000221 could get rectified by disconnecting all the unnecessary drives attached to your Desktop. There is a probability that there is a power issue which is not able to bear the power required for different drives.
All you have to do is to detach Secondary HDD, External HDD, DVD optical drive, Secondary GPU or Sound Speakers etc. and see whether doing this solves this bug on your computer. If your PC is now able to boot up properly without generating any BSOD, then try to reconnect them back one by one. In this way, you can identify the real reason leading to this situation.
If the above method doesn’t carry out any changes, try other fixes mentioned below.
Use Previous System Restore Point
If you have created a “System Restore Point” earlier on your PC, this might rescue you from this issue. It has been found that this problem could get generated if crashed “Windows Update” is causing random BSOD crashes. “System Restore Point” is a nice feature which will bring back your computer to an earlier point where it was working completely fine.
Note: If you don’t have any restore points, you can skip this and move to the next solution.
Right-click on Start and choose Run option.
On the Run box, type rstrui in the void box and click OK so that System Restore wizard opens up.
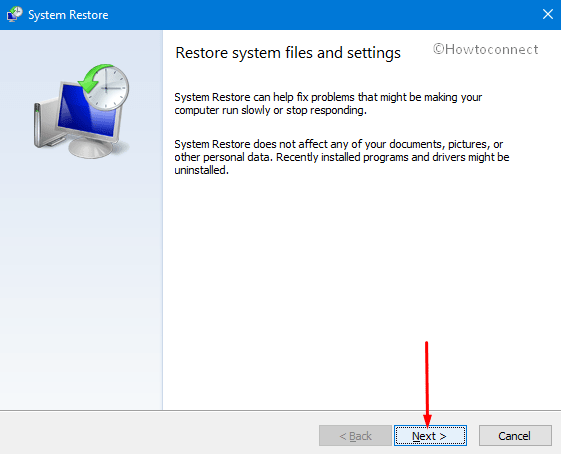
Here in the “System Restore” wizard, perform a hit on Next to generate your PC’s Restore.
In order to view more restore options, make a click on the checkbox against the box “Show more restore points” and click Next to go ahead.
Here select the latest restore point and hit Finish to let start this process.
Note: Make sure you have saved and closed all running applications before going through this procedure.
Perform a Clean Install
If all the above fixes went up nothing to help you, we strongly suggest you perform a “clean install” of Windows OS on your PC. However, make certain to keep a backup of your ‘personal files’ and applications as this prospect can lose your data. Installing clean Operating System could also solve the issue as this is the last resort but you can go for repair install as this will save time as well as data.
If you execute a clean install, this will swap any broken Windows Components which might have gone corrupted. Moreover, it will give you options to either keep all the files or remove everything.
That’s all!!!