FLTMGR FILE SYSTEM BSOD in Windows 10 is an error that occurs because of fltmgr.sys or Filter Manager file. The Blue Screen error is deadly and can even call in unrectifiable consequences when users make late to troubleshoot fixing it. Said BSOD error too has a bug check code of 0x000000F5 which means system has committed an unrecoverable failure in the Filter Manager.
Usually, fltmgr.sys file, in other words, Filter Manager makes sure that every single file in the system is stored in the Hard drive stays in their designated location. When there is a communication error that occurs between specific hardware accessory and the computer bus, FLTMGR_FILE_SYSTEM BSOD appears. From this hypothesis, it’s clear to say that, the issue is well-linked with defective hardware drivers as they serve the same purpose. Some experts claim corrupted files in the system are also responsible for the vulnerability too. Windows start rebooting all of a sudden with a firm BSOD error in it. To fix the drawback, we will cite a good number of workarounds in the below write up. Let’s begin –
FLTMGR_FILE_SYSTEM
Here is How to Fix FLTMGR_FILE_SYSTEM BSOD in Windows 10 –
Deploying the workarounds may be critical, in fact, impossible with a system continuously rebooting without showing any warning. Automatic Restarting will happen in a BSOD affected Windows for sure as to minimize the effect of damage. Therefore we proceed any further, this feature needs to be disabled using the below steps –
- In the beginning, save all the running programs and then close them preferably.
- Once done, press Win+D at once to head over to desktop area.
- Do a right-click on This PC icon.
- From the appearing menu, select Properties option.
- After System window opens up, click the “Advanced system settings” link located on left pane.
- Move ahead to the newly opened System Properties window and enter to its Advanced tab.
- Slide cursor down and click Settings button located under the Startup and Recovery area.
- Head to the System failure area and untick the box saying Automatically restart option.
- Finally, hit the OK button from the bottom to save all the changes.
Windows will no more go for Automatic Restarting and you can now try out the workarounds one after another to fix Blue Screen Error.
1] Update all drivers to fix FLTMGR_FILE_SYSTEM
FLTMGR_FILE_SYSTEM BSOD in Windows 10 happens due to the irregularity of communication between a computer bus and hardware accessory. In a very clear note, Drivers in the system do this job and maintain this communication. Therefore, when drivers are outdated, they cannot perform their tasks very well and Blue Screen error shows up. It’s a very easy task to update the drivers as we have Device Manager in the system. The platform shows outdated drivers with an indication mark and that helps to distinguish the dreadful ones. We will now update all the drivers in the system and guidelines are as follows –
- Open Run dialog box by selecting it from the Power User menu, pressing Win+X together.
- Type in the command devmgmt.msc in the text area provided.
- Select the Ok button from the dialog and let open Device Manager.
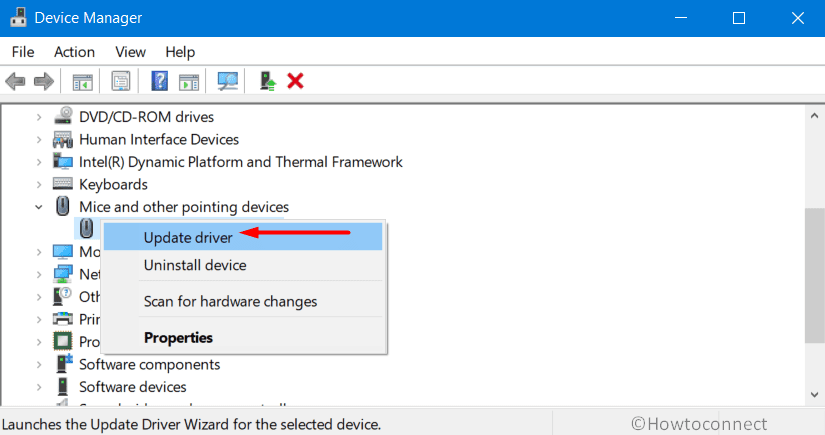
- Move across the console and click the device having an exclamation mark.
- After the devices split up, do a right-click on one having yellow indication.
- Choose Update driver option from visible context.
- Keep working in compliance with guidelines appearing on display until the task finishes.
- Repeat and complete the above tasks for all the outdated drivers in the console.
- After finishing the process, reboot Windows 10 and save these changes.
2] Roll Back driver and if necessary Disable it
As a matter of fact, updating the process for drivers was linked with Windows so that, the scope increases to keep them updated. With an active internet connection, drivers receive the latest updates and they are installed automatically. Unfortunately, that didn’t happen quite perfectly and people started getting more issues than usual.
Some drivers may receive an update that is detrimental for the device whereas some buggy files may also get installed behind your attention. So, if you are getting FLTMGR_FILE_SYSTEM BSOD in Windows 10 after a driver update, disable that device or Roll Back the driver as soon as possible. The process to accomplish tins task is as following –
- Open the Windows Device Manager as shown in the above workaround.
- Opt to the suspicious device whose driver needs to be rolled back.
- Click the device upon reaching to unveil its list.
- Do a right-click on the dreadful device and select Properties option.
- Once a new popup window floats on display, enter into the Driver tab.
- Proceed ahead to Roll Back Driver option and make a click on the same.
- Complete the process obeying the on-screen guidelines displayed.
- If you like to disable this device, choose Disable Device option visible there.
- When the processes end, restart the device to make the changes effective.
3] Update Windows 10 to fix FLTMGR_FILE_SYSTEM
Blue Screen Error FLTMGR_FILE_SYSTEM is a fatal drawback in the system. An outdated Operating System may easily be affected by it unless the user steps up to install the latest updates. In fact, regular updating the operating system keeps it far away from drawbacks and also gives you the scope to access latest tools or features. Microsoft releases a good number of updates, patches with numerable bug fixes every after an interval.
If the device is connected with an active internet, these update files will be downloaded automatically and you just need to reschedule the rebooting to make the new changes effective. Since the automatic process may cause additional setbacks, we prefer to carry out the task manually using the below guidelines –
- Press Windows key together with I to open up Settings app.
- From the appearing layout, click the Update & Security tile.
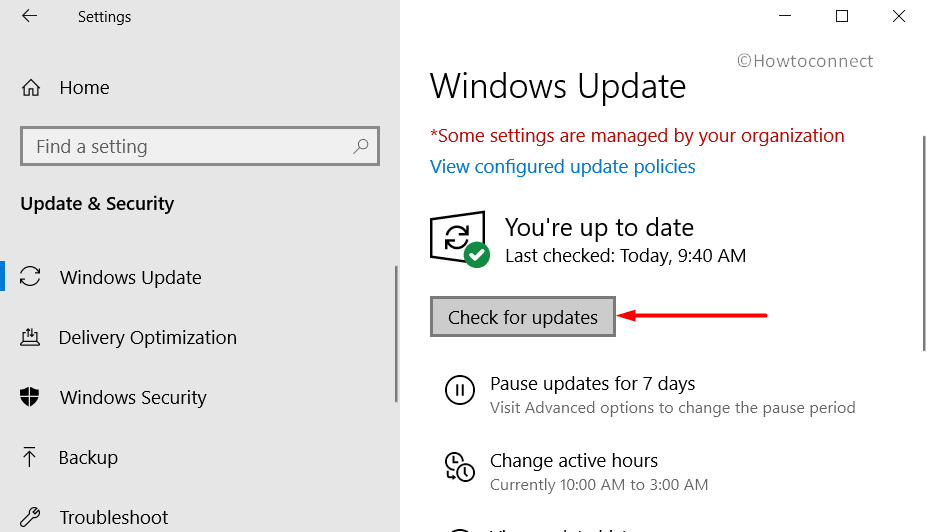
- Moving on to succeeding page, click Windows Update located at the left pane.
- Pass over to the corresponding right and click the button adhered to Check for updates.
- Once the searching is over, all the latest files will be available here, hit Download.
- Installing will take place right after the downloading finishes.
- Follow the next few steps as guided by the system to complete the process.
4] Fix malicious threats using Windows Security
FLTMGR_FILE_SYSTEM BSOD in Windows 10 usually happens from the corrupted system components as mentioned in the earlier part. Now, people may look to and fro with a reason to know how files usually get corrupted. The answer is simple actually and among so many reasons, infection from malicious invaders stands out strongly. Viruses are strongly coded programs and they are developed in order to get access to sensitive personal data. Later on, these bugs are pushed to various computers by means of web links, USB driver and other associated media. This malware gave replication property and they can easily transform an original file to them. When such bug sneaks through the defense line of a device, they will make the system files corrupted.
To avoid malware or virus attacks, an antivirus security solution is necessary so that you can maintain an unbreakable shield. Windows Security is a default utility from Microsoft is the best in service and it comes pre-installed in the system. It has a robust design and provides real-time protection to a device both On and Offline. To resolve the existing malware in the device using Windows Security, here are the steps to follow –
- Invoke Taskbar Search pressing Win+S keys together.
- Once the utility shows up, write security in the empty box.
- Choose the Windows Security app once the results appear.
- After moving to the app area, select Virus & threat protection from the left pane.
- Shift to alongside right and click on the Scan options link available here.
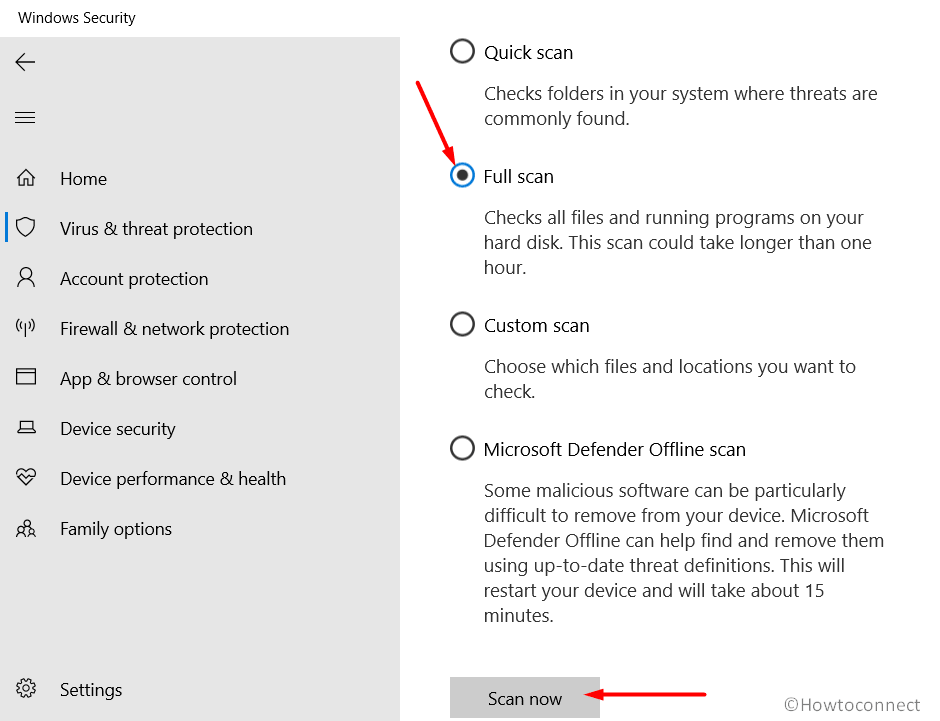
- When all the methods are available here, click on the radio button against the Full scan.
- Hit the Scan now button to begin the detection process.
- If the utility traces out malware in the system, the list of vulnerabilities will be displayed.
- Click the Clean threats option from there.
- Proceeding to the following window, choose Remove first and then Start actions to eliminate them all.
- Lastly, restart the Windows 10 to save all these changes.
5] Remove duplicate applications
Another prominent reason to cause Blue Screen error with FLTMGR_FILE_SYSTEM is missing system resources necessary to operate the OS smoothly. Usually, such files stay in a secured place in the device and no way can disappear unless something happens massive to the system. A software collision between similar programs can only create such fatality and eventually BSOD error take place due to missing system components. We often install applications unnecessarily knowing some of them may be useless.
Sometimes programs with different names but the same activity get installed and they are most likely to cause a collision in between. To keep the system free from such risk factor, we need to uninstall the duplicate programs as well as unnecessary ones using the below process –
- Press Windows key to launch Start menu.
- Click on the Gear icon to open Windows Settings.
- After the UI rolls over to display, select Apps.
- Moving on to the succeeding window, choose Apps & features located on the left pane.
- Jump straight on the right pane and reach to duplicate application you opt to remove.
- Select it and choose the Uninstall button from the expanded pane.
- User Account Control may prompt up, click on Yes to proceed.
- Once the process ends, restart the Windows to save these changes.
6] Rectify and recover missing Windows components
In the above two workarounds, we tried to minimize malware infection and software collision respectively. The intention was to prevent any system file to go missing or even corrupted. Because the reason for FLTMGR_FILE_SYSTEM BSOD is the absence of components whenever required.
Well, if you still have missing or corrupted Windows components, it can be fixed with System File Checker tool. This is a default utility put forward by Microsoft and it will activate in Elevated Command Prompt. The guidelines to accomplish this task is as follows –
- Unveil Power user menu by pressing Win+X hotkey at once.
- Select Run from there to launch it.
- Type cmd in the empty box of Run.
- Press Ctrl+Shift+Enter keys together to straight away Open Command Prompt as Admin From Run Dialog.
- After UAC prompts up for permission, click Yes to get through.
- Being transferred to the Elevated Command Prompt Window, enter below text at the base of the blinking cursor –
Sfc /scannow
- Now, the Pressing Enter key will activate System File Checker here on.
- The task of this tool is to find out corrupted as well as missing system components and rectify them using required measures.
- This task may take a quite long time, be patient and wait till it ends.
- After the process finishes, Restart the Windows 10.
- When you are back again in the next session, hopefully, there will be no BSODs in the system.
7] Use Default Windows Blue Screen Troubleshooter
Blue Screen errors all of a sudden started being so common with the users and the drawback was a treat to the existence of tech giants. To fight with the error was not easy since it was causing permanent damage to the system as well.
Microsoft considering the fatality, came up with an in-built utility to eradicate the chaos and resolving the issue. The tool was named Blue Screen Troubleshooter. To use the tool, follow the below guidelines –
Accessing from Control Panel
- Launch Taskbar Search and type “Control Panel” in the text space. Select the App when arrives in the search results.
- Once UI is loaded, click the dropdown menu beside View by option. Select Large icons and let the page be readjusted.
- Now, select Troubleshooting from the last row.
- Proceeding to the following window, choose View all option from left pane
- After the subsequent page unrolls, double click the Blue Screen option from second place.
- When the Troubleshooter wizard is upfront, click Advanced link from left bottom corner of this page.
- Moving into the next page, put a tick mark on the little box before Apply repairs automatically.
- From here, select Next button to initiate the process.
- After the troubleshooting ends and any issue is detected, the utility will guide you the further tasks. You just need to comply with on-screen guidelines to fix this error.
Using Direct Online Tool
- Launch any of the web browsers and visit Microsoft’s online troubleshooting page.
- When the web page arrives, head over to When did you get the error? Section.
- Do a click on the radio button from here based on your case.
- The page will unveil the stepwise tasks to resolve existing issue.
- Follow them to resolve FLTMGR_FILE_SYSTEM BSOD in Windows 10.
8] Perform System Restore
System Restore is the process of heading back the whole windows operating system to a previous state. Usually after installing a new program or removing, Blue Screen error with bug check code 0x000000F5 may happen. The reason is inserting invalid entries to Windows Registry due to incomplete installation or forced canceling of a process.
System Restore will be much favorable in such cases and the process will revert the state of Windows where there was no issue. To perform the task, steps are as follows –
- Access the Run dialog pressing Windows key and R at the same time.
- When the wizard is visible, type rstrui and click OK to proceed on.
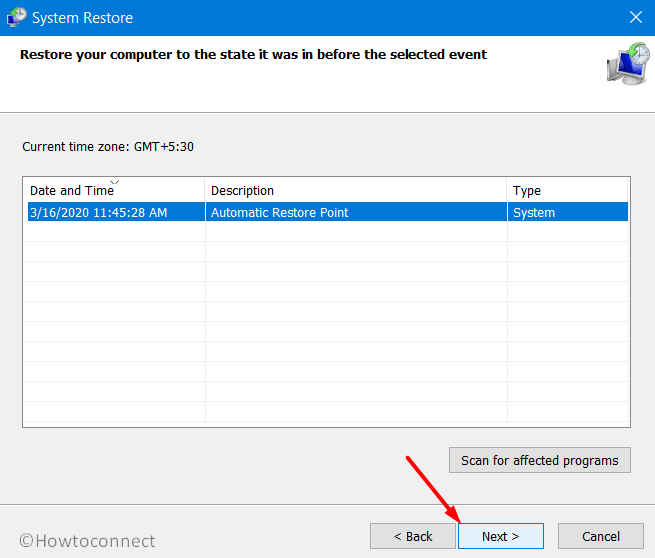
- When the System Restore wizard will arrive on screen, click the option that reads Show more restore points.
- After moving to the succeeding window, choose the latest Restore point and click Next from the bottom.
- From the succeeding page, click on Finish button and initiate the process.
9] Turn Off Fast Startup
Fast Startup or Fast Boot is such a combination of computer’s usual shut down process and hibernate that makes the booting faster in the succeeding session of Windows. It actually collects information on all running processes, data from the earlier session along with the drawbacks and errors too.
Therefore, with Fast Startup enabled, none can really resolve an issue including FLTMGR_FILE_SYSTEM BSOD. The reason behind this is, this setback will be carried over to the following startup keeping all internal information intact. Therefore, we need to disable this feature in order to resolve the problem. Guidelines are stated below –
- Move the cursor to the extreme right bottom end of Desktop and make a right-click on the battery icon.
- Choose Power Options from appearing menu.
- Once a new window opens up from Control Panel, select “Choose what the power button does” link from the left pane.
- After proceeding to the next page, click on Change settings that are currently unavailable to unveil the hidden options.
- Move a little downward and uncheck the box set for Turn on fast startup (recommended).
- Lastly, click on the button says Save Changes from the bottom.
10] Check Hardware areas for poor segments and repair them
Hard Disk stores all data in the device including system files, programs as well as other necessary things. Thus the same consideration as the soul of a device. Users continue using the same Hard Disk usually for life long and seldom go for replacing it unless fully damaged. That’s obvious but it needs to be maintained in a very sophisticated condition. So many workarounds are available to keep it in healthy condition.
But sometimes, bad areas are formed in it for being ill-maintained and that might end up causing FLTMGR_FILE_SYSTEM BSOD error. To fix those areas eventually resolve the Blue Screen issue, Disk Checking tool will be much handy. This utility is a default one and operates in Elevated Command Prompt only. The guidelines to use this tool is as follows –
- Launch the Taskbar Search pressing Win+Q hotkeys.
- Edit the search box and type cmd.exe in there.
- When Command Prompt arrives in the display, do a right-click on it.
- Choose Run as Administrator from appearing menu.
- After UAC floats up on display, click Yes to give consent.
- When shifted to the black window, enter below command tool –
chkdsk C: /f /r /x
- Press Enter key and immediately the Disk Checking tool will be activated.
- The utility will, therefore, detect all the poor segments in HDD and then resolve accordingly. As this process may take a good amount of time, schedule it accordingly.
- Once it finishes, Restart Windows 10 PC to save these changes.
11] Solve FLTMGR_FILE_SYSTEM by enabling Safe Mode
The booting process with loading only default programs and set up is referred to as Safe Mode. Safe Boot seems to appear pretty simple to users because it serves big and it will have a dual benefit. Once you perform this workaround, there is a chance that error will resolve immediately. If that doesn’t happen and error exists, it’s assumed that no default programs are responsible and the user can take actions accordingly.
This simple trick is prevalent from very old times and found to be beneficial for all in case of critical issues in Windows. The same can be used for resolving the Blue Screen error with bug check code 0x000000F5 as well. To boot Windows 10 in Safe Mode, follow the below steps –
- Press Windows key and S together to call upon Taskbar search.
- Type msconfig in the empty text box and select System Configuration when it appears in the result.
- After the System Configuration window will pop up, take yourself to the Boot tab.
- Head over to the lower half of this tab showing as Boot Options.
- Check the box against Safe boot to make all other options alive.
- Click on the radio button before Minimal.
- Lastly, hit the Apply button followed by clicking Ok to save these changes.
- Now, leave the System Configuration and press the Windows key.
- Do a click on Power icon and select Restart.
- Windows after rebooting for the first time will come at the Startup and you need to press F8 key continuously.
- Once the Advanced boot menu arrives on display, opt for Safe Mode from here.
- Finally, Boot into Safe Mode now.
12] Perform Clean Install of Windows 10
When all the resolutions stated above fails to resolve FLTMGR_FILE_SYSTEM BSOD in Windows 10, it’s hard to know from where the setback has originated. You might be in a dilemma on how to sort out the root cause and also fix it accordingly. In that case, Clean Install Windows 10 is more recommended than trying something that could be more complicated. If you have decided to perform a clean installation, prepare a bootable drive with the latest edition of Windows 10 i.e. a USB or a disk.
Relocate all the necessary as well as sensitive data to a secure place to avoid losing them. You can obviously do it by own self but in case of being less confident, call a professional for assistance.
Methods:
1] Update all drivers
2] Roll Back driver and if necessary Disable it
3] Update Windows 10
4] Fix malicious threats using Windows Security
5] Remove duplicate applications
6] Rectify and recover missing Windows components
7] Use Default Windows Blue Screen Troubleshooter
8] Perform System Restore
9] Turn Off Fast Startup
10] Check Hardware areas for poor segments and repair them
11] Enable Safe Mode
12] Perform Clean Install Windows 10
That’s All!!