Oftentimes when you left the Windows 10 PC unattended for a while, all of a sudden you may notice the system has stopped responding. In case you see stop code PDC_WATCHDOG_TIMEOUT this blue screen will be accompanied with bug check code 0x0000014F. This BSOD points out that a Windows component failed to take action within the share out time frame which is obstructing the system from exiting connected standby.
Generally, PDC WATCHDOG TIMEOUT blue screen error occurs because OS encounters a critical issue from where it can’t recover easily. In most cases, low-level software running in Windows 10 including faulty hardware driver, give rise to such a problem. Furthermore, malware infection, bad RAM, missing system elements, an outdated operating system, and software crashing are equally responsible.
PDC_WATCHDOG_TIMEOUT Solutions
Here is how to fix PDC_WATCHDOG_TIMEOUT error in Windows 10 –
Blue screen error forces Windows 10 to restart itself time and again in order to prevent data loss moreover further damages. As a result, you will find difficulty while looking for the root cause of BSOD. Furthermore, you won’t be able to deploy any workaround properly to fix the error. Therefore, disable automatic restart before jumping into the main solutions. Instructions are as followed –
- Press Win+D to reach out to the desktop screen.
- Right-click on This PC icon and select Properties from the context menu.
- Hit the link Advanced system settings present in the left sidebar.
- Doing so will bring forth System Properties wizard where Advanced tab is revealed.
- Click Settings button found under Startup and Recovery section.
- On the forthcoming wizard, reach to System failure segment.
- Uncheck the box set before Automatically restart.
- Hit the OK button to make all the changes effective.
As the changes are applied now, you can process with the workarounds without a hitch.
1] Disconnect external peripherals
PDC_WATCHDOG_TIMEOUT blue screen error mainly rises up due to plugged in USB accessories such as mouses, keyboards, monitors, and speakers. Most of us take help of external peripherals to have better user experience at the same time increase work productivity. Working without these kinds of stuff is really hard because a simple task seems horrible without them. But when these accessories found to cause blue screen error in Windows 10, you left with no choice rather than unplugging those.
Fortunately, you don’t need to disconnect the external accessories for always. Cut off the connection one by one and keep the peripherals in a safe place. After doing so, restart Windows 10 and check if the blue screen error still exists. If the issue doesn’t appear again, you can plug the items one after another. During the process pay attention to make sure if any particular product is giving rise to BSOD. If so, keep them unplugged for a while and reconnect later. In the worst cases, you might need to change the item itself or the wire connected through the USB port.
2] Disable or roll back drivers
Incompatible device drivers are another big reason to generate PDC_WATCHDOG_TIMEOUT blue screen error. If Windows 10 was running smoothly earlier and you started getting BSOD all on a sudden after making any changes in the system, there is a high possibility that a device driver got affected through the procedure. In such a case, either disable the suspicious driver or else roll back to a previous state. Here is the process –
- Click on the taskbar search icon and type device manager.
- Hit Enter when the same appears in the search results.
- When the Device Manager shows up, look for the devices whose drivers you want to disable or rollback.
- Bug check code 0x0000014F mainly becomes visible when Display and Network adapters become problematic. That’s why it’s better to focus on them in the first instance.
- Double click on Display adapters.
- From the spread list, right-click on the driver and choose Properties.
- When the dedicated wizard prompts, shift to its Driver tab.
- Click Disable Device or Roll Back Driver.
- Repeat the same for all drivers that exist in Display adapters and Network adapters.
- Upon completion, reboot Windows 10.
3] Update BIOS
BIOS is a fundamental part of Windows OS which allows to seamlessly set up a computer from the root level. After bringing a device freshly from the store, BIOS runs first as a program software because the microprocessor passes the first signal to it when the user power up a computer. The firmware maintains the necessary flow of data between the Windows 10 PC and the connected hardware accessories.
When your Windows desktop gives rise to critical errors like PDC_WATCHDOG_TIMEOUT, outdated BIOS could be the reason behind it. In such a case, you need to update it manually. While doing so, make sure that firmware you are downloading is compatible with your motherboard. As some motherboard models have multiple hardware revisions, it’s challenging to get the right one. Let’s see the procedure to update BIOS –
- Press Win+X together and select Run.
- Put msinfo32 in the blank text field followed by hitting Enter.
- When System Information appears, look for BIOS Version/Date.
- For quick access, type BIOS Version in its search bar and click the button Find.
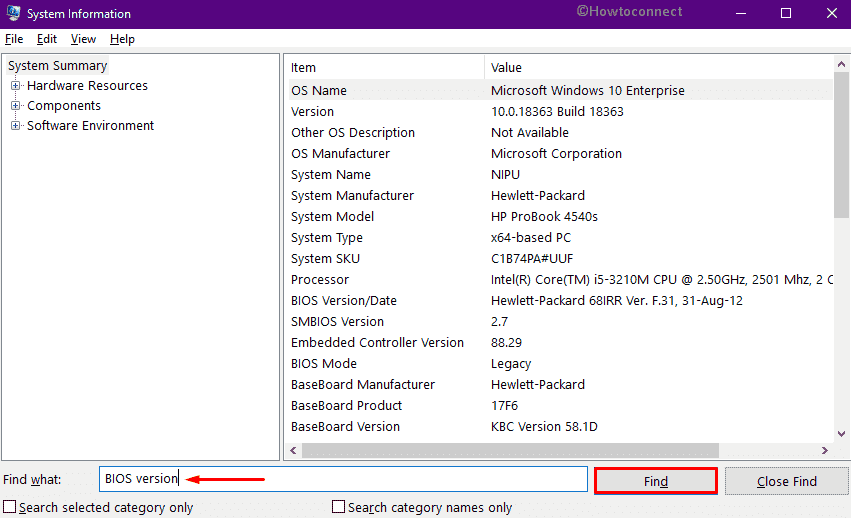
- Note down the related information for later use.
- Close the wizard and open a web browser.
- Navigate the manufacturer website for your BIOS using the info you noted down.
- Find the latest at the same time compatible version.
- After gettings, download the setup file first and then install it as well.
- Once done, reboot the device and check if PDC_WATCHDOG_TIMEOUT blue screen error still exists.
4] Download newer patch of Windows 10
Microsoft provides major updates twice or thrice a year but cumulative updates on a regular basis. These patches mainly contain new features, system settings, security patches, and bug fixes for reported issues. Windows runs on thousands of types of hardware and they all have different kinds of software installed. It’s impossible for Microsoft to test all those permutations before release. So, they release fixes every time a new issue rises up.
Usually, providing a newly released update is an autonomous process when you are connected with an active internet connection. But very often, the procedure gets disrupted due to poor connection or limited data usage. Furthermore, some people keep the Windows service deliberately thinking it’s useless. It’s a fact that an update doesn’t make your system super fast but they keep the computer more secure than without updates. Let’s see how you can download updates –
- Press Win+I at one go to bring forward Windows Settings app.
- Once it appears, click on Update & Security.
- When Windows Update page opens, move to the right pane.
- Click Check for updates button.
- If the system gets any newer patch, hit Download button.
- Upon completion of the download, the installation will take place automatically.
- During the procedure, be present in front of the PC as it may ask for manual restart.
5] Update device drivers to fix PDC_WATCHDOG_TIMEOUT
Device drivers are the sole component of Windows as they make the PC function smoothly by maintaining the relation between system and hardware. When they become outdated, incompatible, or faulty system generates several bugs and issues moreover make the OS slower than ever. PDC_WATCHDOG_TIMEOUT can be a result of the same corruption especially when Display and Network adapters become broken. Usually, all device drivers get updated on their own while installing an update for Windows 10 itself and you rarely need to take care of it.
Oftentimes, incomplete installation due to poor internet connection makes the driver corrupted. Furthermore, many of us exclude drivers from being updated before proceeding to carry out a Windows update. The settings remain same unless we include driver updates along with automatic update mechanisms again. Therefore, if you are not receiving any update for drivers, download the newer version manually for the outdated one. Steps are as followed –
- Press Windows key and R at once to invoke Run.
- Type devmgmt.msc in the command box.
- Click OK button.
- When Device Manager floats up, double-click on Display adapters.
- Right-click on the driver exists here followed by choosing Update driver.
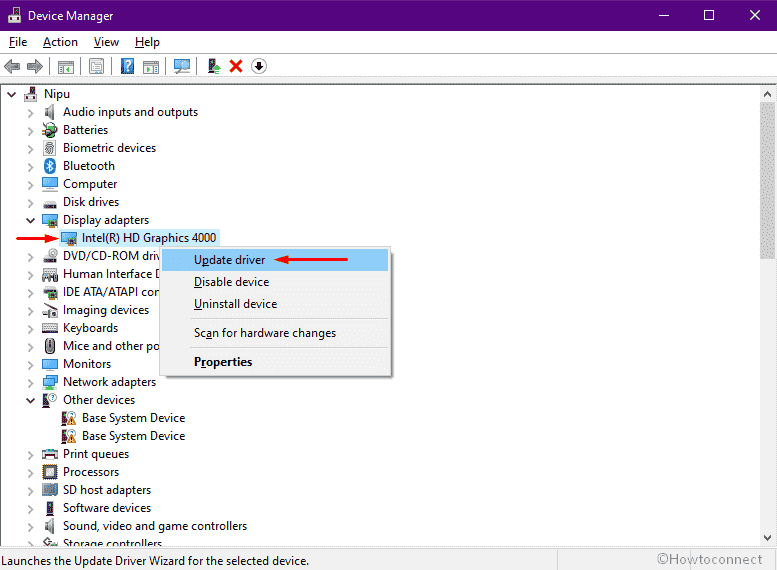
- From the forthcoming pop-up, go with the option Search automatically for updated software driver.
- If the system gets a newer version available, Device Manager will download and install the same automatically.
- After that, update drivers of Network adapters also the ones having yellow exclamations marks beside them.
- Once the procedure finishes, restart the PC.
Note – If Device Manager fails to get any update for the corrupted device driver, visit the manufacturer website of your driver and look if any newer and compatible version is available. When you discover any, download and install the same.
6] Recover missing system component
System files are the core component of Windows as they help the OS to operate according to plan. These elements could be part of a device driver or other types of resources and they usually don’t get corrupted themselves. There might be thousands of reasons to make system components corrupted among them virus attack, confliction of similar apps, and power surge are mostly found to be guilty.
When system elements go missing or become faulty, Windows registry also gets modified automatically in the wrong way. Under this circumstance, the system stops functioning properly on top of that throw out different types of error codes. To get rid of such a situation, System file checker utility comes handy. Once executed in elevated Command Prompt, the command-line will recover the missing files at the same time rectify corrupted ones. To run SFC, follow the below steps –
- Press Win+S to bring forth Windows search.
- Type cmd in the available bar.
- When you see Command Prompt at top of search result, press Ctrl+Shift+Enter keys at one go.
- Click Yes for the UAC that prompts for consent.
- Insert
Sfc /scannowat the base of winking cursor and hit Enter key. - Once the procedure hits 100%, check if the system automatically resolved all issues.
- If not, take the necessary action as per the system suggests.
7] Get rid of malware infection to fix PDC_WATCHDOG_TIMEOUT
In the era of internet, it’s almost impossible to stay away from viruses as they are everywhere waiting to break your security defense. They might be in the attached item of mails, not trustworthy webpages, or downloaded files from an unreliable website. Only a wong click is enough to give entrance to the malware.
After entering into your system viruses stay in disguise and keep replicating themselves to affect every single component. As a result, genuine Windows components go missing and errors like PDC_WATCHDOG_TIMEOUT rise up. If you don’t take action before it’s too late, the full system might get affected and you may lose important data. Here is how you can eliminate them –
- Open Windows Settings app.
- Continue with Update & Security.
- Select Windows Security from the left sidebar.
- Move to alongside right and pick the option Virus & threat protection.
- When the dedicated page comes into the view, click on Scan options link from the right pane.
- From the following page, click the radio button set beside Full scan.
- Hit the button Scan now to commence the scanning process.
- After completion, click Clean threats option if the utility track down any malware in the system.
- Following that, click Remove first and eventually Start actions.
- When the process ends, reboot Windows 10.
8] Check if the RAM has bad sector
When the system gives rise to PDC_WATCHDOG_TIMEOUT, you will notice that the Windows 10 desktop is frequently freezing moreover restarting time and again. This happens mostly due to RAM failure or when the memory stick has a bad sector in it. Though you can’t decide on this cause for sure, there is a tweak to know if the error is coming from corrupted RAM.
For that, reboot the Windows PC whenever the system slows down all of a sudden. If the system seems re-energized after powering up, you can be almost sure that RAM is behind this unexpected blue screen error. In such a case, Memory Diagnostic tool fixes the related issue automatically. Therefore, don’t rush to pull out the RAM sticks and replace them when an error shows up. If the diagnostic utility doesn’t work, better seek help from professionals. Let’s check how you can diagnose RAM –
- Open Run Dialog box in the first instance.
- Type in mdsched and then click the OK button.
- From the imminent pop-up, choose the option Restart now and check for problems (recommended).
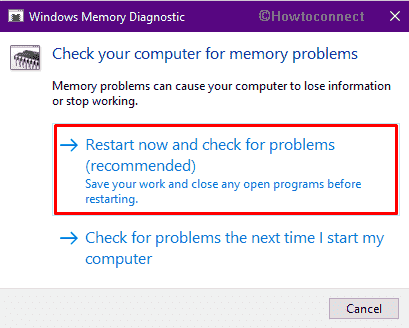
- Once the system powers up, a blue screen will become visible detecting RAM issues.
- When the process ends, Windows will restart itself for the second time.
- After signing in, look into the system tray to view the report of the diagnosis.
If you somehow missed the diagnosis report, don’t worry at all as Windows 10 allows you to get them manually using Event viewer. For that –
- Click the search icon from the taskbar.
- Type eventvwr.msc and hit Enter key.
- When Event Viewer makes an appearance, go to Windows Logs => System.
- Click the Find option from the extreme right column.
- On the upcoming pop-up, put MemoryDiagnostic and then hit Find Next button.
9] Run Blue screen troubleshooter to fix PDC_WATCHDOG_TIMEOUT
Sometimes BSOD errors are stubborn enough to get fixed easily. As of now, you have already tried out so many resolutions from updating device drivers to checking bad sectors in memory in order to fix PDC_WATCHDOG_TIMEOUT. If nothing worked, try out online troubleshooting guides that Microsoft provides depending upon the situation. Here are the steps to follow –
- Open a web browser you prefer.
- Navigate the dedicated page of Troubleshoot blue screen errors.
- Once there, move down to When did you get the error? section.
- Opt for one of the radio buttons from here based on your case.
- Doing so will bring forth some helpful links along the way.
- Comply with them to resolve the stop code.
10] Perform System restore
While installing software or uninstalling one, the system often tweaks some registry key. The Windows registry also gets affected in the wrong way when we forcefully end an uninstallation process in between for taking a longer time than usual. Apart from that, making changes in software, and system settings are also responsible to harm registries badly.
When this happens, Windows 10 lost the necessary component that is needed to run the system smoothly and also give rise to unexpected fatal codes along with blue screen errors. So, try to remember if you started getting PDC_WATCHDOG_TIMEOUT after any of these incidents. If so, you can revert back the system to an earlier state where the PC was running without any hitch. To do so –
- Click on Start icon and type in rstrui.
- Hit Enter key when the search result shows up.
- When System Restore wizard prompts, click the Next button.
- From the available restore points, choose the most recent one and hit Next once again.
- In the end, click Finish button to immense the procedure of restoring Windows.
Advanced tip – Check Minidumps file to find out the reason behind PDC_WATCHDOG_TIMEOUT
Minidump files got saved every time the Windows restart itself without any prior notice. As we said earlier, this type of unexpected shutdown mainly happens when the system struggles with blue screen error. However, by analyzing minidumps you can be assured that what actually gave rise to PDC_WATCHDOG_TIMEOUT in your system. The procedure may seem hard at first glance but don’t step back as it may help you to eradicate the BSOD. Follow the steps properly –
- Arrive at desktop area by pressing Win+D.
- Right-click on This PC icon and choose Properties from the context menu.
- Hit the link Advanced system settings from the left sidebar.
- Click Settings button you will get under Startup and Recovery segment.
- Make sure the checkbox of both Write an event to the system log and Automatic restart options are ticked.
- Choose Small memory dump (256KB) for Write debugging information.
- Put D:\Minidump as System Dump Directory or any other preferred location.
- Click OK button to save the changes.
- Later on, surf the official page of the Windows Driver Kit and download the compatible tool.
- When the downloading process finishes, go to the folder where the system saves downloaded files.
- Double-click the setup file you downloaded and install the same.
- After completion, .
- Insert the below command after winking cursor and hit Enter –
cd c:\program files\debugging tools for windows
- Thereafter, execute any of the following commands in the same Command Prompt –
windbg -y SymbolPath -i ImagePath -z DumpFilePath
or,
kd -y SymbolPath -i ImagePath -z DumpFilePath
- Following that, you will have to run the below command –
windbg -y srv*c:\symbols*http://msdl.microsoft.com/download/symbols -i c:\windows\i386 -z c:\windows\minidump\minidump.dmp
- In the end, navigate C:\windows\minidump\minidump.dmp directory and check the file properly.
- Once you get to know the culprit behind PDC_WATCHDOG_TIMEOUT, search the issue in Google to find out needed solutions.
Methods:
1] Disconnect external peripherals
2] Disable or roll back drivers
3] Update BIOS
4] Download newer patch of Windows 10
5] Update device drivers
6] Recover missing system component
7] Get rid of malware infection
8] Check if the RAM has bad sector
9] Run Blue screen troubleshooter
10] Perform System restore
That’s all!!