Several modern laptops running Windows include certain power features to adjust the screen brightness. Though users have many options to Customize Power Options, many experience various issues like Screen Dims When Unplugged in Windows 10. They complain that when the charger is plugged in, the screen becomes brighter, and after unplugging it automatically turns darker.
The previous versions of the Operating system also had this problem but users are going crazy as it occurred again. So, in this article, we will discuss some effective workarounds for this issue.
Screen Dims When Unplugged in Windows 10 Solutions
Here is How to Fix Screen Dims When Unplugged in Windows 10 –
1] Configure Intel Graphics Settings
The power feature in the Intel Graphics settings is one of the important reasons behind the screen Dims when Unplugged in Windows 10 issue. Experts suggest turning off the Display Power Saving Technology option to bypass this dimness problem. Here is how you will carry out this workaround –
- First of all, head to the desktop and right-click on an empty space. From the desktop context menu, choose Intel Graphics Settings.
- Intel UHD Graphics Control Panel interface will show up, go to the Power category at the bottom.
- Choose On Battery on the left sidebar. Ensure that Power Plan is set to either Balanced mode or Maximum performance.
- Select Disable under the option namely Display Power Saving Technology (see snapshot).
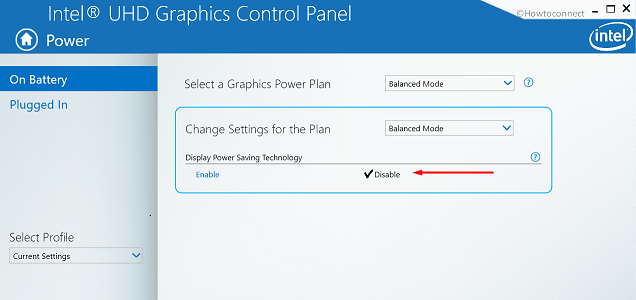
- Click the Apply button to implement the modifications and henceforth the brightness changes will not occur automatically upon changing the power status.
2] Update Display Driver to Fix Screen Dims when Unplugged in Windows 10
Sometimes, this annoying problem of Screen Dims when Unplugged in Windows 10 can be resolved by simply updating the display driver. For many computers, the issue has nothing to do with the power settings, but it is rather the display driver that creates a mess. So, just give an attempt to this as well and see how this works for you –
- Open Run dialog box and to do so jointly hit the Win logo & R keys.
- Insert the command devmgmt.msc and click OK. Once you access Device Manager, expand the Display adapters.
- Right-click on the devices listed one after another and choose Update driver.
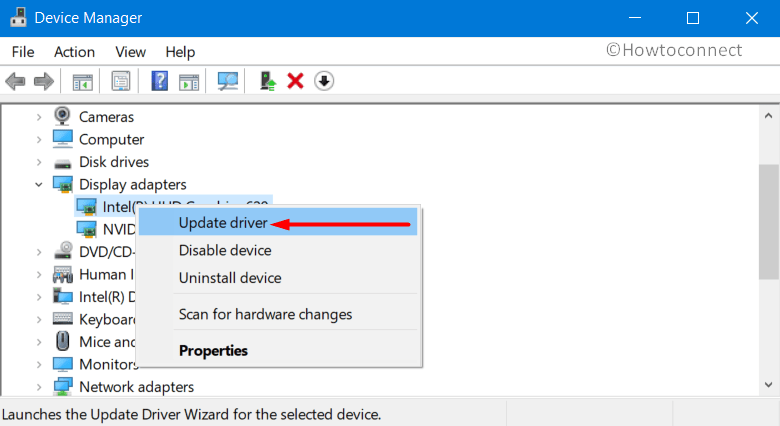
- The wizard will prompt with two choices, select Search automatically for drivers. Once the update and installation of the driver complete, Restart Windows 10 PC.
3] Run Power Troubleshooter
Windows provides a series of troubleshooting tools that help to detect and resolve the related issues quite promptly. So, to conserve more power and extend the battery life of the device you need to run the built-in Power troubleshooter. The utility will scan, detect, and thereafter attempts to fix the possible issues. Let us see how to bring this tool into action –
- Press Win & I hotkey to open Windows Settings, one of the main components of the operating system.
- Once into the interface, click on Update & security.
- Go to the Troubleshoot subsection on the left sidebar. Switch to the right pane and locate the Power option. Select it and click on Run the troubleshooter.
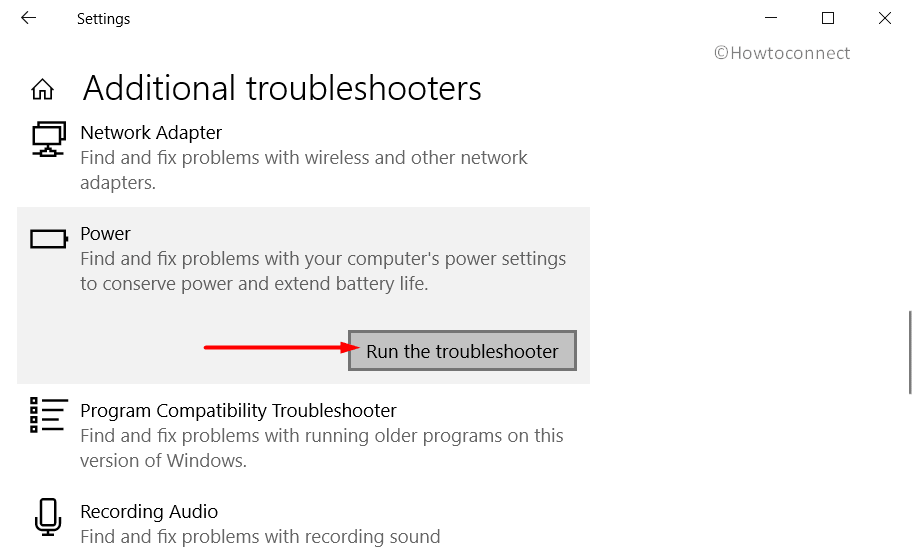
- The scanning will start and proceed ahead with the directions on the wizard to complete the process.
That’s all!!!