Many users complain that they encounter a frustrating error while creating system image backup on Windows 10. Commonly, the issue occurs shortly after starting when using an external drive to store the folder. The error message says – “There are no items specified to be backed up (0x80780172).”
Reasons for the System image backup error 0x80780172 might be stopped services, folder conflicts, and lack of enough room on one of the partitions or drive, etc. Furthermore, some basic configurations lack of permission could also cause the problem.
System image backup error 0x80780172
Here is how to fix System image backup error 0x80780172 in Windows 10 –
1] Check services
Services as administrative tools handle the processes on Windows to run different components successfully. System image backup is giving error indicates that the related services are not working fine and there might be an issue within them. So check whether any are creating problems using the following instructions –
- Press – Windows+S.
- In the search bar, insert – services.msc.
- Hit – Enter.
- From the listed services, find – Volume shadow copy.
- Check whether its status is running.
- If not, right-click the same and select – Start.
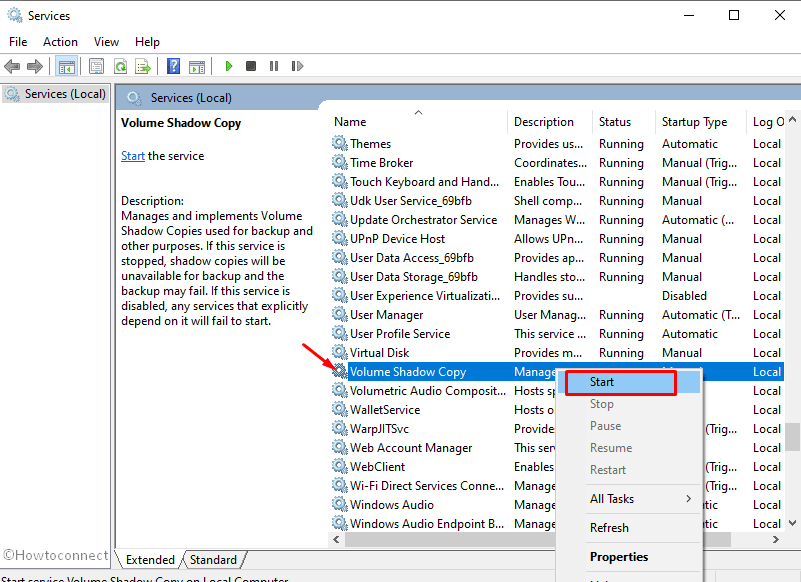
- In the same way, run File history service too.
2] Change the name of old backup folder
If previously a backup has been created and stored anywhere on the system it may create conflict with the current one and display an error message. Windows get confused about whether which folder should be processed in this situation and become unable to run the backup further. So rename the folder having backup currently –
- Press – Windows+E.
- Activate the search bar by pressing Ctrl+F.
- Type in – WindowsImageBackup.
- Hit – Enter.
- When search result appears, right-click on WindowsImageBackup and choose Rename.
- Change the name to WindowsImageBackup.old or anything you like.
- Now, Start taking backup and see if error 0x80780172 doesn’t occur.
3] Perform Clean boot to fix backup error 0x80780172
Clean boot lets Windows boot with a limited set of software and services and is helpful for diagnostic activities. This state reduces the possibility of software conflicts so that you could identify the root cause of system image backup error 0x80780172. Once the reason is dug out you can return back to the normal mode and resolve the issue using – How to Come Out of Safe Mode in Windows 10.
- Press – Windows+R.
- In the Run command, type in – msconfig.
- Click – OK.
- When System Configuration shows up, click the radio button of Selective startup.
- Untick the checkbox of Load startup items.
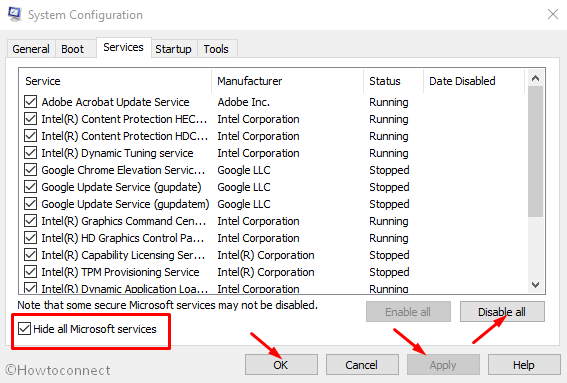
- Shift to Services tab.
- Check the box set before Hide all Microsoft services.
- Click – Disable all.
- Move to Startup tab.
- Click – Open Task Manager.
- From the newly appeared window, select an enabled program and click – Disable.
- Disable all startup applications similarly.
- Close Task Manager.
- When back to System Configuration wizard, click Apply and then OK.
- Reboot the PC.
- When in a clean boot state, try to create a system image backup.
Note – If the process takes place without any error, undo the changes to start Windows 10 as usual.
4] Ensure enough free space for System image backup
Space is the most important factor when you start creating System image backup. Less room in the disk is unable to accommodate the huge Windows backup folder and prone to throw an error message. Therefore, when you encounter 0x80780172, at first, check if the disk drive has sufficient volume that can hold the amount. If not, use an external device having a substantial capacity for keeping the folder.
5] Clean System reserved data
Many users report that cleaning system reserved data work like wonder to fix System image backup error 0x80780172. Follow the steps –
- Press – Windows+X.
- Select – Disk Management.
- Right-click in System Reserved and choose – Change Drive Letter and Paths.
- Click the button – Add.
- Assign a drive letter and then click – OK. For example X.
- Now, open Command Prompt as admin.
- In the black pane, insert – fsutil usn queryjournal X:
Note – Replace X with the letter you assigned as drive name.
- Hit – Enter.
- After that, execute fsutil usn deletejournal /N /D Z command too in the same way.
- Close Command Prompt.
- Go through steps 1, 2, and 3.
- Click the Remove button this time to delete the drive letter.
- Finally, try to create System Image backup and see if error 0x80780172 still persists.
6] Delete all previous restore point
However, system restore is one of the most indispensable utilities on Windows some of its settings coerce to consume a huge amount of disk space. This may create a hindrance while you require some more room to store the system image backup. Windows includes system protection that allows you to delete the points for a drive.
- Press – Windows key.
- Write down – sysdm.cpl.
- Hit – Enter.
- Shift to System Protection tab.
- From Protection Settings area, select – Local Disk (C:) (System).
- Click – Configure.
- From the bottom part, hit – Delete.
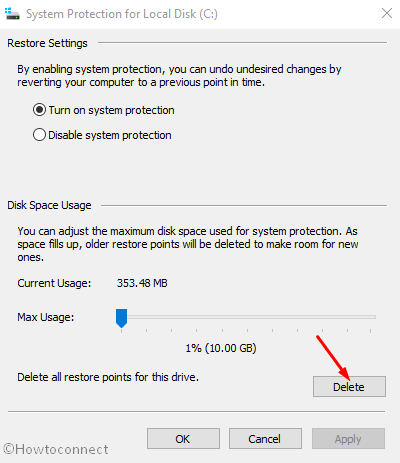
- To confirm the process, click – Continue.
7] Turn on Windows system protection
Windows 10 following its predecessors contains system protection for a local disk to revert back changes in case something bad happens. When you have gone for system image backup and a fatal issue occurred this setting will save you from unnecessary files loss.
- Right-click Start button and choose – System.
- From the right far column, click – System Protection.
- Select Local Disk (C:) (System) located beneath Protection Settings segment.
- Click – Configure.
- Select the radio button set for Turn on system protection.
- Click Apply and then OK.
7] Check for permissions to back up on the hard disk
Sometimes, lack of permission for local disk might also cause System image backup failed error code 0x80780172. However, getting permission for a user is a super easy method and all you need is to follow the instructions ahead –
- Right click on the drive you’re taking the backup and select – Properties.
- Click the – Security tab.
- Select the Grop or user names for whom you want to take permission.
- Check all the boxes for – Allow.
- Click on Apply and then OK to save the changes.
8] Make sure local drive is NTFS
In order to create a system image backup, the File system of the destination disk drive must be NTFS otherwise you will certainly go through errors. After ensuring don’t forget to format the hard drive if it is external. You can check the same as follow –
- Right-click on the – Start.
- Select – Disk Management.
- Once the console is on the screen, see the File system column.

Methods list
1] Check services
2] Change the name of old backup folder
3] Perform Clean boot
4] Ensure enough free space for System image backup
5] Clean System reserved data
6] Delete previous restore point
7] Turn on Windows system protection
That’s all!!