Stop error or blue screen issue is generated after a critical system crash in Windows 10 and restricts users from doing anything. VIDEO_DWMINIT_TIMEOUT_ FALLBACK_BDD BSOD is one of such setbacks appearing in the form of the error message. This is a critical issue that leaves very little chance for the user to recover a computer back completely. Once occurred, system will show you an error message on display having the name of the blue screen and a significant code. The mentioned error has a bug check value of 0x00000187 and it indicates that video fell back to BDD rather than using the IHV driver. This will always generate Live dump files.
Blue Screen of death is usually very stubborn and doesn’t have a proper fix to resolve as there is no fixed cause of origin. However, most of such issues are caused by the driver issues i.e. outdated drivers and if some of these receive a defective update. Furthermore, missing .dll files, faulty system elements, the formation of bad areas in hard disk, memory problems in windows, backdated BIOS can be named as strong causes. Sometimes hardware problems, low disk storage, kaput Windows image files can generate the error unexpectedly. As the exact reason is always unknown, you may have to try out a few workarounds in order to resolve VIDEO_DWMINIT_TIMEOUT_ FALLBACK_BDD blue screen error completely. We will discuss some on point workarounds in this write up, follow the quick links to navigate promptly. Let’s start –
VIDEO_DWMINIT_TIMEOUT_ FALLBACK_BDD
Here is how to fix VIDEO_DWMINIT_TIMEOUT_ FALLBACK_BDD Error in Windows 10 –
1] Restrict the Windows from rebooting automatically
Blue Screen error is a final phase of a critical system crash in Windows 10 and the action pushes the system to lose valuable resources. In order to save some of these key components, Windows will immediately activate its build automatic restarting feature. You will observe the computer is repeatedly going to reboot showing an error message indicating the name of the fatal code. At this point, the system will be inaccessible and you cannot avoid restarting even.
Automatic Restart is a default feature in Windows 10 comes pre-enabled from the time you buy a computer. This is a basic of the operating system as it can protect many important data from being damaged. However, it can be really annoying as well as a hindrance to troubleshoot the blue screen error and resolve it accordingly. Therefore, you can disable this feature for the sake of making the device stable and deploy the workaround. To accomplish the task, follow the below guidelines –
- Open the Run dialog by tapping the Winnows key and R together.
- Once the wizard arrives, type sysdm.cpl in the empty text box of it.
- Press the Enter key to open up System Properties Windows.
- Jump into the Advanced tab and scroll down to the Startup and Recovery zone.
- Click the Settings option located beneath to proceed.
- When the succeeding popup shows, move to System failure area and uncheck the box present before Automatically restart.
- Click the OK button from bottom part to save these changes.
System Properties will be re- adjusted after these changes being effective and Windows will not reboot unexpectedly. Therefore, system will be a bit stable and you can then apply the fixes accordingly.
2] Eliminate Malware threats using Windows Security
Viruses are the most dangerous vulnerabilities of a system as they can severe fatality once sneaked through the defense. No device is out of malware risk nowadays as of being connected to internet network always. Viruses nowadays a very much strongly coded as to hack personal data, make unlawful transactions and breaching company security and other fraudulent activities. But it’s not the end only, the bugs will make the system files corrupted. Sometimes most important dynamic link library (.dll) files may also be erased by them. The system will then encounter fatal crash leading to generate VIDEO_DWMINIT_TIMEOUT_ FALLBACK_BDD blue screen error in Windows 10.
There are other means using which the malware can disperse quickly such as USB devices, pen drives etc. If a strong security system is not there, they can dodge the defense easily and accommodate in the computer like usual files. In order to strengthen the security system, Microsoft provided Windows Security with a robust structure against strong malware like Trojans, spyware, and worms. A full system scanning using this program will help to detect the existing malware and thereby eliminating them. You can perform a system scan using below guidelines –
- Press the Windows key and open up Start menu.
- Approach alphabetically in the appearing app list and find Windows Security.
- Click the app and let’s open it in a separate window.
- From the left pane of the opened window, click Virus & threat protection option.
- Shift to adjacent right and click on Scan options link.
- Hit the radio button against Full scan and tap the Scan now button to begin malware search.
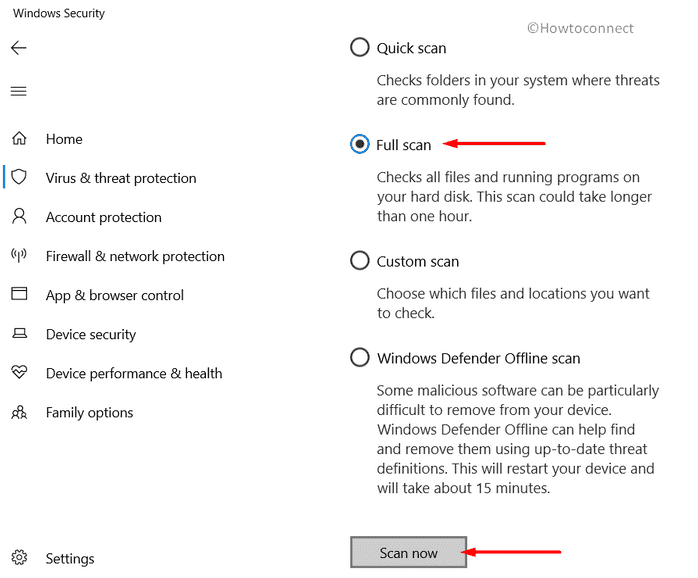
- Upon finishing the scanning, the app will present a list of detected threats on display. Click the Clean Threat option to get rid of them.
- From the next page, click Remove and then Start actions to clean up all the threats.
3] Install all the latest patches for updating Windows 10 to fix VIDEO_DWMINIT_TIMEOUT_ FALLBACK_BDD
Installing the latest patches does not only make the operating system updated but also make it stronger to stay safe always. The released Windows Update files always contain the structural modification, pragmatic tools, latest security patches as well as bug fixes for most reported issues. Installing these in time will make the OS healthy as well as secure keeping away all the bugs & issues. As the blue screen errors are a little bit mysterious, you may not find the exact cause from where it is evolved. A large group has claimed to resolve the VIDEO_DWMINIT_TIMEOUT_ FALLBACK_BDD Error simply by installing these patches.
In Windows 10, this updating process is autonomous and files will be downloaded followed by installing them after being available. For that, you have to keep the device connected with an active unmetered connection. Unfortunately, Microsoft delays the process oftentimes and the system runs with previous patches. In that case, install the patches manually using below steps –
- Press Windows key and I together to invoke Settings app.
- From the UI, click Update & Security tile and load additional settings page.
- Upon moving to the Windows Update page, jump to the right side.
- Click on Check for updates button.
- When all the update patches are visible, hit Download button.
- Installation will start automatically upon accomplishing the downloading.
- Follow the displayed guidelines and complete the updating process successfully.
4] Make all the drivers up to date to resolve VIDEO_DWMINIT_TIMEOUT_ FALLBACK_BDD
Outdated drivers cause the maximum damage in Windows and system generates blue screen error eventually. Device drivers being one of the most important part of a system, controls the interaction, communication between Computer bus and external hardware peripherals. Hence, Windows can detect the hardware specifically and executes the nominated task. Sometimes more than one driver is too necessary to accomplish a single function.
Outdated drivers are responsible for making a system non-function and rendering instability afterwards. In order to keep the system fully operational always, software vendors like Microsoft release qualitative updates for them after a certain period regularly. If you miss out some of these and leave them outdated, the system is at higher risk of a critical crash and thereby generating the VIDEO_DWMINIT_TIMEOUT_ FALLBACK_BDD Error. Device Manager is a very helpful application allowing you to update these drivers easily and amazingly you can identify the outdated ones seeing yellow indication on them. Therefore, follow the below guidelines and update the device drivers –
- Press Win+X hotkey to bring forward Power user menu and once appears, select Run.
- Type devmgmt.msc in the available bar and press Enter key.
- When the dedicated console is upfront, search for any mark of exclamation beside the devices.
- If there is any, expand the driver lists of same device by double-clicking.
- Now, right-click the driver that is marked with yellow indication and choose Update Driver option from the appearing context menu.
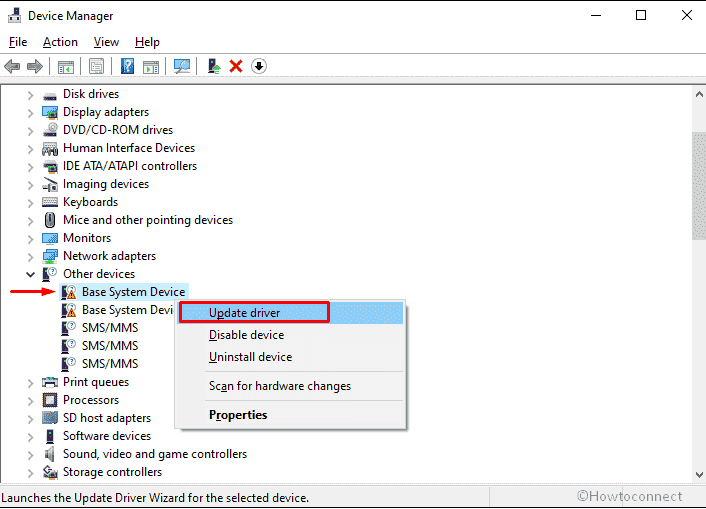
- When you see a small popup on display, continue with the option says Search automatically for drivers.
- System will start searching for available updates online. When it gets any, the system will download and install the driver automatically.
- In the same way, make all the outdated and defective drivers up-to-date.
- After doing so, restart Windows 10 machine for bringing these changes into effect.
5] Reinstall drivers that have received defective update or Roll back it to previous version
Updating the drivers usually is very helpful to resolve the VIDEO_DWMINIT_TIMEOUT_ FALLBACK_BDD bule screen error and most of the users have fixed it successfully. Unfortunately the same didn’t happen in few cases instead, caused additional trouble in the system. The reason is, software vendors including Microsoft Corporation often releases some buggy update for a driver installing which doesn’t really help. Some updates come with missing components as well and they cause additional trouble. Therefore if you have failed to resolve the blue screen error even after updating the drivers, the best way is to uninstall the device and re-install again.
Device Manager holds two most handy features in it namely Uninstall device and Roll back driver to manage the associated incompatibilities. Rolling back helps the driver in returning back to previous version deleting the recently received update. Follow the below guidelines and perform these tasks –
- Click the search icon from taskbar and type in devmgmt.msc.
- When you see Device Manager option at top, select the same.
- Once the particular window shows up, double-click the device whose drivers you want to modify.
- From the expanded drivers’ list, right-click the one that is doubtful and choose Properties.
- Shift to the Driver tab of newly turned up wizard.
- Click the button Roll Back Driver to restore the previous version of the driver. You can also continue with Disable button to make the driver inoperative.
- Comply with on-screen guidelines to finish the process completely.
- In the end, reboot the Windows and check if the error has resolved in next session.
Alternatively,
- When in Driver tab, click Uninstall.
- If a pop-up prompts for confirmation, give consent.
- After the task finishes, reboot Windows 10. When the desktop loads back again, the system will install the default version of uninstalled driver automatically.
6] Use Disk Cleanup tool and wipe out junk files altogether to fix VIDEO_DWMINIT_TIMEOUT_ FALLBACK_BDD
A computer system comes with fixed storage capacity and it remains the same until a user increases. Slowly after using, lots of files, important data, and entertainment materials start piling up in it and storage gets low. Adding with that, some useless temporary files, browser cache, shader cache, anti-virus logs, downloaded program files will occupy good amount of space unnecessarily. After upgrading the Windows to a newer build, gigabytes of update log files will be stored and previous ones will be useless unless you may try for a system restore.
Once the storage gets low with these junk files, normal operation gets affected, system will experience annoying lag and often generate VIDEO_DWMINIT_TIMEOUT_ FALLBACK_BDD Error as well. In order to make the device operation normal again, you can recover some space in the drive only by erasing these unnecessary items. To do so, disk cleaning tool is the handiest utility since you can choose the areas to delete and clean the files altogether. Process to run the tool, follow the below steps –
- Bring up Run dialog box by pressing Win+R keyboard shortcut.
- Put cleanmgr in the void text space and then click OK button.
- A small pop-up will open up asking to choose the desired drive you want to clear. By default, C: remain selected, so, you just need to click OK button.
- When Disk Clean for (C:) rolls out, hit Clean up system files from the bottom left.
- Again a small pop-up will prompt where C: is selected already. Just click OK button to continue.
- On the imminent wizard, check all the options lying under Files to delete. If some important files and folders remain in Downloads and Recycle Bin, make sure to leave them unchecked, or else system will be clear up them as well.
- Click the OK button from the bottom to start the cleaning process.
- To ask for final confirmation, a pop-up will appear. Hit Delete files button.
7] Remove unnecessary third party programs
Windows 10 is a self-sufficient operating system comprising of numerous handy tools, default applications, and amazing features to accomplish usual tasks. Yet, these programs are not always enough to carry out specialized operations and you might need additional programs for them. Despite Microsoft Store is the biggest platform to download applications, you may prefer to have some freeware from third-party vendors as well. All these third applications are not trustworthy always and often carries bug in them.
Furthermore, some programs with different names and the same functionalities will cause the worst software collision in the system. This often deletes some very important system files including .dll files leading the generate VIDEO_DWMINIT_TIMEOUT_ FALLBACK_BDD BSOD Error. We recommend you to restrain from installing applications unnecessarily especially the third party ones in order to avoid additional troubles. If you have already installed them and experiencing Blue screen error, remove them now using the below guidelines –
- Right-click on Start icon and opt for Run.
- Insert appwiz.cpl in the dialog box and hit Enter key.
- When Program and Features show up in a separate window, look for the apps that are prone to conflict such as third party anti-malware solution.
- Right on the same and select Uninstall.
- Click Yes when the User Account Control prompts for authentication.
- Uninstall all unnecessary apps you hardly use by following same method.
- After completion of uninstallation process, reboot the system and save these changes to it.
8] Detect the problems in Windows Memory to fix VIDEO_DWMINIT_TIMEOUT_ FALLBACK_BDD
Memory problems in Windows usually occur when the disk storage gets low and the hard disk is full of heavy programs. Some issues may also evolve from a defective RAM stick exposed to external damage. Memory issues had always been one of the most common causes to generate the VIDEO_DWMINIT_TIMEOUT_ FALLBACK_BDD BSOD blue screen error. To resolve this issue, you may have to replace the RAM unit which is not always welcomed. Hence before we recommend buying a new RAM, a diagnosis is really necessary to detect from where the error is generating actually and whether RAM is really defective.
Windows Memory Diagnostic tool is a tool you need in order to detect the problems in the memory unit. Upon carrying out scanning, the utility will send you report indicating the problems if you have any and you can take necessary actions then. To carry out the diagnosis, follow the below instructions –
- Press Win+S altogether and insert mdsched in the Windows search.
- Opt for Windows Memory Diagnostic from the appearing result.
- A pop-up will come up from where you need to click Restart now and check for problems (recommended).
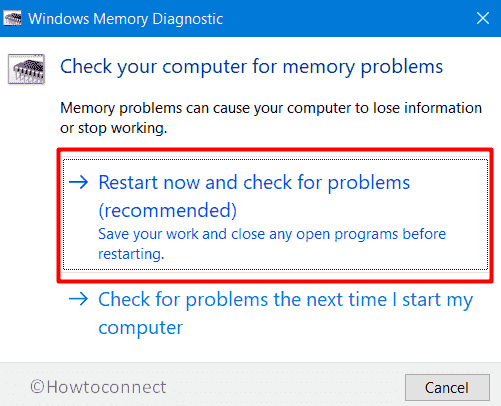
- Now, the system will reboot itself and when it powers up, you will see a blue screen detecting RAM issues.
- Once the process finishes, Windows 10 machine will reboot itself for the second time.
- After signing back in, look into the system tray to view the report of the memory diagnosis.
Oftentimes, people don’t get the diagnosis result in the system tray or close it by mistake. If this is the case, don’t worry at all as you can get the same from Event Viewer as well. For that –
- Type eventvwr.msc in the taskbar search and hit Enter key.
- When Event Viewer shows up in an individual window, navigate Windows Logs => System.
- Hit Find option exists in the far right column.
- In the impending prompt, type in MemoryDiagnostic followed by hitting Find Next button.
9] Boot Windows 10 in the trustworthy Safe Mode
Once the system experiences a fatal crash, no one can make the system up and running easily in a usual way. Instead, you can only boot the Windows in the Safe Mode with essential programs and settings. This is a very popular and trustworthy startup technique that helps in troubleshooting the critical issues like VIDEO_DWMINIT_TIMEOUT_ FALLBACK_BDD BSOD error. This special booting method allows only the essentials as well as default tools at the startup and opts out the third-party ones. If the error is no longer available in the Safe Mode, you can clearly understand that it was generated by a third party program. Understandably the troubleshooting gets a lot easier and you can take necessary actions to resolve the error.
Safe Boot Mode has another subcategory along with the conventional one i.e. Safe Mode with Networking. This is an advanced type of troubleshooting technique allowing network drivers additionally to aid internet facility. To carry out this workaround, follow the below steps –
- Launch Start Menu by pressing Windows key.
- Keep scrolling through the menu and locate and Windows Administrative Tools.
- Once found, select the same to expand its list and then click System Configuration.
- Transfer yourself to Boot tab of the new appeared wizard.
- Move down to Boot Options and then check the box set alongside Safe Boot.
- When the below options which were grayed out earlier become active, click the radio button lying before Minimal.
- Hit Apply button followed by OK to save the changes.
- Now, close the ongoing tasks if there is any to avoid data loss.
- Thereafter, press Alt and f4 hotkey simultaneously.
- From the appearing pop-up, opt for Restart available in the drop-down list.
- Click OK to let the system reboot.
- When the device is booting up, keep pressing F8 key until you see Advanced boot menu.
- In the next move, choose Safe boot option.
10] Run the SFC /scannow command to rectify corrupted system components
System files may oftentimes subject to corruption due to sudden power surge, power outage, virus attack, or windows update faults. After such corruption, a corrupted file loses its fixed structure and internal data is erased. Hence the file will appear as unreadable and generate VIDEO_DWMINIT_TIMEOUT_ FALLBACK_BDD BSOD error.
System File Checker tool is a default Windows utility in order to fix the corrupted components experienced severe damage. The same tool is a hotfix for recovering missing system components and dynamic link library (.dll) files. To run the utility, you have to execute a simple command in Elevated Command Prompt only. Rest of the detection tasks and fixing will be carried out by System File Checker automatically. The guidelines to run this tool is as following –
- Click the magnifier icon from taskbar and type in cmd.exe.
- When Command Prompt appears at top of search result, click the option Run as administrator from the right hand side.
- A UAC will rise up for affirmation, click Yes to agree.
- In the black console, put the below text at the base of blinking cursor and then hit Enter key to execute the command –
Sfc/ scannow
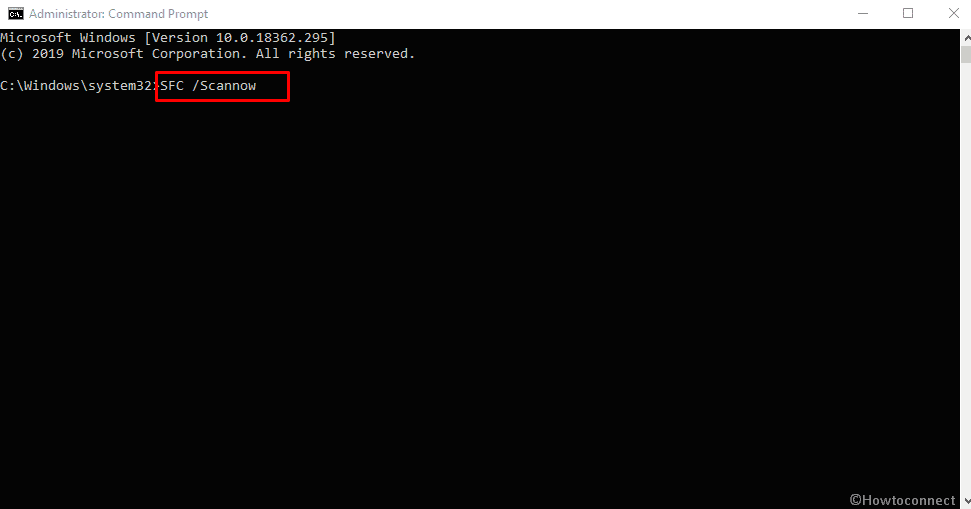
- Once System File Checker finishes its task, check the result carefully. If the utility couldn’t fix the existing corruption, do whatever it suggests.
11] Update BIOS of the Operating System
BIOS is the short form of Basic Input/Output System and it’s an integral part of the operating system that comes pre-installed with it. It is basically a ROM chip of a system located on the Motherboards and receives signal from microprocessor. The firmware is dedicated to help users set up the device from a very basic level and make it running. It’s the first software to run when you power on a computer for the first time. it energizes the system, manager data flow between Operating System and the attached accessories such as video adapter, keyboard, mouse, printers, hard disk, etc. it’s a volatile firmware, one a setting is saved can be recovered anytime even the BIOS is removed from the device.
BIOS has some very crucial tasks in the operating system being an inseparable part and one of the major components. It has access to Central Processing Unit on EPROM and the microprocessor passes control to it primarily. Therefore, outdated BIOS will make the system unstable as well as non-operational. Blue screen errors like VIDEO_DWMINIT_TIMEOUT_ FALLBACK_BDD may also evolve in a system whose BIOS is outdated. Hence, keep it updated always using below instructions –
- Press Windows key and X at one go.
- From the appearing list, choose Run.
- Type msinfo32 in the command box and then click OK.
- When System Information becomes visible, look for BIOS Version/Date on the right pane and note down the information displayed alongside this name.
- Terminate the System Information window and open a web browser you prefer.
- Visit the manufacturer’s page for BIOS using noted info.
- Choose the compatible version based on your system requirement and click Download.
- When downloading ends, go to Downloads folder and install the update files to make BIOS up to date.
12] Remove the defective Windows update patch installed last
We have mentioned before, blue screen error is an exceptional fatality and mostly having no fixed cause. Oftentimes VIDEO_DWMINIT_TIMEOUT_ FALLBACK_BDD BSOD error gets fixed easily with installing the latest patches and updating Windows 10. Unfortunately, many users have started receiving the same error again even after installing all the latest update files. The reason is, Microsoft releases some buggy patches installing which will be very much detrimental to the system. Furthermore, the process being autonomous, may also be stuck in an unexpected loop for poor internet connection sometimes.
If you have installed such a defective patch, Windows will face some severe fatality and experience additional issues. Windows has an option to uninstall a patch without affecting the usual operation of the system in the Control Panel. Therefore, uninstall those patches using below instructions –
- Use Win+I keyboard shortcut to launch Windows Settings app.
- When the app turns up, click on Update & Security tile.
- Once in the next page, move to its right pane.
- Click the option View update history.
- From the consequent page, hit Uninstall updates link
- Doing so will redirect you to Program and Features window where all installed update is listed. Locate the most recent at the same time dreadful one.
- Right-click the same and then choose Uninstall option from top ribbon.
- If the system comes up with any instructions, follow it to finish the process completely.
- Once you are done, restart the Windows.
13] Repair the bad areas in hard disk
If the hard disk is not really maintained in good condition, it will be very much prone to generate some severe issues. Being considered as the soul of the computer, it stores all the necessary components required to run the operating system. Despite being so important part, most don’t really care about its condition and let bad areas being formed in it. Usually, there are two types of bad areas among which hard or physical one evolves due to production fault or when the device is subjected to external damage. Logical or soft bad areas are software oriented and caused by sudden power failure or pulling a cable forcibly from the CPU.
Bad areas in the hard disk are more likely to generate the VIDEO_DWMINIT_TIMEOUT_ FALLBACK_BDD BSOD error in Windows 10. To repair them, we can use the disk checking tool which is a default utility in the operating system. The guidelines to run this tool is as follows –
- Manage access to the Elevated Command Prompt.
- When the black window turns up, enter below commands at the base of the blinking cursor and hit Enter after each one –
bootrec.exe /rebuildbcd
bootrec.exe /fixmbr
bootrec.exe /fixboot
- After successful execution, you need to run the below command in same console –
chkdsk C: /f /r /x
- Once the Disk Checking tool finishes scanning the system, it will fix the bad areas of hard disk automatically.
- All you need to do is restarting the PC so that the changes can be effective.
14] Dis-engage the problematic hardware peripherals temporarily
Hardware peripherals like mouse, keyboard, printer or speakers are the most popular used gadgets and also necessary for the operating system. Unfortunately, some of the users have discovered generation of VIDEO_DWMINIT_TIMEOUT_ FALLBACK_BDD BSOD error in their systems after connecting these peripherals. Though the issue can evolve actually due to some incompatibilities in USB adapters, it might be a mysterious reason too. Surprisingly, many users have resolved the error just by disconnecting them from USB ports temporarily. It might be one of the easiest tasks but carry out with utmost and perform restarting to Windows 10. Once the desktop loads back, check if the error is resolved successfully. You can again connect them and use normally after the error being resolved completely.
15] Fix the defective Windows image files using DISM tool
Windows image files are the snapshots of ISO files released before any major Windows Upgrade and saved in ISO- ISO-9660 format. These components can be later on used for making identical copies of that release in CD-R or DVD-R format. Often these files can be corrupted by some third party applications and end up causing a severe system crash. Hence, VIDEO_DWMINIT_TIMEOUT_ FALLBACK_BDD blue screen error may be generated in your Windows 10.
Defective Image Servicing and Management (DISM) tool is the best tool to fix these corrupted Windows image files once executed in Elevated Command Prompt. The application is so handy that, it can also be used for offline image files as well. To run the utility, follow the below instructions –
- Open Run Dialog box and type in cmd.
- Press Ctrl+Shift+Enter at once.
- Click on Yes when a UAC prompts for permission.
- When Command Prompt arrives with admin privilege, insert the below command and hit Enter –
DISM.exe /Online /Cleanup-image /Restorehealth
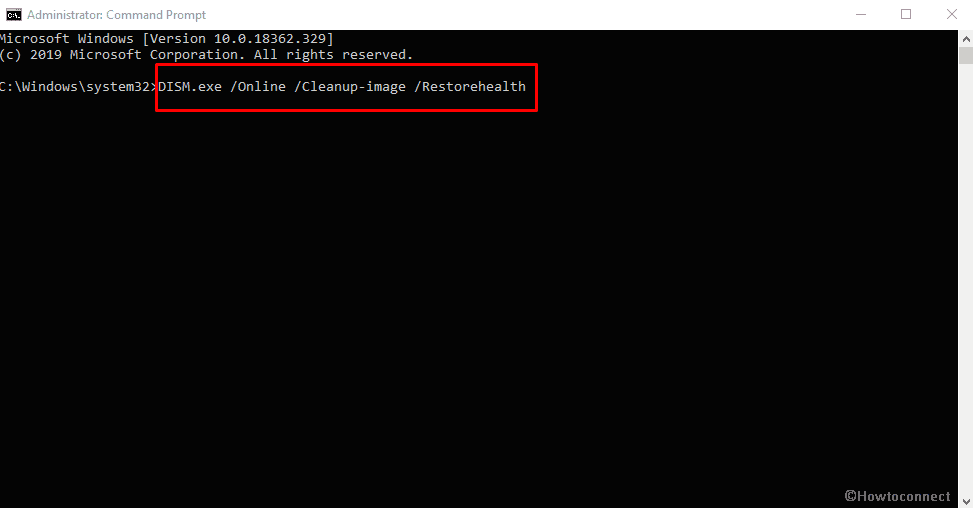
- Now the utility will start scanning the components in the system, and try detecting the defective image files. So, the process may take longer than usual.
- When finished, restart Windows 10 and check if the blue screen error still exists.
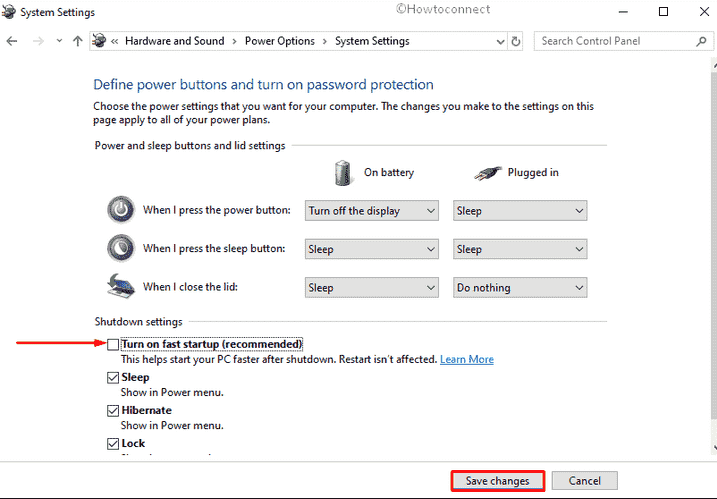
16] Disable Fast Boot mode in Windows 10
Fast Boot mode is a Windows built-in feature in order to make the startup faster and it comes pre-enabled with the operating system. This is a combined feature of traditional shutting down process and hibernate that saves necessary data from an ongoing session. These saved data are used to load the essential programs in the succeeding boot up and make it faster.
Fast Startup despite being an amazing option in Windows 10, can also be risky to carry over BSOD error data to the following session. Hence, the same error will circulate instead of being resolved completely unless you disable Fast Startup. Therefore, follow the below steps and turn this –
- Hover the mouse pointer to system tray and right-click on the battery icon followed by choosing Power Options.
- When the dedicated window floats up, click the link What the power buttons do from the left overlay.
- Once in the succeeding page, click Change settings that are currently unavailable link to reveal the hidden options.
- From the bottom part, uncheck the box set aside Turn on fast startup (recommended).
- Click the Save Changes button to make the modifications effective.
17] Perform System Restore and load previous Windows state
Windows may often act abnormally after installing a new program of deleting an existing one. The reason is, Windows registry can be modified wrongly when buggy software gets installed and invalid DWORDs are generated. Registry is the most sensitive part of a system and any invalid entry will lead to a critical system crash. The ultimate result can be VIDEO_DWMINIT_TIMEOUT_ FALLBACK_BDD blue error in Windows 10.
In order to resolve this problem, you may need to tweak the Windows Registry again which is quite a professional task and risky as well. Instead, there is an easy way out to bypass the generated issue by performing System Restore. The process will load back previous point of Windows where there was no trouble. Eventually, you may recover the computer from very severe damage like blue screen error. To perform System Restore, follow the below steps –
- Press Windows key and Q hotkeys together and open up Taskbar Search.
- Type Recovery in the provided text area.
- Choose Recovery option when the results are visible.
- After moving into a new from Control Panel, click Open System Restore link.
- A new popup will appear immediately, scroll down in it and click Next from the bottom end.
- Moving on to the following page, put a checkmark to the box saying Show more restore points.
- All the previous pints will be shown here now, select the most recent Restore point where you opt to roll back Windows.
- Tap the Next to proceed forward.
- Click the Finish button from the succeeding page.
- If a warning message appears, hit the Yes button to continue restoring.
- The system will automatically restart once restoring is completed.
- Once the desktop area loads back in the following session, you will receive a message mentioning Restoring has been done successfully.
Methods:
1] Restrict the Windows from rebooting automatically
2] Eliminate Malware threats using Windows Security
3] Install all the latest patches for updating Windows 10
4] Make all the drivers up to date
5] Reinstall drivers that have received defective update or Roll back it to previous version
6] Use Disk Cleanup tool and wipe out junk files altogether
7] Remove unnecessary third party programs
8] Detect the problems in Windows Memory and fix it
9] Boot Windows 10 in the trustworthy Safe Mode
10] Run the sfc /scannow command to rectify corrupted system components
11] Update BIOS of the Operating System
12] Remove the defective Windows update patch installed last
13] Repair the bad areas in hard disk
14] Dis-engage the problematic hardware peripherals temporarily
15] Fix the defective Windows image files using DISM tool
16] Disable Fast Boot mode in Windows 10
17] Perform System Restore and load previous Windows state
That’s all!!