Microsoft keeps providing various improvements in the forms of updates but getting them without having any issue seems like a daydream. Even though encountering unexpected error codes while installing an update is pretty common in Windows 10, every time it causes the same distress. Error 0x8007042B – 0x4000D is one troublesome issue people are experiencing lately and it prevents feature update from being installed. It mainly prompts during the second boot phase of the installation process. The same error can also show up in the middle of other Windows 10 updates and upgrades.
Windows 10 Error 0x8007042B – 0x4000D basically rises up when the data migration process falls out during the upgrade. After bringing forth the error, Windows reverts to its former state and rolls back all the changes that were made throughout the update procedure. Thankfully, the error doesn’t prevent the OS from functioning; it just leaves you in a state from where you’ve started. The reason behind failed data migration process is not clear yet and that is why it might be difficult to resolve the error. Since the fatal code doesn’t happen to every user, it’s pretty much sure that the problem doesn’t evolve due to buggy updates.
0x8007042B – 0x4000D
Here is how to fix Windows 10 Error 0x8007042B – 0x4000D installation failed in the second_boot phase –
1] Resolve corrupted system files
Due to corrupted system files, the update process often ends up with unexpected error codes. As a result, things don’t go as they supposed to moreover create additional difficulties. To find out whether damaged system components are triggering the update error while upgrading Windows 10, System File Checker will be handy.
Once you run the dedicated command line with administrative privilege, the utility goes through all of your system files to detect existing abnormalities. Furthermore, the found corruption also gets fixed automatically. To run the tool, follow the way –
- Press – Windows + S.
- In the search bar, type – cmd.exe.
- Choose – Run as administrator.
- To allow User Account Control, click – Yes.
- In Command Prompt, insert –
Sfc /scannow. - Hit – Enter.
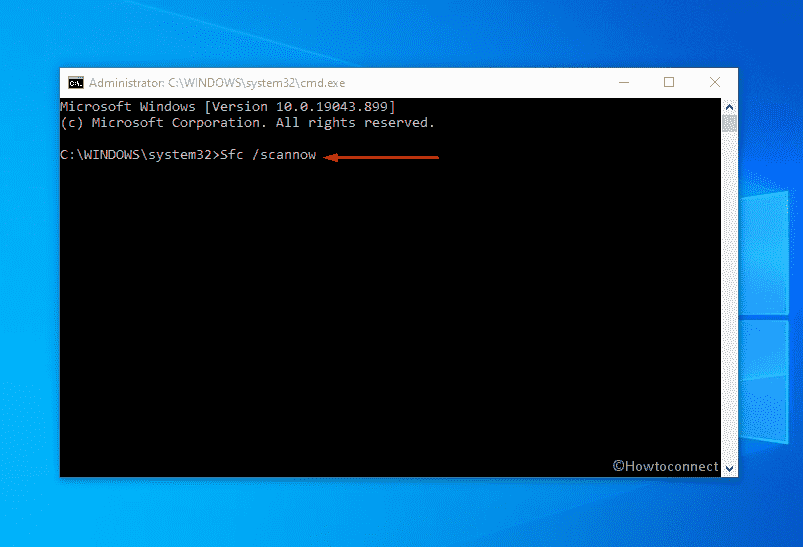
- After the completion of the scanning process, check the report thoroughly.
- If it describes the corruption is resolved, close Command Prompt and reboot Windows 10.
- In case System File Checker fails, execute
DISM /Online /Cleanup-Image /RestoreHealthin the same elevated Command Prompt. - Let the scanning process end.
- Once it reaches 100%, run sfc command the way you did earlier.
- In the end, restart your PC.
- After signing back in, check for update.
2] Run built-in Windows troubleshooter to fix 0x8007042B – 0x4000D
Since the actual reason for error 0x8007042B – 0x4000D is yet to be known, it’s difficult to say which workaround will actually work. Built-in troubleshooter that is dedicated to fixing update errors can be helpful in such a case. When you run the tool, it scans the system to find out what actually triggering an issue during the installation process of the latest patch. If the problem is not complicated, the utility will offer a fix that resolves the error automatically.
- Press – Windows + I.
- Click – Update & Security.
- From the left sidebar, select – Troubleshoot.
- Move to right-pane and then click – Additional troubleshooters.
- Select – Windows update.
- From the expanded pane, click – Run the troubleshooter.
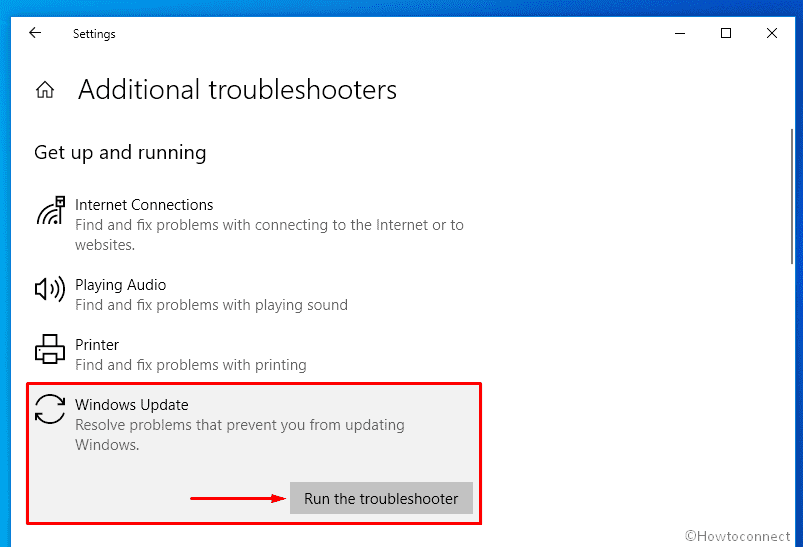
- Comply with on-screen instructions if any.
- If the utility comes with a resolution, click – Apply this fix.
3] Reset update components
If any of the update-related services is disabled or the old update files present on Softwaredistribution and Catroot2 folder is broken, error 0x8007042B – 0x4000D may evolve. Therefore, bring back the default state of update components so that the process of installing newer patches runs smoothly.
- Click the Start button and type – cmd.
- Press – Ctrl + Shift + Enter.
- When User Account Control prompts for your consent, click – Yes.
- Insert the following commands one after another and hit Enter after each –
net stop wuauserv
net stop cryptSvc
net stop bits
net stop msiserver
ren C:\\Windows\\SoftwareDistribution SoftwareDistribution.old
ren C:\\Windows\\System32\\catroot2 Catroot2.old
net start wuauserv
net start cryptSvc
net start bits
net start msiserver
- Finally, close the Command Prompt window and reboot your PC.
4] Disable third-party antimalware program to fix 0x8007042B – 0x4000D
If you are using third-party antivirus software instead of built-in Windows security, there is a high chance of conflict between the security suite and update files. To eradicate the issue and install the Anniversary update without error 0x8007042B – 0x4000D, uninstall installed third-party security program for the time being. If the latest Windows patch gets installed successfully after doing so, you can reinstall the application again.
- Press – Winkey + R.
- In the Run dialog box, write down – appwiz.cpl.
- Hit – Enter.
- From the appearing window, find the antimalware program installed on your system.
- Right-click the same and select – Uninstall.
- Follow on-screen instructions to complete the removal process.
- Try to get the update and check if the error still exists.
5] Clear pending.xml file
Error 0x8007042B – 0x4000D mainly appears after the second boot phase and prevents Windows 10 from completing the installation process. We don’t know why but many users get rid of this error after removing the existing pending.xml file. Hence, you should give it a try.
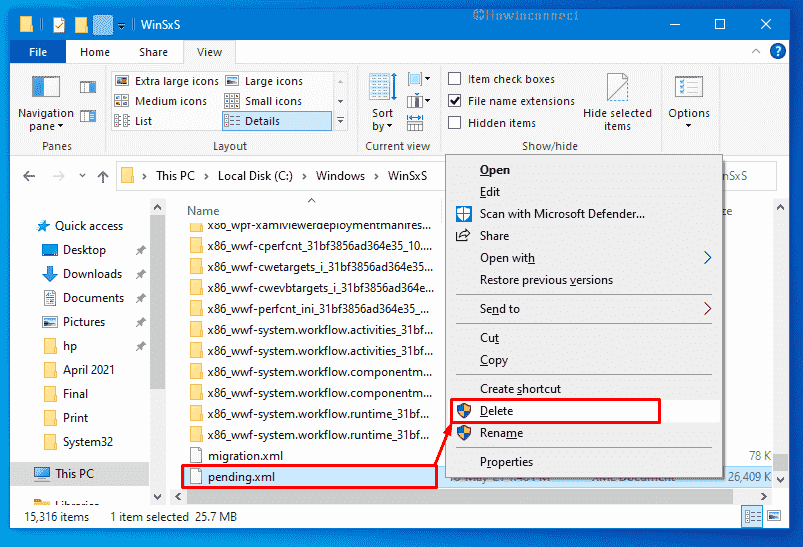
- Open Command Prompt as administrator.
- Insert the below line in the black pane and hit Enter –
del C:\windows\WinSxS\pending.xml
If the process fails, you can delete pending.xml file from File Explorer too. For that –
- Press – Windows + E.
- Navigate to – C:\Windows\WinSxS
- Find – Pending.xml file.
- Right-click the same and choose – Delete.
6] Perform clean boot
Some of the third-party applications or services oftentimes conflict with the inbuilt ones. This can obstruct the update process and trigger 0x8007042B – 0x4000D error during the installation. To start Windows 10 with limited programs and services, here is the process to follow –
- Press – Windows key.
- Type in – msconfig.exe.
- Hit – Enter to open System Configuration.
- Select the radio button set before Selective startup.
- Uncheck – Load startup items.
- Jump into Services tab.
- Click the checkbox present alongside Hide all Microsoft services.
- Hit – Disable all.
- Move to the Startup tab.
- Click the link – Open Task Manager.
- Once in the dedicated window, right-click on a program listed there and choose – Disable.
- Do the same for all startup programs.
- Go back to the System Configuration window.
- Click Apply and then OK.
- After starting Windows 10 in clean boot, try to download and install update.
Methods list:
1] Resolve corrupted system files
2] Run built-in Windows troubleshooter
3] Reset update components
4] Disable third-party antimalware program
5] Clear pending.xml file
6] Perform clean boot
That’s all!!