In this web-based era, hackers are always looking for a way out to make an entrance into your system and infect the device with malware. As most people are working from home lately, there is an alarming spike in the number of virus attacks. System vulnerabilities due to outdated OS is found to be guilty almost every time. That’s why keeping the Windows OS updated is mandatory. Though installing updates is an automatic process in most cases, getting them without any error is a real challenge. Windows Update Error 0x8007012f is one of such fatal codes that obstruct the system from installing the latest patch even after the download and installation progress reaches 100%.
Error 0x8007012f may appear anytime during app updates, system updates, security updates, or feature updates. Unlike other fatal codes, it doesn’t provide any information about what actually caused the issue. The probable causes might be old installer files present on your computer, poor internet connection, presence of malware, or antimalware program. As there is no fixed reason behind this Windows update error, we have prepared a method list that includes the most suitable solutions you can try to successfully resolve 0x8007012f.
Windows Update Error 0x8007012f
Here is how to fix Windows Update Error 0x8007012f –
1] Make use of Windows Update Troubleshooter
Built-in utility Windows Update Troubleshooter generally fixes potential issues that obstruct the system from installing a new patch. From renaming SoftwareDistribution folder, wiping out the old cache associated with Windows update, restarting the dedicated services, resolving and recovering corrupted update files, the utility does it all to fix the existing error code. In order to run the tool, here are steps to follow –
For Windows 10
- Press the – Win+I.
- Click the – Update & Security.
- Choose Troubleshoot present in the left sidebar.
- Shift to right.
- Click – Additional troubleshooters.
- Select – Windows update.
- Hit – Run the troubleshooter.
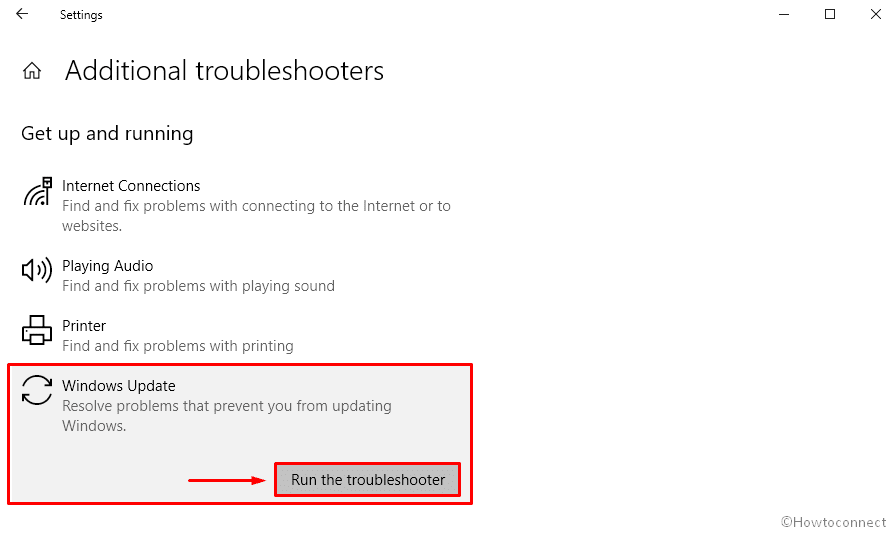
- Now, the tool will start detecting associated issues causing the update error.
- If it comes with a solution, click Apply a fix or else, follow the guidelines the utility rolls out.
- After completion, restart Windows 10.
For Windows 11
- Right-click on Start button.
- Choose – Settings.
- Move to the right hand side of appearing window.
- Scroll down a bit to find – Troubleshoot.
- Select the same and from following page, click – Other troubleshooters.
- Hit Run button present beside Windows Update.
2] Fix existing system corruption to eradicate Windows Update Error 0x8007012f
Corruption in the system may take place from a sudden power surge, software conflict, virus attack, and for some other reasons. Once an essential system element related to the update component goes missing or becomes faulty, Windows update error 0x8007012f may evolve. To resolve the corruption and restore the missing elements automatically, imitate the below steps –
- Press Win+S to invoke Windows search.
- Type in – cmd.exe.
- Press the – Ctrl+Shift+Enter.
- Click Yes when a UAC asks for consent.
- In the elevated Command Prompt, insert sfc /scannow and hit the – Enter.
- Let the scanning process hit 100%.
- Usually, the command line fixes the corruption that exists in your system. If the issue is critical, follow the instructions the utility suggests.
- Lastly, reboot the PC so that the changes can take place.
3] Bring back the default state of Windows update component
When the system fails to download or install an update because of error 0x8007012f, there might be a high chance that the update agent either has stopped working or there is some issue with the existing cache. The error may also rise up if Windows update service is unable to connect to the Microsoft servers. These problems will go away after resetting the component manually. For that –
- Open Command Prompt with admin privilege.
- Copy the following lines one after another paste into the command prompt and hit Enter after each –
net start wuauserv
net stop cryptSvc
net stop bits
net stop msiserver
- The above commands will immediately disable the Windows update service. The next process is to rename the SoftwareDistribution as well as Catroot2 folder. For that, execute the below commands one by one in that same panel –
ren C:WindowsSoftwareDistribution SoftwareDistribution.old
ren C:WindowsSystem32catroot2 Catroot2.old
- After doing so, re-enable the associated Windows update services that you stopped in the first instance. To do so, the following commands need to be run one after the other –
net start wauserv
net start cryptSvc
net start bits
net start msiserver
4] Remove pending.xml file
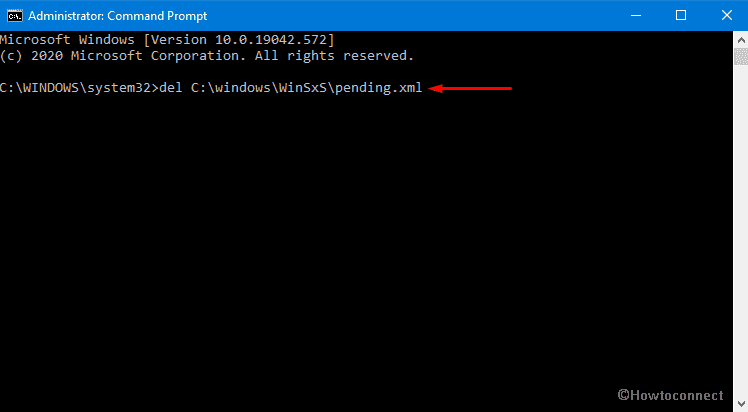
Windows update error 0x8007012f often appears even if the system shows that the downloaded and installation process is fully complete. Sometimes, you will also notice some pending Windows updates are refusing to install without any particular reason. Fortunately, you don’t need to do much to deal with those failed updates as these files can be deleted with a little tweak. Steps are as followed –
- Right-click on the Start button and choose – Run.
- Write cmd in the command box and then press – Ctrl+Shift+Enter.
- When a UAC prompts, click – Yes.
- Insert the below line and hit Enter –
del C:\windows\WinSxS\pending.xml
Or else,
- Open File Explorer by pressing Win+E hotkey.
- Navigate the following directory –
C:\Windows\WinSxS
- Look for Pending.xml file.
- Once found, right-click the same and choose Delete.
5] Clear out BITS queue
If BITS queue will have tasks in error state, the same will prevent the system from installing a new update successfully moreover, give rise to Windows Update Error 0x8007012f. To wipe out –
- Open elevated PowerShell or Command Prompt.
- Execute the following command –
bitsadmin.exe /reset /allusers
- After execution, restart the device and check if the Windows update error still exists.
6] Run Background Intelligent Transfer Service Troubleshooter to solve Windows Update Error 0x8007012f
Background Intelligent Transfer Service is one of the essential components as it helps the system and applications during foreground or background downloads and uploads between the Windows OS and a remote server. Anything wrong the same can give rise to Windows Update Error 0x8007012f. Before you run the dedicated troubleshooter to resolve the update issue, make sure the service is running. To check it –
- Press Win+R at one go.
- Click the Windows key and type – services.msc.
- Hit Enter to launch the Services console.
- From the newly appeared window, look for Background Intelligent Transfer Service.
- Double-click the same to invoke its Properties window.
- Set the Startup type to Automatic.
- Click Start button.
- Now, save the changes by clicking Apply followed by OK.
If error 0x8007012f turns up even when the BITS service is running, run the troubleshooter made for the same –
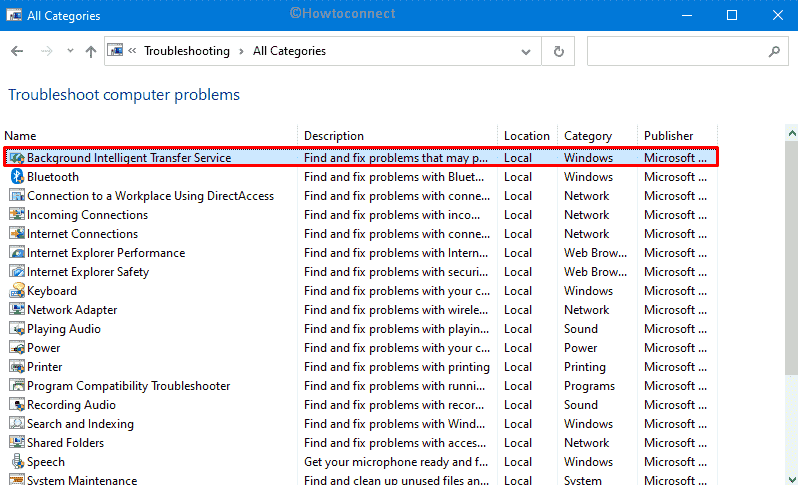
- Click the search icon from taskbar.
- Type in control and hit Enter.
- Set the control panel View by type to Large icons.
- Select the – Troubleshooting.
- Click the link View all present in the left overlay.
- Opt for – Background Intelligent Transfer Service.
- Click the – Advanced.
- Check the box set before – Apply repairs automatically.
- Hit the – Next.
- When the utility finishes detecting problems, click – View detailed information.
- Review the Detection details and then click the – Next.
- Close the wizard.
7] Disable antimalware program for the time being
Oftentimes, your security suite prevents the update from downloading and installing thinking that it has a virus or unwanted program in the download which is just a misinterpretation. To unblock the updates, put the antimalware program out of action temporarily.
Turn off Windows Defender Firewall
- Open Control panel.
- Set its view by to Small icons.
- From the available links, click the – Windows Defender Firewall.
- Select the link that reads – Turn Windows Defender Firewall on or off lying in the left column.
- Click the radio button set beside – Turn off Windows Defender Firewall (not recommended).
- Do the same for both – Private network settings and Public network settings.
- Finally, click the – OK.
- Reboot the PC.
Note – When the system powers up, check for error 0x8007012f. If it goes away, don’t forget to turn on the Windows Defender Firewall.
Disable third-party antimalware program
- Look for the antivirus program icon present in the Notification area. If you don’t see anything there, click the up arrow icon to get hidden icons.
- Right-click on the icon and choose – Disable. As the option may vary for different programs, therefore, you might need to select Stop or Shut down or anything similar.
- The app may also ask to choose a time slot after which it will be enabled automatically. Decide what you prefer.
8] Clean Install Windows to get rid of Windows Update Error 0x8007012f
If nothing from the above helped to rectify Windows Update Error 0x8007012f, try to install the build manually. This way, you will get a fresh version of Windows.
- Open a web browser you prefer.
- Navigate the official page of Microsoft Website.
- Click Download tool now.
- Visit the directory where the system stores downloaded items.
- Double-click the setup file you just got.
- If a UAC turns up, click the – Yes.
- Once Windows Setup wizard becomes ready, click the – Accept.
- Click the radion button present before – Create installation media (USB flash drive, DVD, or ISO file) for another PC and then hit – Next.
- Check if the Language, Edition, and Architecture for your computer selected by the system are correct. After making sure everything is alright, click the – “Next”.
- Select the radio button of ISO file followed by hitting Next.
- Pick a directory where you want to save the copy and then click the – Save.
- Once the downloading process reaches 100%, click the – Finish.
- Now, install the recent version of Windows using the downloaded file.
Methods list
1] Make use of Windows Update Troubleshooter
2] Fix existing system corruption
3] Bring back the default state of Windows update component
4] Remove pending.xml file
5] Clear out BITS queue
6] Run Background Intelligent Transfer Service Troubleshooter
7] Disable antimalware program for the time being
8] Clean Install Windows
That’s all!!