Windows update is a great feature on Windows to improve the experience and enhance security. Unfortunately, some issues prevent this from downloading and installing on your computer. 0x800f090 is such an error code you might encounter while receiving a patch or build. Sometimes, these types of problems are really hard to fix but you will find here some effective and easy methods to solve this Windows update error.
Error 0x800f090 may occur due to various reasons but in most cases, corrupted Windows update component is found culprit. Other possible causes to give rise to such errors are incompatible software, confliction of existing programs, malware infection, and non-Microsoft services.
Windows 11/10 Update Error 0x800f090
Here is how to fix Windows 11/10 update error 0x800f090 –
1] Reset Windows update components
If an error code is obstructing the system from downloading and installing a new update, the first thing you can try out is resetting component. Doing so will settle all issues related to Update agent and bring back the default state of Windows update component. Here is how to proceed –
- Press the Win+S and Type in the – cmd.
- Hit the – Ctrl+Shift+Enter.
- Click – Yes when a User account control dialog rolls in.
- Copy-paste the following line one after another and hit Enter after each one –
net stop wuauserv
net stop cryptSvc
net stop bits
net stop msiserver
- Now, enter the below commands by turn to rename SoftwareDistribution folder –
ren C:WindowsSoftwareDistribution SoftwareDistribution.old
ren C:WindowsSystem32catroot2 Catroot2.old
- To make the Windows update components work again, run the below commands –
net start wuauserv
net start cryptSvc
net start bits
net start msiserver
See for more detail – How to Reset Windows Update to Default in Windows 10.
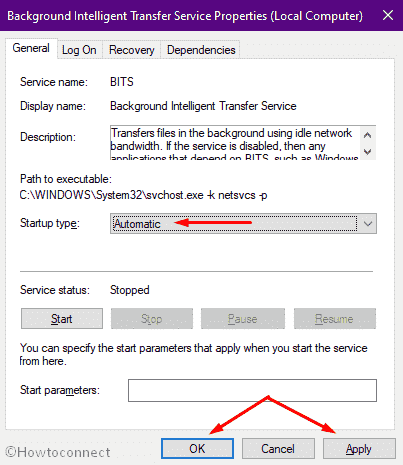
2] Make sure BITS is running
BITS is an important component of Windows because it helps the system to download files from Microsoft servers moreover assist the OS and applications during foreground or background downloads and uploads. The service also lets the system exchange files between the device and a remote server that too without impacting the network experience. If this feature stops working, Windows update process may fail with error 0x800f090. Therefore, make sure the service is running and for that go through the following steps –
- Click the taskbar search and type in – services.msc.
- Hit the – Enter.
- Look for the – Background Intelligent Transfer Service.
- Right-click the same and select Restart.
- Right-click on Background Intelligent Transfer Service once again and choose Properties.
- Set the Startup type to Automatic.
- Click Apply and then OK to save the changes.
3] Rename CBS log file
CBS refers to Component-based servicing and it logs files that let you know which component was modified during Windows update. These files hold all detailed information from the most recently installed patches and sometimes help to troubleshoot update errors. The same can be corrupted or create conflict and prevent the system from downloading a new update. Deleting the CBS log file will often resolve error 0x800f090 but if you don’t feel is safe, renaming the same will also work. Here are the steps –
- Click the Start, type in %systemroot%\Logs\CBS, and hit the Enter.
- Rename CBS.Log to something else.
If the system doesn’t allow you to rename, go through the below steps –
- Open Run dialog and type in – services.msc.
- Click the OK.
- Keep scrolling until you reach the – Windows Modules Installer.
- Once found, double-click the same.
- Set the Startup type to – Manual.
- Click Apply followed by OK.
- Reboot the computer.
- After signing back in, navigate C:\Windows\Logs\CBS directory.
- Rename CBS.Log to anything else.
- Restart the PC.
- Now, again launch Services console.
- Set the Startup type of Windows Modules Installer back to Automatic.
4] Fix error 0x800f090 with Windows Update Troubleshooter
Windows has a dedicated troubleshooter for update component that helps the system to fight back against any error that was obstructing the upgrade procedure. When you run this built-in tool, it will scan for the feasible causes responsible to give rise error 0x800f090 and suggest you fixes that are more likely to resolve the issue.
To run the utility in Windows 10 –
- Press Win+I keyboard shortcut.
- Click the – Update & Security.
- Select the – Troubleshoot.
- Go to the right-hand side.
- Click the link that says – Additional troubleshooters.
- Select the – Windows Update
- Click the – Run the troubleshooter.
- When the utility suggests any potential resolution, apply the fixes.
- Turn off the troubleshooter and check for the update error.
For Windows 11
- Press – Windows + I hotkey.
- Move to the right of Settings page.
- Scroll down a bit and click – Troubleshoot.
- Choose – Other troubleshooters.
- From next page, click Run present next to Windows update.
5] Try for manual update to eradicate error 0x800f090
Generally, Microsoft provides updates automatically if your system is engaged with an internet connection that is allowed to use unlimited data. When things are autonomous, there might be several reasons to obstruct the download process such as poor internet speed. To make sure the process runs without a hitch, connect your Windows PC with good Wi-Fi and then check for the updates manually.
For Windows 10
- Right-click on the Start and choose the – Settings.
- Opt for – Update & Security.
- Move to the right pane.
- Click the – Check for updates.
- Though the installation procedure takes place automatically, you might need to restart the system manually once.
For Windows 11
- Press – Win + I.
- Select – Windows Update from left sidebar.
- Move to right.
- Click – Check for updates.
6] Obliterate Windows Update download path
Registry keys play an important role to make sure all component runs smoothly. Anything wrong with any of its keys can give rise to unexpected error codes. The same goes for Windows update as well. When the associated string value goes corrupted, error 0x800f090 may arise and prevent the system from downloading and installing a newer update. If this is the case for you, remove related registry keys to eradicate the issue.
Note – Invalid Registry is harmful to PC as it can damage your OS moreover end up causing data loss, therefore, be careful while changing the key to avoid any further complication.
- Press the – Win+S.
- Type in regedit and hit the – Enter.
- Click Yes when a UAC turns up.
- Once in the Registry Editor, copy-paste the following string –
HKEY_LOCAL_MACHINE\SOFTWARE\Policies\Microsoft\Windows\WindowsUpdate
- Right-click on WUServer and choose Delete.
- Similarly, delete WIStatusServer too.
- Close Registry Editor and restart Windows.
7] Put antivirus program out of action to resolve error 0x800f090
Though Windows comes with a built-in antimalware program that ensures our security and keeps us safe from vulnerable threats, often we install some third-party software for the same purpose. While performing the same task, they may conflict with each other and cause the system elements to go missing. Or, there might be an instance when your third-party antivirus misinterprets the update file as a threat and obstruct them from downloading. Any of the reasons can be responsible to generate update error 0x800f090.
So, keeping the built-in Windows security in the system will be a wise decision to take. For that, you can either uninstall the third-party app or keep it disabled for the time being to check if the app is really responsible or not. To disable the app –
- Right-click on the antivirus icon present on the system tray.
Note – If you don’t get the icon, click the up arrow symbol first to view the hidden item along with the installed antivirus program.
- Opt for Disable or something similar.
- Choose a time slot to decide how long you want to keep the program disabled. Once the time limit ends, the app will be enabled automatically.
After disabling the app, Go to dedicated Windows update Settings page and Check for updates. If the updating process takes place without error 0x800f090, uninstall the app right away. Here is the process –
- Type in appwiz.cpl in the Run command.
- Click OK.
- From the appeared wizard, look for the installed antimalware program.
- Select the same and click Uninstall option from the top bar.
8] Clean boot Windows
Third-party services and apps are more likely to cause update errors on Windows 10 and 11 machines. To check out if this is the real culprit, clean boot the PC so that Windows can start with the least possible set of drivers moreover startup programs and services. Steps are as followed –
- Press Win+X at one go and choose Run.
- Insert msconfig in the dialog box followed by clicking OK.
- Click the radio button set alongside Selective startup.
- Uncheck the box set before Load startup items.
- Shift to Services tab.
- Select the checkbox present before Hide all Microsoft services.
- Click Disable all from the same wizard.
- Head over to Startup tab.
- Hit the link that says – Open Task Manager.
- You will be now redirected to Task Manager with Startup tab opened.
- Right-click on a program and choose Disable.
- Similarly, put all the apps available here out of action.
- Close the – Task Manager.
- Return back to System Configuration wizard.
- Click on Apply and then OK.
9] Clean up temporary files
Temporary files are made whenever you execute a task so that every information about the program is saved from time to time. These items help software to perform at a high level moreover start up quickly in the next session. Such temp files are more helpful when you are working on MS Word, PowerPoint, or editing software. It not only let the system start a program quickly but also helps to recover a file when your OS shut down or close without any prior notice.
However, if you don’t delete temp files at regular intervals, they may pile up and occupy a large amount of disk space. Furthermore, such files become useless after a certain period of time. Therefore, clean up them regularly to free up space moreover resolve update related issues. Here are the steps you need to follow –
- Launch Run dialog box (Win+R).
- Type temp and hit – Enter.
- Meanwhile, the “Temp” directory shows up, press Ctrl+A.
- Right-click on the selected area and choose Delete.
- After completion, wipe out user-related %temp% files too.
- For that, click the Start, type in %temp%, and hit the Enter.
- Delete the items available in the appearing folder.
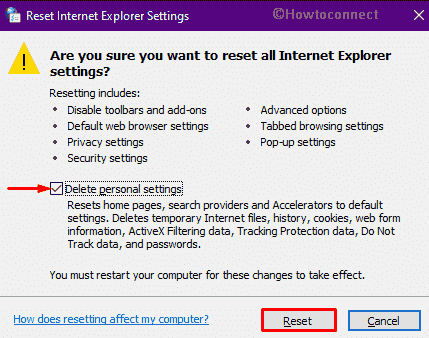
10] Set Internet Explorer Settings to default to resolve error 0x800f090
When you will reset the settings of Internet Explorer, installed add-ons will be disabled at the same time all settings including security and privacy will be restored to the default state. If update error 0x800f090 was caused by any add-ons or modified settings, re-establishing the same to its built-in state will do the tweak. This procedure will wipe out all your saved passwords but bookmarks will be still there.
- Press the Windows key, type control, and then hit Enter.
- Check if the View by type is either Large icons or Small icons.
- Opt for – Internet Options.
- Head over to Advanced tab of newly appeared wizard.
- Click the – Reset.
- Put a tick mark on the box set before Delete personal settings.
- Click – Reset.
11] Uninstall previously installed updates
Oftentimes, the existing patch conflict with the newer one and block the updates from downloading. Or, error 0x800f090 may be a result of the bug carried through the most recently installed patch. Removing the same will eradicate the issue in most cases.
- Open Run dialog box.
- Insert – appwiz.cpl.
- Click – OK.
- From left sidebar of appearing window, choose – View installed updates.
- Reach to the bottom of this window.
- Right-click on the KB you received in the recent past.
- Choose the – Uninstall.
- Follow on-screen guidelines to complete the uninstallation process.
- Lastly, restart the machine.
12] Get rid of system corruption to fix error 0x800f090
Due to malware attack, software collision, and some other reasons, system elements can go missing at the same time become corrupted. If anything similar occurs with the elements related to Windows update, error 0x800f090 may arrive. To recover the missing elements as well as resolve the existing corruption, here are the steps you need to execute –
- Click the search icon from taskbar and type in cmd.exe.
- Press the Ctrl+Shift+Enter altogether.
- When a User account control turns up, click Yes.
- On the elevated Command Prompt, put in the bellow line and hit Enter –
DISM.exe /Online /Cleanup-image /Restorehealth
- After executing the command, reboot your PC.
- Hopefully, update error 0x800f090 won’t occur when you sign back in.
- If the fatal code still persists, again open Command Prompt as admin.
- Now, run the below command –
Sfc /scannow
- Wait patiently and let the procedure complete without interruption.
- In the end, restart the Windows machine.
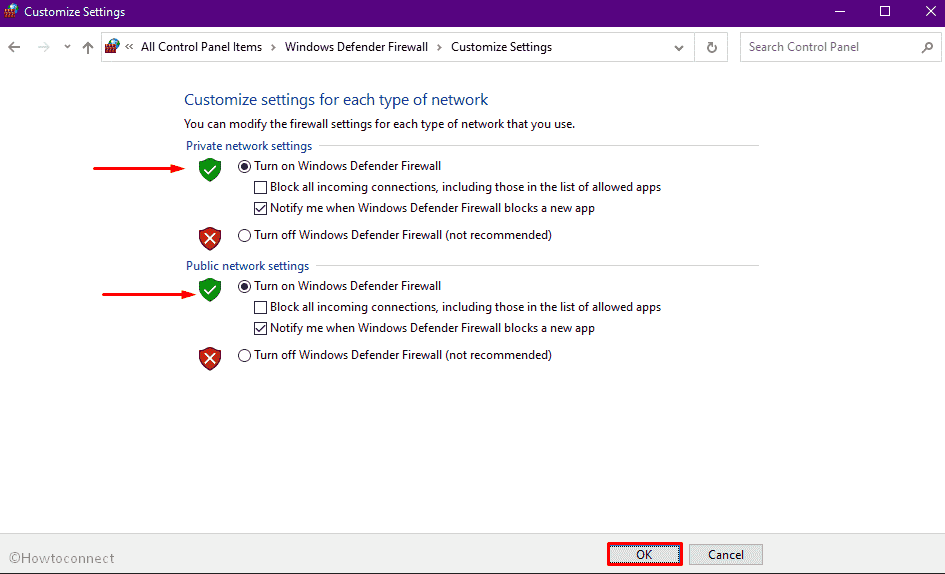
13] Check if the Windows Firewall is working properly
Update error 0x800f090 may show up if Windows Firewall is not functioning or the feature is disabled. The reason behind this is not clear yet but you can try out the below steps and check if the issue resolves.
- Open Control Panel.
- Set the View by option to Large icons.
- Pick the link Windows Defender Firewall.
- From the next page, check if each option is green here. If so, skip the below steps. In case you see red highlights, enable the feature manually.
- For that, hit Turn Windows Firewall on or off from the left overlay.
- Click the radio button fixed alongside Turn on Windows Defender Firewall.
- You need to choose the same option for both Private network settings and Public network settings.
- Click OK to save these changes.
14] Free up disk space
To download and install an update, the system needs a good amount of free space in the local disk. If you find out your system is running out of storage, remove all unwanted files that often hold up gigabytes of space unnecessarily and give rise to update errors like 0x800f090.
- Press the Win+S, type in – cleanmgr.
- Hit the – Enter.
- After figuring out how much space the utility can evacuate, Disk Cleanup for (C:) will arrive.
- Click the – Clean up system files.
- Click OK for the upcoming pop-up.
- Once again Disk Cleanup for (C:) will show up.
- Tick the check boxes available under Files to delete.
- Hit the – OK.
- Click Delete files as the final step.
15] Use System Restore Point to get rid of error 0x800f090
If you started getting error 0x800f090 after making any changes in the settings, registries or installing a new software program, there is a high chance that the recent modifications are responsible behind this fatal code. To restore an earlier state that was error-free, here are the steps to follow –
- Click the Windows key.
- Type in rstrui and then hit the – Enter.
- Click Next button when System restore wizard comes up.
- Check the box set by – Show more restore points.
- Choose the most recent point available here and click – Next.
- Hit the – Finish.
- Click Yes when a final confirmation pop-up arrives.
- When the restoring process ends, the system will restart itself.
- After starting of a new session, new patch should be installed without update error 0x800f090.
16] Clean install the Windows
There are different ways to install Windows, clean install is one of them. This procedure will help you to start afresh without any cache and damaged file moreover eradicate error 0x800f090. Steps are as followed –
- Open – Microsoft Edge browser.
- Navigate the official webpage of Microsoft.
- Click – Download tool now.
- Choose a location and click – Save.
- Visit the directory where you saved the item and double-click the setup file.
- Click Yes for the appearing UAC.
- Hit Accept when Windows setup wizard becomes ready.
- Click the radio button set for Upgrade this PC now followed by hitting – Next.
- Opt for the option – Keep your files and apps.
- Click – Next.
- Hit the Install to initiate the upgrading process.
- Comply with on-screen instructions.
- After completion, open Settings and then click – Update & Security.
- Hit the button Check for updates from right pane.
- Update error 0x800f090 should not appear this time.
Methods:
1] Reset Windows update components
2] Make sure BITS is running
3] Rename CBS log file
4] Windows Update Troubleshooter
5] Try for manual update
6] Obliterate Windows Update download path
7] Put antivirus program out of action
8] Clean boot Windows
9] Clean up temporary files
10] Set Internet Explorer Settings to default
11] Uninstall previously installed updates
12] Get rid of system corruption
13] Check if the Windows Firewall is working properly
14] Free up disk space
15] Use System Restore Point
16] Clean install the Windows
That’s all!!