Most of the frustrating and annoying issues in the computer happen at the worst times always. All your hard work for a nearly finished project may get stuck at a point if suddenly the mouse starts malfunctioning. If you are in the users who are facing wired or wireless mouse not working on Windows 11 laptop then don’t worry. Workarounds in this post will save your doings and documents from being spoiled.
In Windows 11, Bluetooth or USB mouse issues can vary like some may have problems of cursor frozen on laptop or not working, lagging, unresponsive button, jumping, and complete non-functional device. These mostly occur due to the driver compatibility or incorrect change of setting. In recent times, many people have updated their Windows and facing trouble with hardware peripherals like mouse, keyboard, and touchpad not working.
Windows 11 Laptop Mouse not working
Here is how to fix Windows 11 Laptop Mouse not working in Windows 11 –
Way-1: Restart the Computer
It might hear a bit weird but you have to believe, restarting serves as the best troubleshooting to any problems in Windows 11. System oftentimes jams for a variety of reasons and needs a fresh reboot. Fatigue is the most common root cause for most of the problems like mouse not working in Windows 11, frozen, or lagging.
Restarting PC restores everything afresh, runs services and without having any problem, moreover, minor issues get resolved automatically. Hence, start troubleshooting with a simple rebooting of Windows 11. As you have a frozen mouse cursor, use touchpad or keyboard shortcuts to proceed forward.
- First of all, unplug the unresponsive mouse from the USB port or the remove Bluetooth device that connects the wireless mouse.
- Save all ongoing tasks and arrive at the desktop screen.
- Press – Ctrl+alt+Delete.
- Hit the down arrow key until the dropdown menu shows Restart in it.
- Press – Enter key.
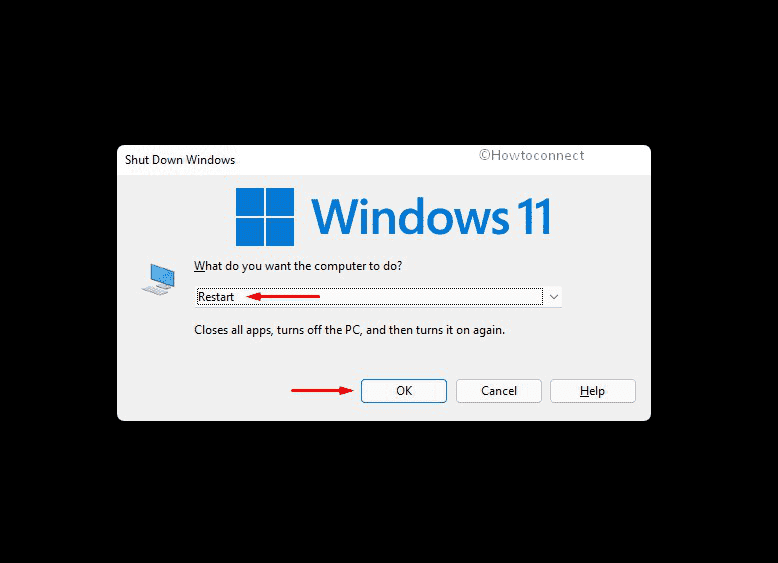
- You can also try Shutting down the Computer instead of Restart. Wait for 5 minutes and Strat it normally.
- Connect the mouse via USB or Bluetooth device.
- Check if it is working normally.
Way-2: Check the connections
If the Restarting doesn’t fix the Windows 11 Laptop Mouse not working issue it’s time to check the connections. For a wired one, checking connection is a must as there is possibility of having variety of issues. Calibrate the wiring for any external damage like torn apart at any place, loose connection at the terminals. For both a Bluetooth mouse device and a wired one, checking USB is also very much important.
Check the mouse or Bluetooth device by connecting it to another USB port, and in another system. If the mouse works there, try using other ports in the computer and replace it if the issue lies with it solely.
Way-3: Replace battery for a Bluetooth mouse
This workaround is for those who are using a wireless mouse and it is unresponsive. Earlier we have guided you to check the connections and this time to examine the battery. Batteries have a cell and that will be discharged after a certain period of time for sure. This is not rechargeable in most cases and contains an AA or AAA battery that needs replacement once discharged. At the same time, you have to check the battery compartment for dirt and debris. Sometimes, a battery might clog the compartment after being melted at the positive or negative terminal. If that happens, the connections will not be established due to insulating materials at the terminal. Therefore, clean the ends with something sharp like a knife if you see any leftover particles jamming the terminals.
Nowadays, we don’t really prefer to have a mouse with ball but if you have one, check it. Ensure the ball and optical port is clean, use alcohol-based cleaner to avoid damaging it. After cleaning and replacing the battery, connect everything in place and try out the mouse operation. Hope this will work fine from now onwards.
Way-4: Enable Mouse pointer from Settings app
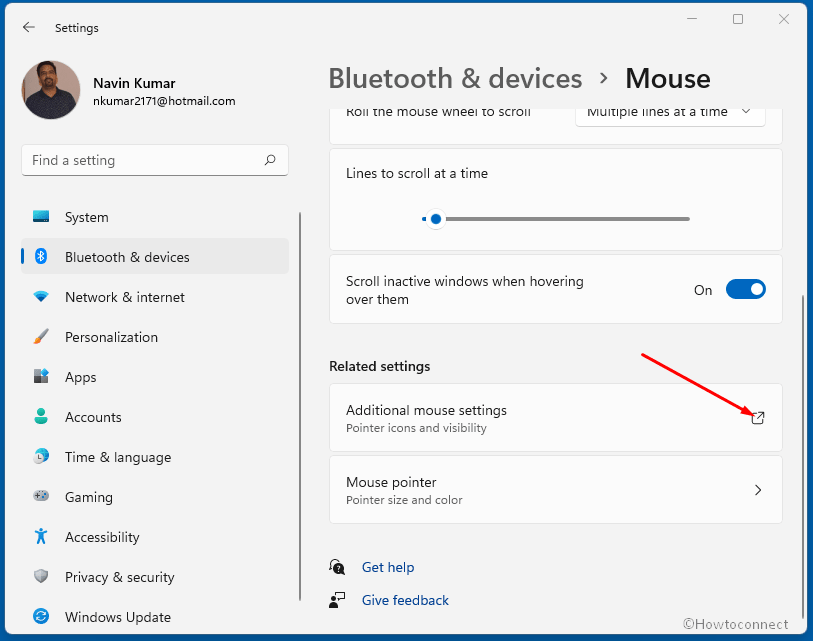
Windows 11 Mouse issues can occur in various shapes, the cursor not working is the most common problem. Sometimes you may observe that the mouse pointer is no longer visible. This happens usually after performing a Windows update. The system may have disabled the pointer during the update and missed enabling it again. If this happens in your case, re-enable the mouse pointer from the Settings app. For that, follow the below guidelines –
- Press – Windows key and I.
- After the Settings app appears, click – Bluetooth & devices.
- On the following page, select – Mouse located at the right pane.
- Go down and click – Additional mouse options.
- On the new popup window, click – Pointer Options tab.
- Move down to the Visibility area.
- Select the box set for Show location of pointer when I press the CTRL key.
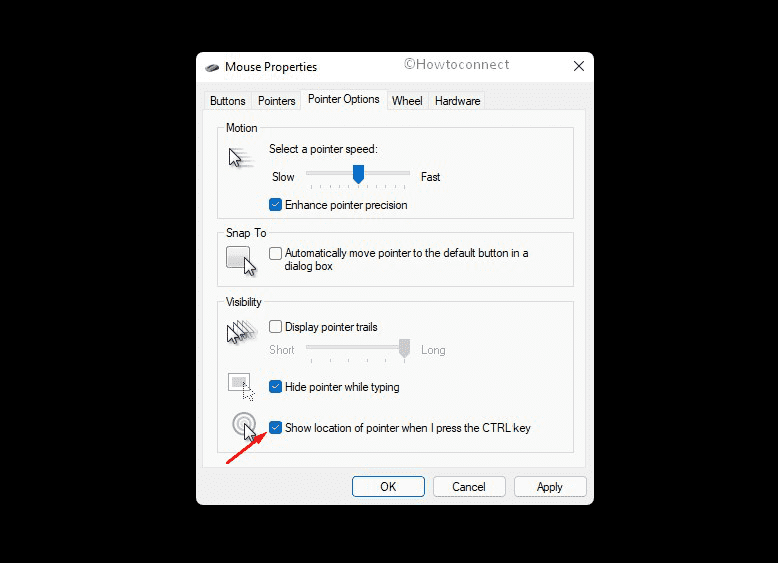
- Click – Apply button followed by OK.
- Restart the machine and check if the mouse pointer is visible again.
Way-5: Update the Mouse driver
Updating the driver is the best suited as well as most needed troubleshooting for the laptop Mouse not Working, lagging, cursor frozen, or jumping in Windows 11. Whenever there is trouble with hardware devices in Windows-operated machines, it is suspected that drivers are having problems. This might be outdated which happens in most cases or it can be incompatible with the device. Since the drivers control the interaction between the devices and the software running them, the issues are quite obvious.
Updating any driver is required for smooth functioning and doing so is quite easy in Windows 11. All you have to do is to open the Device Manager and perform this task from there. Ensure the system is connected with a stable active internet connection as the update files will be downloaded automatically from the official website.
- Press – Windows + R.
- Type – devmgmt.msc in the Run dialog box.
- Press – Enter key to open up Device Manager.
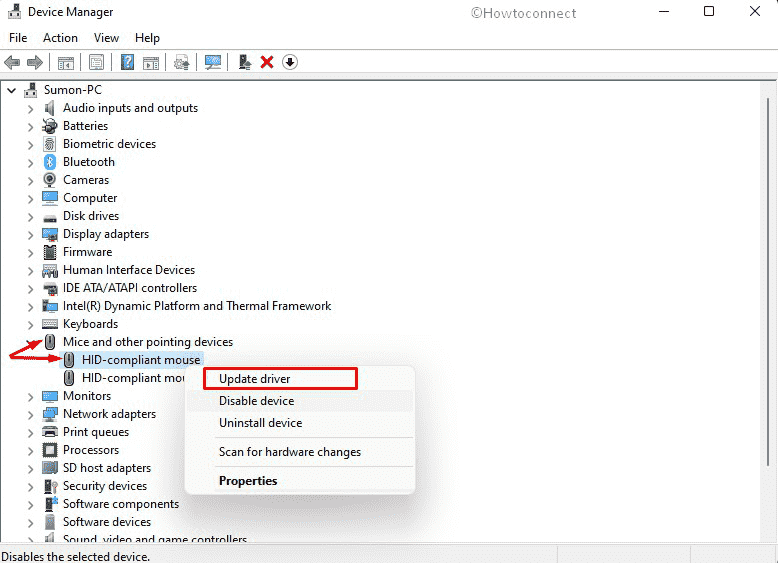
- Scroll down to – Mice and other pointing devices.
- Expand the driver list by double-clicking the device.
- Right-click your ‘mouse driver’.
- Select – Update driver option.
- From the next window, select – Search automatically for drivers.
- Follow the on-screen guidelines until the task is finished successfully.
- If the system says you already have the best-suited driver, visit the manufacturer’s website to get the updated version manually.
- Once done, restart the machine and check if the mouse starts working.
Read – How to update drivers in Windows 11 (Best ways).
Way-6: Reinstall the Mouse driver
Updating the driver sometimes is unable to fix Mouse not Working in Windows 11 issue. The reason is, software vendors don’t allow the devices to download the propitious version from their website automatically. Most of the time, the original files are kept hidden and you have to approach manually for that. Additionally, some buggy and incomplete drivers are also available on the site, installing which will be detrimental for the device instead of resolving the issue.
There is an easy escape if you have installed a defective update and it is rolling back the driver to the default version. If this doesn’t work, uninstall and reinstall it. Here are the steps for performing rollback and reinstalling the driver from Device Manager –
- Press – Windows key.
- Type – ‘Devmgmt’.
- Select – Device Manager.
- Locate – Mice and other pointing devices.
- Double-click to expand the driver list.
- Right-click your mouse ‘driver’.
- Select – Properties.
- On the following popup window, enter into the – Driver tab.
- Click – Roll Back Driver button to bring back the former version.
- Restart Windows 11 and check if the mouse is working fine.
In case that doesn’t help, uninstalling will probably be the preferable solution for that. To do so –
- Repeat steps 1-7 as described above.
- From the Driver tab, click Uninstall.
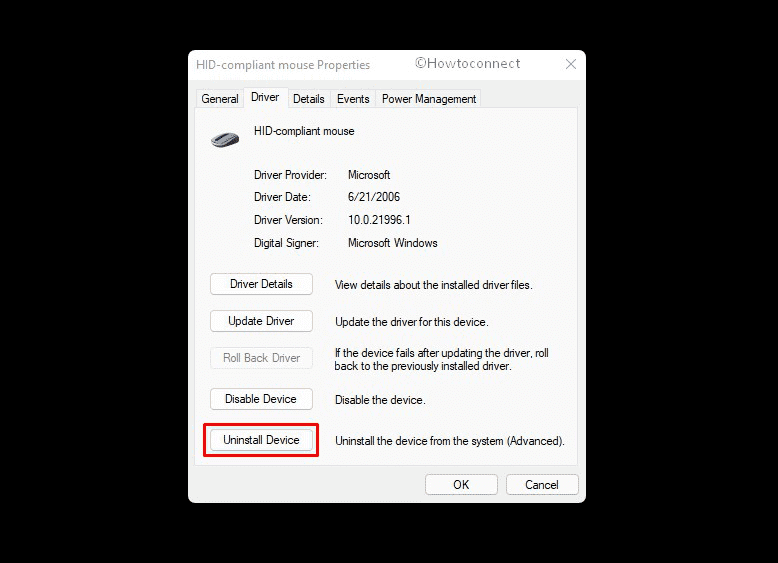
- This will completely remove all files related to the mouse driver including the registry.
- Restart the Windows device.
- When the system powers up, the default version of the mouse driver will be automatically installed.
See – How to Uninstall and Reinstall Mouse Drivers in Windows 10.
Way-7: Remove the mouse that is not in use
Suppose you are currently using a wired mouse and utilized a Bluetooth one previously, you may experience the problem too. In this situation, the old configurations of the device stay in the system and cause the driver to conflict with the existing one. In the end, you will experience the laptop Mouse not Working in Windows 11 problem.
However, you can easily remove the devices that are not in use presently from the settings app. Here are the steps to be followed for that –
- Open the Settings app by pressing Windows + I.
- Click – Bluetooth & devices from the left pane.
- On the right, select ‘Devices’.
- Click on 3 dots menu of the paired device and click – “Remove device“.
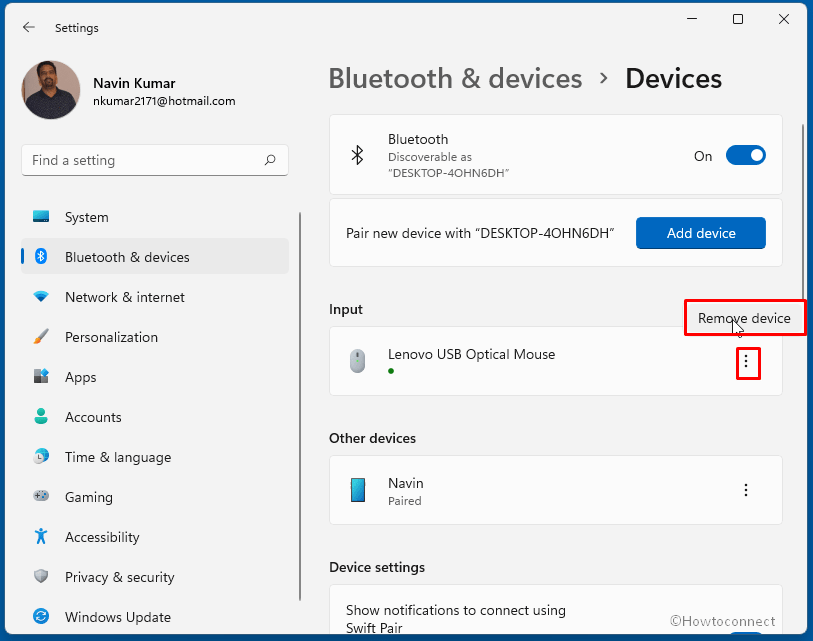
- Once done, restart the computer and check if the mouse is working.
Way-8: Run Hardware and Device Troubleshooter in Windows
Hardware and devices troubleshooter in Windows is one of the most useful utilities Microsoft has included. The tool will diagnose and fix the issues in the system automatically once ran.
In order to fix up the Mouse not Working in Windows 11, run the Hardware and devices troubleshooter and see if it helps. Follow the below instructions to accomplish this workaround –
- Press – Windows + S.
- Type – cmd.
- When Command Prompt appears, hit – Ctrl + Alt + Enter.
- To allow User Account Control, click – Yes.
- Type the below command in the black pane –
msdt.exe -id DeviceDiagnostic

- Hit – Enter key.
- Tap – Next option when the Hardware and Devices Troubleshooter shows up.
- When the utility presents a list of devices having issues, select – Mouse.
- Hit – Next button.
- If the utility traces out some problems and offers automatic repair, click – Apply this fix.
- Click – Next once more.
- Restart the Windows once troubleshooting ends successfully.
Way-9: Uninstall defective Windows Update causing trouble
A significant number of users have come up complaining that, they are facing Windows 11 laptop Mouse not working issue after installing a patch. This is now anticipated as several users have experienced worst problems after updating Windows. Any update may contain components that can conflict with existing drivers to cause hardware trouble like an unresponsive mouse.
If you have a similar kind of issue, remove the most recently installed patch immediately to fix it. Windows 11 has got simple ways to uninstall a patch without making any changes to the system. Follow the guidelines to uninstall the latest patch –
- Press – Winkey key and R.
- Type – appwiz.cpl.
- Press – Enter key to bring Programs and Features window.
- Click – View installed updates.
- In the following step, navigate to – Microsoft Windows section.
- Right click on the most recently received patch
- Select – Uninstall.
- Once more click on ‘Uninstall’.
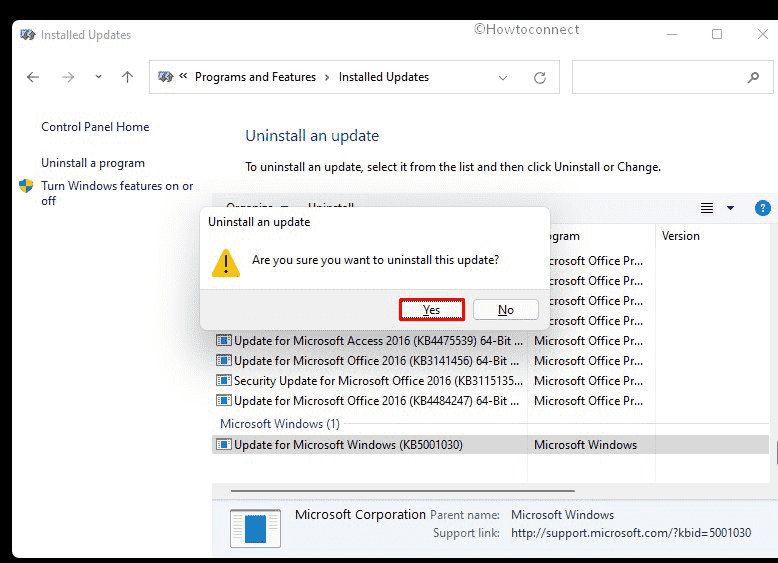
- Follow the on-screen guidelines to complete uninstalling process.
- Restart Windows when done.
- Check if the mouse is working normally now.
Way-10: Check for Updates
Some problems in Windows 11 come in all of a sudden and you will be in the middle of nowhere. Mostly the root cause will be unknown and you will find the issue is a hard nut to crack. Oftentimes these get fixed with simple tasks like performing Windows updates.
Microsoft very frequently rolls out patches, cumulative updates (names may be changed) for the users to avoid potential and existing errors. You find lots of modifications in the UI, security improvements, and fixes for running issues in them. On the contrary, an outdated OS may be undergoing the attack of malware and several other problems. Windows 11 users can install the patches for free from the settings app. What you need is to ensure an unshakable internet connection in the machine. Let’s see how to check the updates and install them to eliminate the mouse unresponsive –
- Press – Windows + I.
- Click – Windows Update.
- Select – Check for Updates.
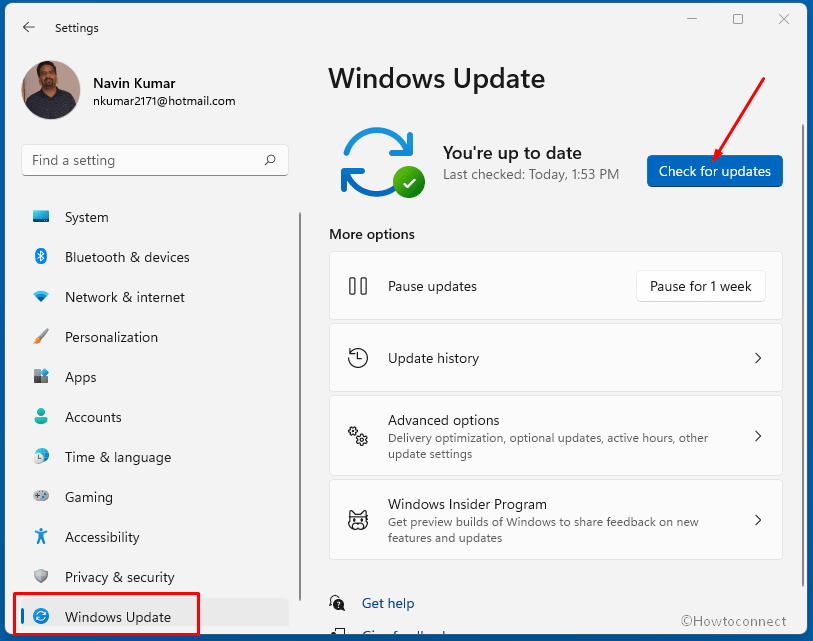
- Windows will start looking for pending.
- Downloading followed by Installation will take place automatically.
- Once done, Restart the Windows to make the changes effective.
Way-11: Perform Clean Boot to Windows 11
Windows has a special type of starting method called Clean Boot. The startup process will power up the device with minimal sets of installed programs and services. This is a great technique to trace out whether the issue is coming from a built-in program or a third-party suit.
If you are encountering Mouse not Working in Windows 11 problem and didn’t find where to carry out the troubleshooting, Clean Boot can help you halfway through. Follow the guidelines –
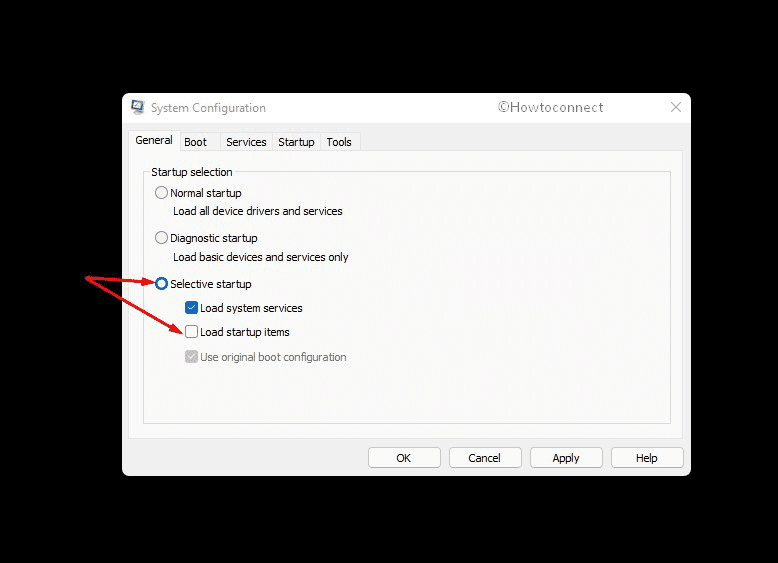
- Press –Windows key.
- Type – msconfig.exe.
- Hit – Enter to open System Configuration.
- Select the radio button present before Selective startup.
- Uncheck – Load startup items.
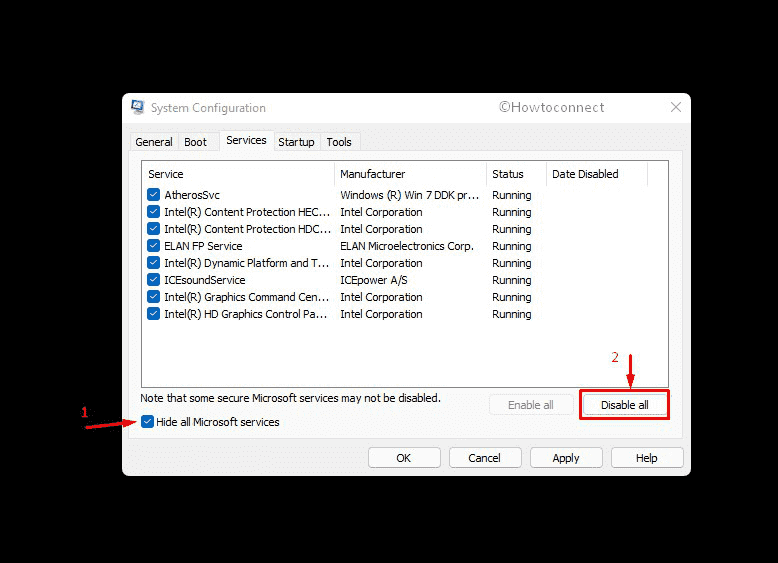
- Shift to Services.
- Select the checkbox present before Hide all Microsoft services.
- Click – Disable all.
- Move to the Startup
- Click the link – Open Task Manager.
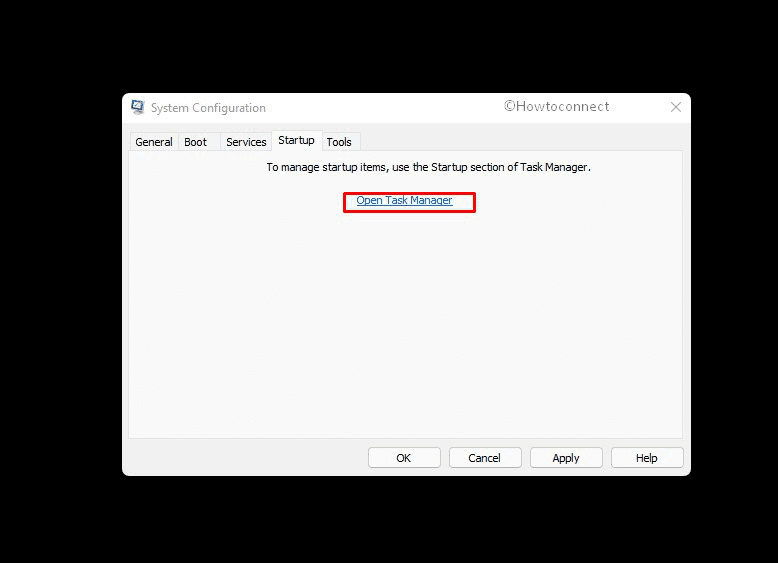
- When the window turns up, disable all startup programs.
- For this, select an application and then choose – Disable.
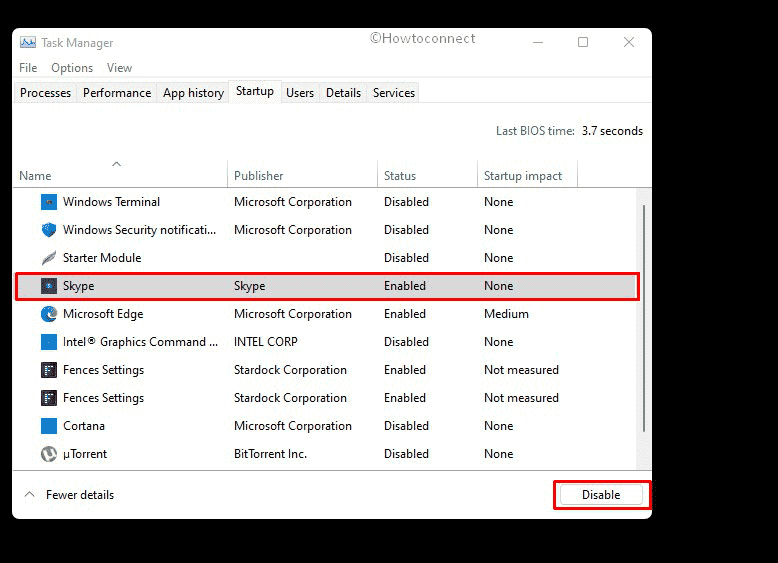
- Go back to System Configuration
- Click Apply and then OK.
- Restart the PC.
- When the computer starts in clean boot mode, check if the mouse works properly
Way-12: Adjust Mouse Properties
Turning off ClickLock from the properties resolved Mouse not Working in Windows 11 issue for many. This is one of the most effective solutions so follow the below guidelines –
- Press – Windows key and R.
- Type – main.cpl.
- Press – Enter.
- By default, you will be in the Buttons tab.
- Reach ClickLock area.
- Unmark the – Turn on ClickLock check box.
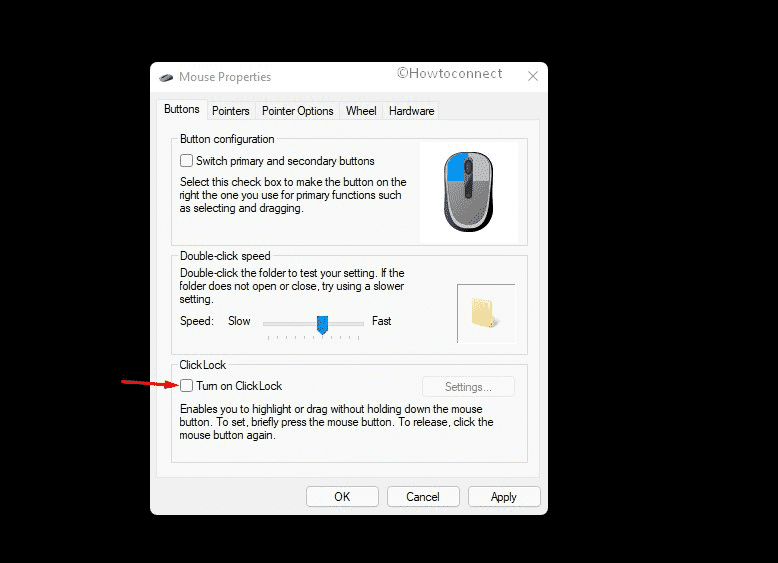
- Click OK button and then hit – Enter.
Way-13: Turn Off Tablet mode
Mouse right-click doesn’t work properly oftentimes on touch screen devices. Several users have come up with a solution that, turning of Tablet Mode can fix this laptop Mouse not Working in Windows 11 easily.
- Use the touchpad and click Action center icon from the Taskbar (or press Win+A).
- Tap on Expand.
- Make sure the Tablet mode feature is grayed out from here.
- If it is enabled from before, tap the same to disable it.
- Check if the mouse right-click is working fine.
Way-14: Adjust power management settings for USB Root Hub
Another authentic workaround to fix Mouse not working in Windows 11 is to adjust the Power management settings for USB root hub. To accomplish this task, here are the steps to follow –
- Press – Win+X.
- Select – Device Manager.
- Navigate to – Universal Serial Bus controllers.
- Once on the device, click arrow to expand the drivers.
- Use the down arrow and reach to – USB Root Hub.
- Right click on it and select – properties.
- Go to Power Management tab.
- Uncheck – Allow the computer to turn off this device to save power option.
- Click – OK.
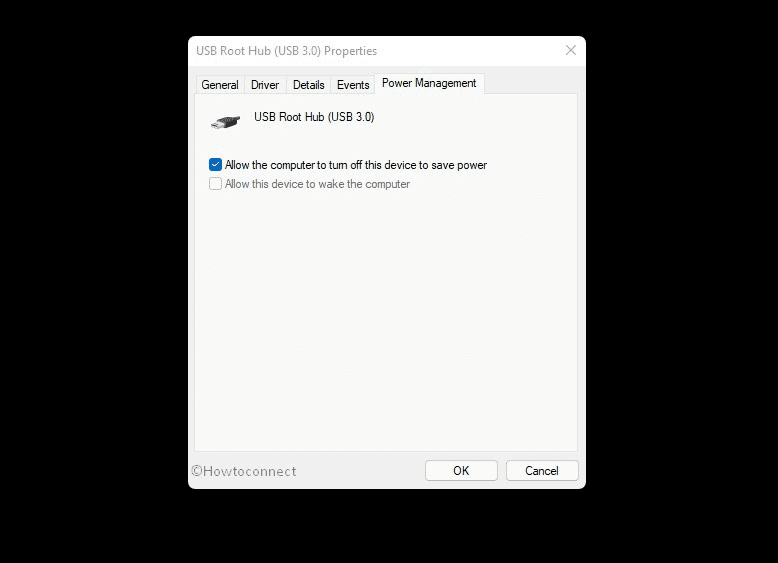
- Check if the mouse is working normally now.
Way-15: Disable Fast Startup
Fast Boot is an outstanding inclusion in Windows devices. The startup technique will make the accessing desktop and shutdown speedier. The method usually collects information from various programs and stores it to load the programs at the boot up next time. The booting time doesn’t need to load the programs afresh and shortens the period of the startup.
Similarly, this makes the shutting down faster bypassing the regular powering off. Though it has been found to cause compatibility issues with the devices that don’t support the regular Sleep mode and Hibernate. It may so happen that, Mouse not working in Windows 11 is caused by Fast startup functionality being enabled. Hence, you will have to disable this feature right now using below guidelines –
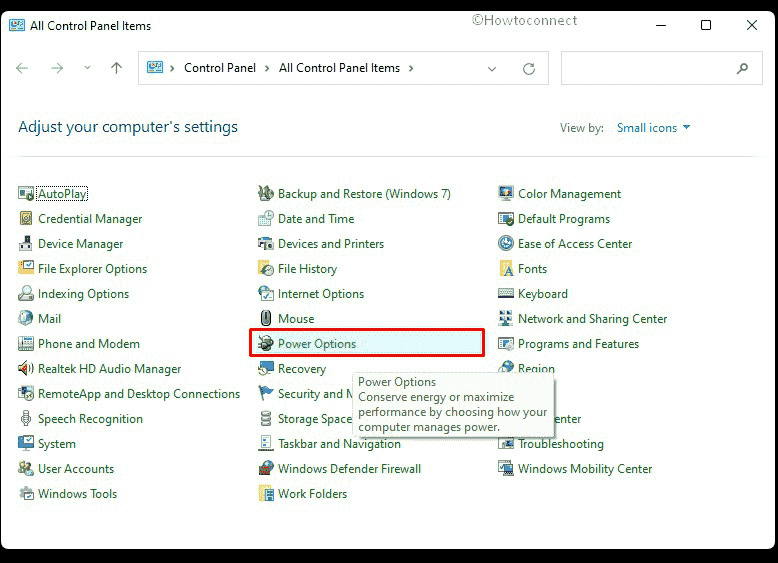
- Press – Win + R.
- Type – control.
- Hit – Enter.
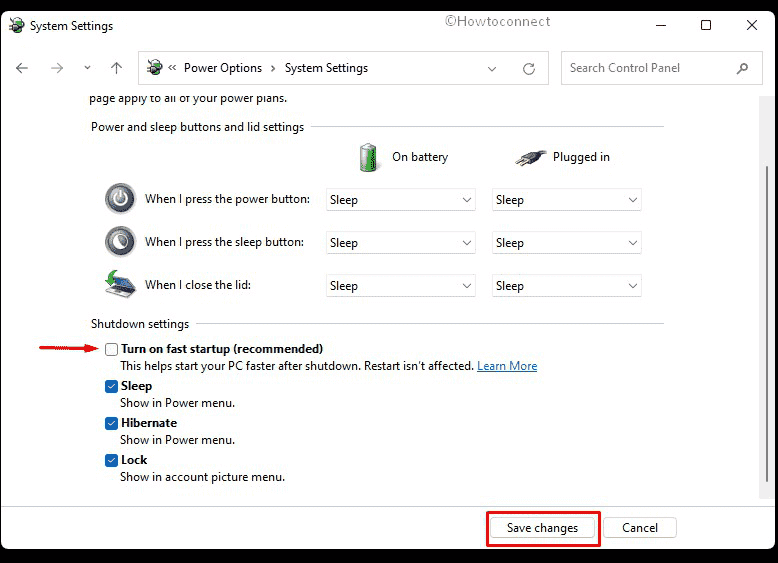
- Select – Power Options.
- When the following page is upfront, click – Choose what the power buttons do link from the left pane.
- From the next window, click – Change settings that are currently unavailable link.
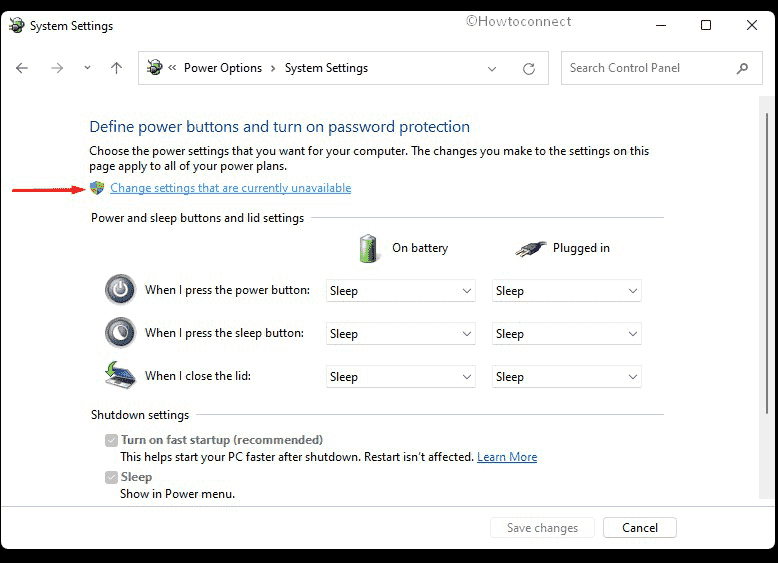
- Move down to Shutdown settings segment.
- Remove the checkmark from the box saying – Turn on fast startup
- Click – Save changes button.
Way-16: Disable Context Menu of Windows Explorer in Group Policy
Some users complain that they cannot view the context menu on right-click of the mouse in Windows 11. This is quite frustrating as we need to access the functionality for so many reasons frequently. However, you can easily fix this right click menu issue by tweaking the Group Policy Editor settings.
In order to solve laptop Mouse not Working in Windows 11, you have to modify the Local Group Policy (gpedit). To do that, follow the below method –
- Click – Start.
- Type – gepedit.
- From the best match results, select – Local Group Policy Editor.
- On the left pane of the window, navigate to the following path –
User Configuration > Administrative Templates > Windows Components > File Explorer
- Under the File Explorer on the left pane, move to the right side.
- Locate – Remove Windows Explorer’s default context menu.
- Double click on this to open up a new window.
- Scroll down to – Remove File Explorer’s default context menu.
- Click the radio button set for – Disabled.
- Click Apply and OK to save the modifications.
Way-17: Uninstall third-party antivirus suits
Some third-party antivirus programs often make conflict with the built-in applications and in the end cause unnecessary troubles in the system. Mouse not working in Windows 11 can be an outcome of such a program once installed in the OS.
Windows 11 comes with modern protection tools and they are genuinely powerful solutions all around. However, many users prefer to have a secondary security system and install third-party antivirus suits. This is okay until you have faced some problems such as an unresponsive mouse. If you have one, uninstall that now going through the below steps –
- Press – Windows + X.
- Choose – Run.
- Type – appwiz.cpl.
- Click – OK.
- When Program and Features window comes in to view, scroll to the third-party antivirus program.
- Right-click the app and choose – Uninstall.
- Click – “Uninstall” once again for final consent.
- Follow the on-screen instructions to complete the removal process.
- Once done, restart Windows 11 and check if the mouse works.
Way-18: Perform System Restore
You will need to perform a system restore when trouble stays for a long time and become very hard to solve using the conventional workarounds. This is the method to restore a trouble-free Windows state without making significant changes to the OS. Especially your personal files and folders. settings and changes remain totally affected and only the reasons that were causing the mouse problem are wiped out.
If you are failed to eliminate the mouse not working in Windows 11 issue using the above methods, System Restore can be helpful. To do that, follow the below way –
- Press – Windows + S.
- Type – rstrui.
- Hit – Enter key.
- When System restore wizard turns up, click the option – Choose a different restore point.
- Click – Next.
- Select the checkbox set before – Show more restore points.
- Choose the most recent one and then click – Next.
- To start the restoring process, click – Finish.
Methods list:
Way-1: Restart the Computer
Way-2: Check the connections
Way-3: Replace battery for a Bluetooth mouse
Way-4: Enable Mouse pointer
Way-5: Update the Mouse driver
Way-6: Reinstall Mouse driver
Way-7: Remove the mouse that is not in use
Way-8: Run Hardware and Device Troubleshooter
Way-9: Uninstall defective Windows Update
Way-10: Check for Updates
Way-11: Perform Clean Boot
Way-12: Adjust Mouse Properties
Way-13: Turn Off Tablet mode
Way-14: Adjust power management settings for USB Root Hub
Way-15: Disable Fast Startup
Way-16: Disable Context Menu
Way-17: Uninstall third-party antivirus
Way-18: Perform System Restore
That’s all!!