Shutting down and restarting are often very common fixes we use to solve a lot of different issues on Windows 11. Getting a new startup mostly helps the system to resolve simple or temporary issues like certain errors or PC hanging, etc. However, what if you are not able to just shut the computer down? Should be annoying, right? So, in this post, you will find multiple solutions to Windows 11 not Shutting Down.
The shut down problem in Windows 11 mostly occurs due to high resource consuming processes, bugs, heavyweight third-party programs, or presence of malware. However, you can get help and some hint to get rid of the processes by reading this article – How to Fix Windows 11 disk usage 100%. These kinds of bugs are expected for an operating system that has been introduced or is still in the development phase, which is the case with Windows 11. But, do not worry- we do have a couple of tricks and workarounds you can try to fix the problem of being unable to shut down Windows 11 PC.
Windows 11 not Shutting down
Here is how to fix Windows 11 not Shutting down –
Way-1: Alternate ways of Shutting down Windows 11 PC
We suggest you try different ways of shutting down first because the issue might be temporary and got fixed once you reboot. Here are some of the easy alternate ways to shut down Windows 11 PC –
1] Using Physical power Button
Every laptop or desktop comes with a power button so where other options for shutting down fail this is a useful one. You need to just press and hold the physical power button for a few seconds until the machine has shut down completely. In case, the computer is powered off successfully this is confirmed that the running problem is related to software only and not to hardware. Therefore, press the Power button again (but not hold this time) to start the PC and focus on solving them.
2] Using Ctrl + Alt + Delete
Because you are struggling to shut down your Windows 11 system Ctrl+alt+Delete hotkeys should provide you relief. This shortcut combination has the capability to brings ongoing functions and processes to end and enter into a secure environment to turn off the PC. When Start menu power options or other ways don’t work this option is useful to power off your machine securely. If you are interested in other hotkeys see – Complete list of Windows 11 Keyboard shortcuts. Coming to the point now shut down the PC using the following guidelines –
- Press – Ctrl + Alt + Delete.
- Click on the Power icon visible on the bottom right corner.
- Select Shut down or Restart.

3] Via Command line
Shutdown command allows a local computer to directly and instantly shut down after adding /S parameter. Using this syntax, you can also shut down the machine remotely and the only requirement is to sign in as an administrator account. So, at the time you encounter the issue, pursue the instructions –
- Press – Win+S.
- Type – CMD.
- Right-click on Command Prompt showing under Best match.
- Select – Run as administrator.
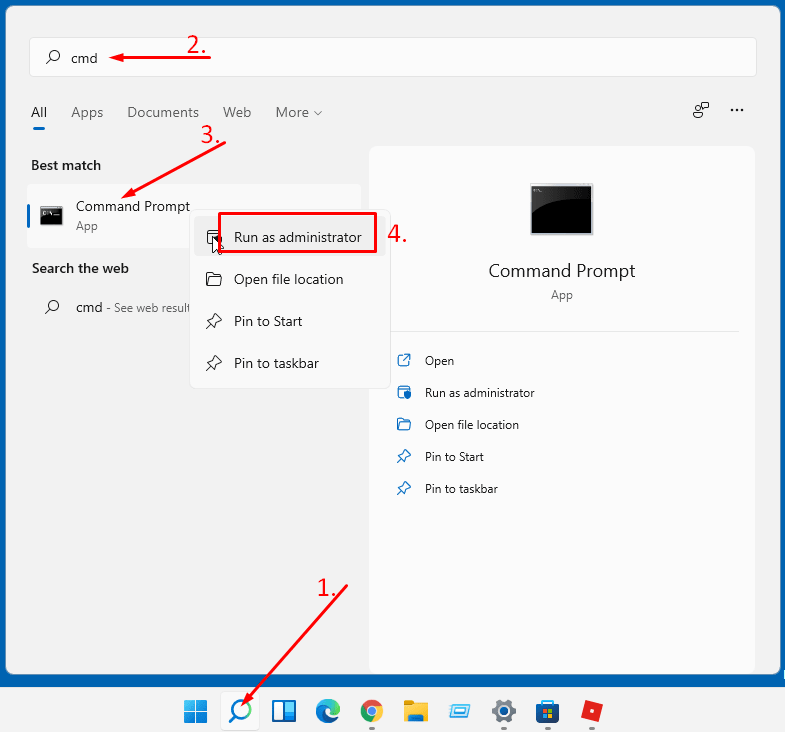
- Click Yes on UAC to open Command prompt as administrator.
- Copy –
shutdown /s /f /t 0and right-click on the prompt. - Press Enter to run the command.
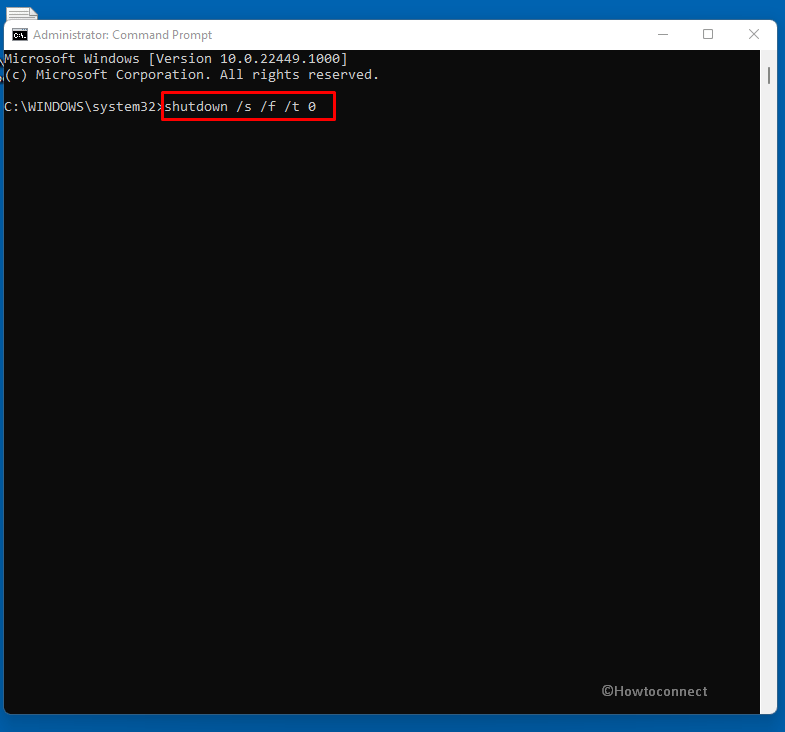
- This will directly shut down the computer.
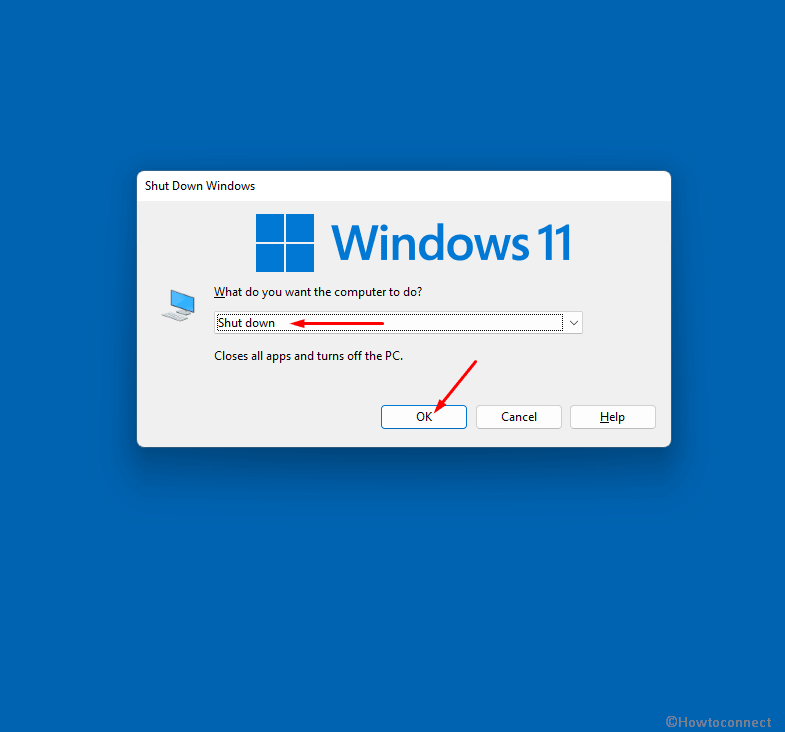
4] Through Alt + F4
During facing Windows 11 not Shutting Down completely, Alt+f4 is another option you can use. This will invoke a ‘Shut Down Windows’ dialog with multiple menus in a dropdown. This hotkey is functional when either you’re not running any program or have minimized them to the taskbar. So move forward with the steps below –
- Close or minimize all the programs open on your computer.
- Press the Alt key together with F4.
- Shut down should be selected by default.
- Click Enter or Press OK.
5] Using Run command
The command executed through command prompt works with equal efficiency when used via Run command to shut down the PC. Hence, go with the underneath steps –
- Press – Win+R.
- Type –
shutdown /s /f /t 0 - Hit the – enter.
6] Create a custom shut down button using batch file
You can create a custom shutdown button using a bat file and use it anytime when encountering the issue. Follow the guide –
- Right-click on desktop and hover over New.
- Click on Text Document from the sub-menu.

- Copy
shutdown /s /f /t 0. - Open the text document and paste the command into it.
- Next, click – File > Save as.
- On the Save as type drop-down, choose – All Files (*.*).
- In Fie name bar, type Shutdown.bat.
- Click – Save.
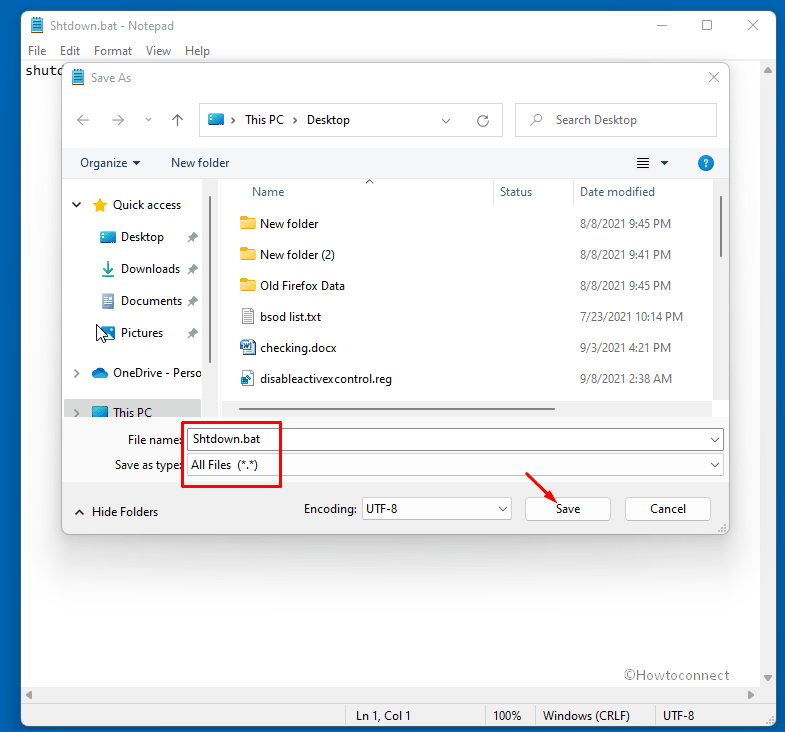
- The shutdown shortcut is ready to use; just double click it and all done.
Way-2: Change Power options
Sometimes Windows 11 not Shutting Down occurs due to misconfigured settings under Power options. However, the erroneousness setting prevents the computer from being turned off even on pressing the hardware power button. But before moving to the next way we must check the settings once –
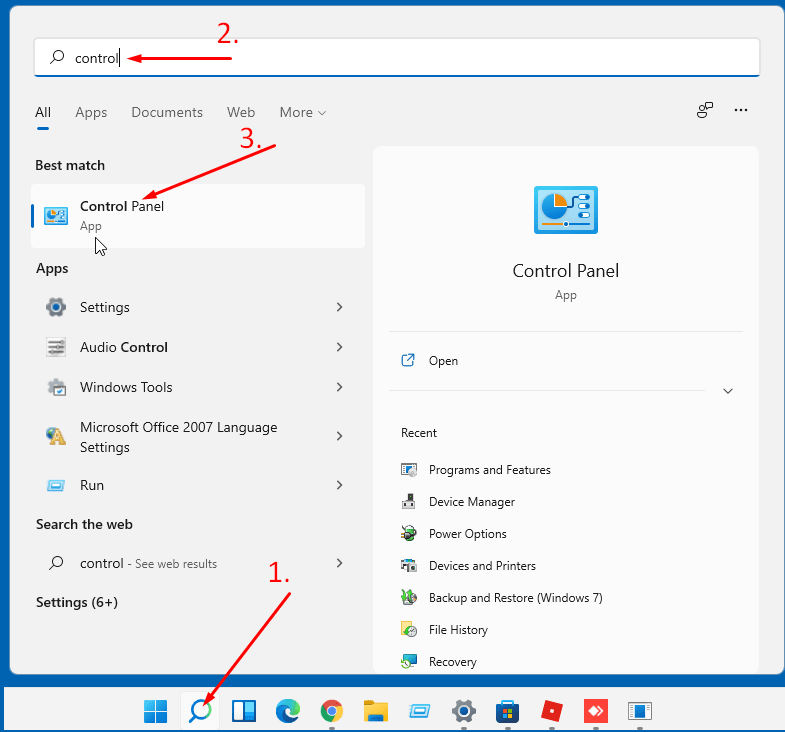
- Click Start from the Taskbar.
- Type – Control.
- Press – Enter.
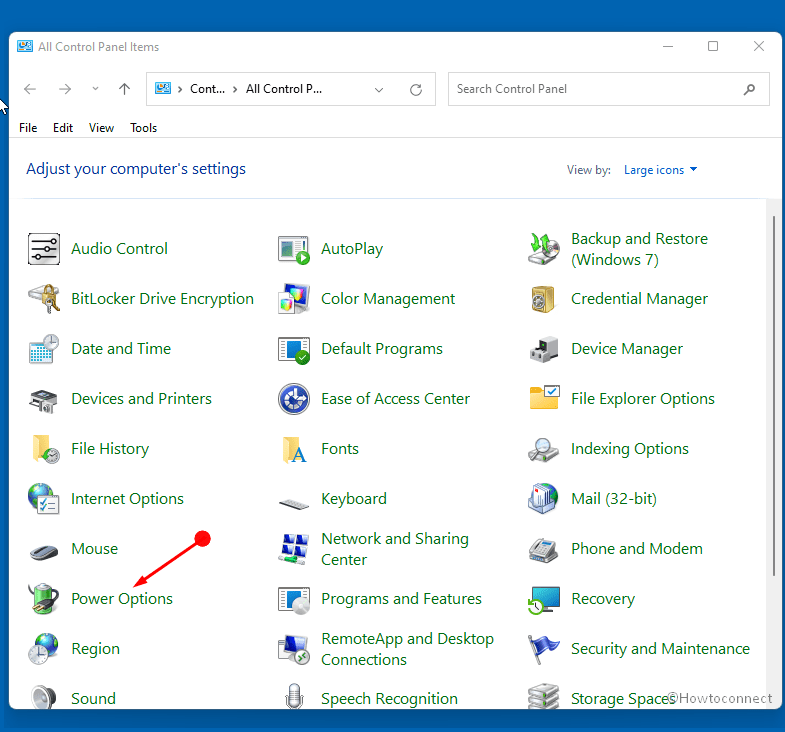
- When the Control panel appears, click the drop-down for View by: and select Large icons or Small icons.
- Next, click – Power Options.
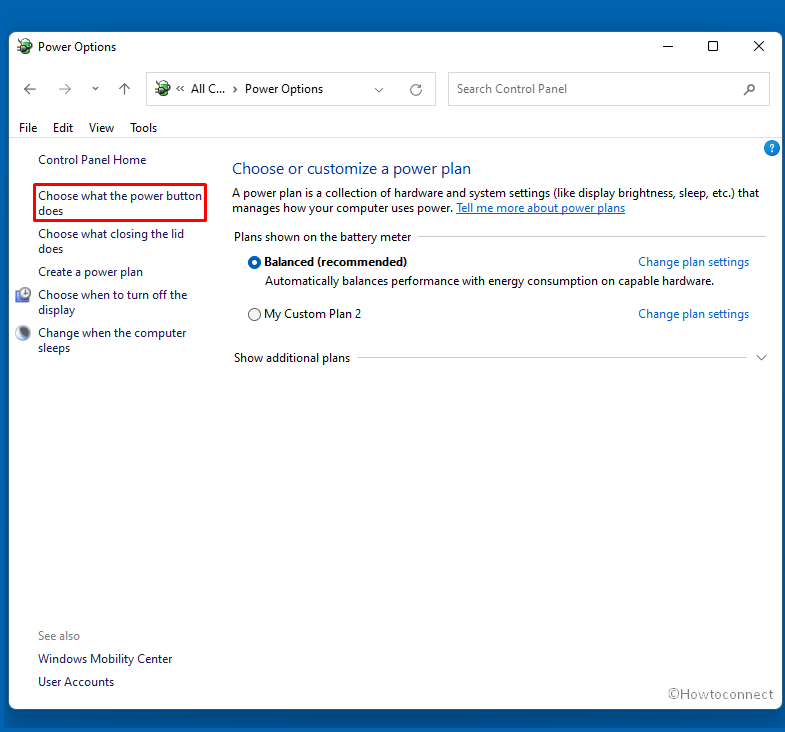
- Select – “Choose what the power button does”.
- In the drop-down menu corresponding to “When I press the Power button”, select “Shut down”.
- Hit “Save Changes”.
Note for Laptop users: – you need to make sure Shut down is selected for “Plugged in” as well as “On battery”.
Way-3: Disable Fast startup to fix Windows 11 stuck on shutting down
Fast startup is although a handy tool for Windows users but there are negative sides of this Setting. Hardware incompatible systems often encounter glitch after enabling fast startup in Windows 11 or other versions. That’s why, if Windows 11 stuck on shutting down then disable this setting.
- Pres Win+S and write control.
- Hit the Enter key.
- Select Power Options from Control panel.
- Next, click – “Choose what the power button does”.
- On the next window click the link – Change settings that are currently unavailable.
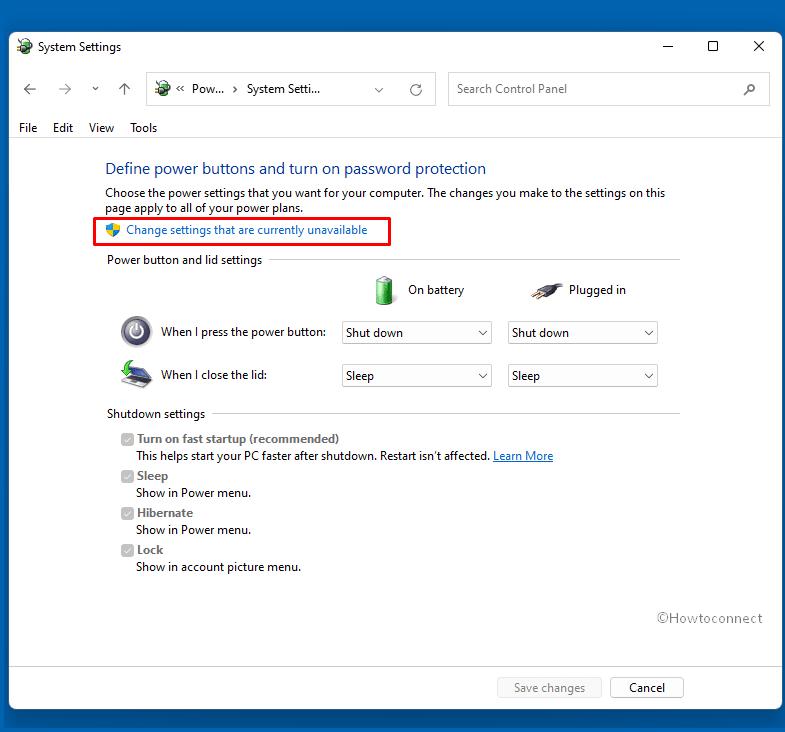
- Now, uncheck the box for “Turn on fast startup (recommended)“.
- Click – “Save changes”.
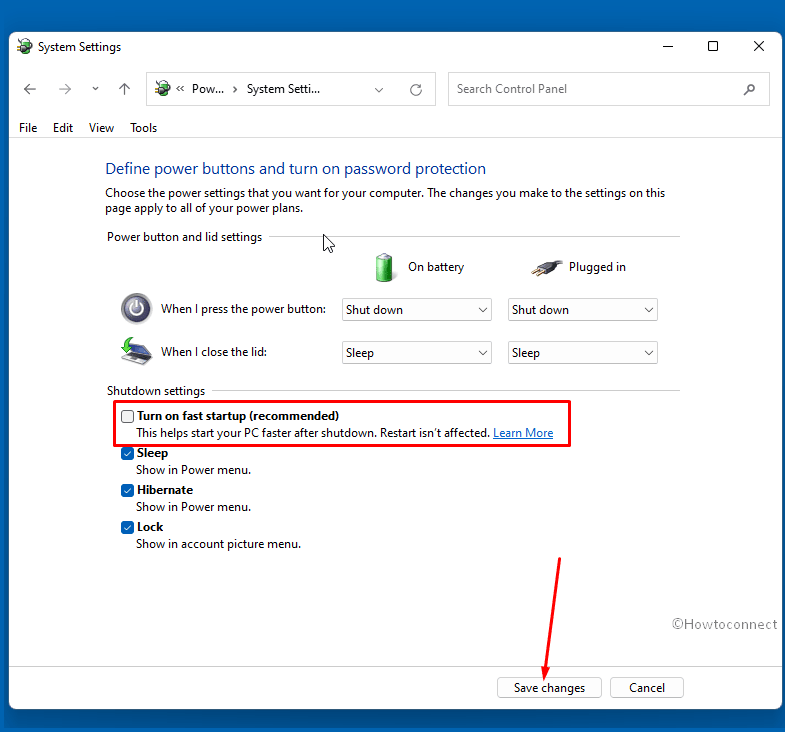
- Reboot the system.
Way-4: Run Power Troubleshooter
Windows offers built-in powerful and free tools to repair almost all the issues and same with this one. When Windows 11 not Shutting Down properly problem occurs, the recommended Fix it utility is Power troubleshooter. In addition to diagnosing the root cause, the tool will repair or suggest something that can solve this.
- Press Windows + I keys.
- Once Settings app opens go to the right pane and move down.
- Click Troubleshoot.
- Select – Other troubleshooters from next page.
- Find Power and click Run.
- The tool will start detecting the issue, give it a couple of minutes.
- Follow that the Power Troubleshooter says.
Way-5: End task unnecessary processes
Most of the time the shut down problem in Windows 11 occurs because some processes freeze the desktop. Due to the functions, power on Start menu stops responding making you unable to click it, or even after clicking no changes appears. Furthermore, after selection of shut down there does nothing. Terminating the process creates a difference during this issue so move on with the steps below –
- Right-click on the Start.
- Select – Task Manager.
- Click on More details to see the full view of the tool.
- Have a look at the processes’ list and find which one may be the culprit in this case. The process which is eating more resources such as CPU, Disk, and Memory will be the factor. So, identify such process, right-click on it and select End task.
- Back to the Start menu and try shutting down the PC.
- If it is still not possible then repeat the same and “End task” the next process which is consuming more resources.
Way-6: Run System File checker
SFC is just like a universal solution for Windows 11 competent in fixing the errors that appear due to missing or corrupt system files. Every issue in Windows operating system somehow has relations with this reason whether it started due to 3rd party programs, malware attacks, corruption in dll or exe files, or anything else. Therefore when you find Windows 11 shutdown problem then SFC is a must-use tool to bring into application. Here are the steps helping you to run the System file checker using the Command Prompt –
- Click the – Windows Search.
- Type – Cmd.exe.
- Press – Ctrl+Shift+Enter.
- Click Yes when UAC is prompted.
- In the command prompt, type the following text and press the Enter Key –
SFC /scannow - You will see – ‘Beginning the system scan. This will take some time.’
- So give it some minutes and reboot the computer after getting completed.
Way-7: Install available updates
If you have not installed updates on your Windows 11 recently, it would be worth giving a shot. The reason being, updates may contain the solution to the bug or system issues like Windows 11 not shutting down. Therefore, check for updates and if find any pending then install it to solve the problem. Furthermore, updates for OEM drivers are also available through this method so follow the guideline –
- Press – Winkey + I.
- Click – Windows Update.
- Select – ‘Check for updates’.
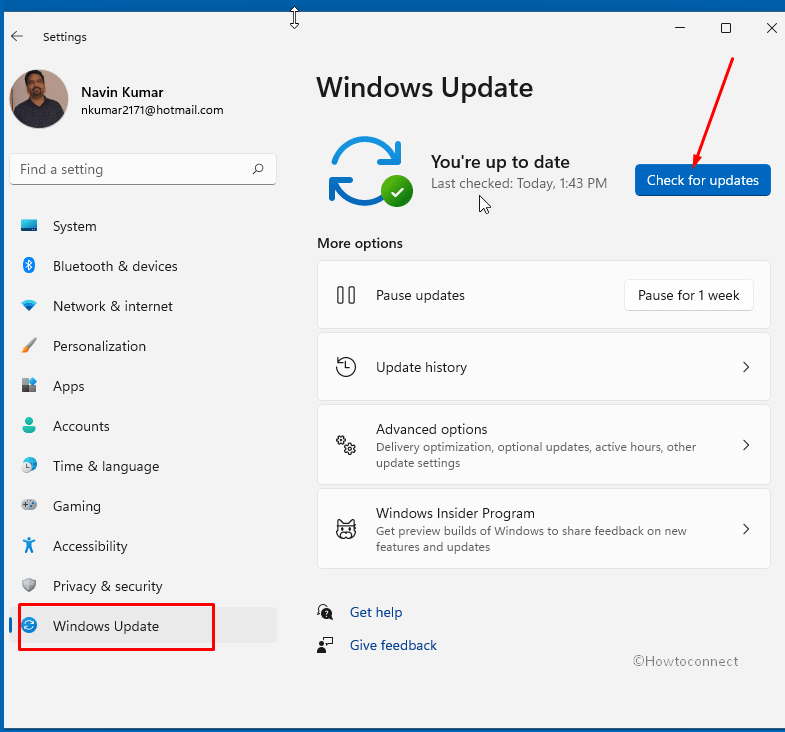
- Allow your PC to download and install all the pending updates.
- Lastly, click – Restart now.
- Now again reach the Windows Update Settings page and select – Advanced options.
- Click – “Optional updates”. Download and install them as well.
Way-8: Update drivers to solve Windows 11 not Shutting Down
Drivers, the apps to establish communication between hardware and software in the Windows operating system, should be always in up-to-date condition. Once got outdated, the OS starts behaving wrong and throws some errors. Windows 11 PC is not shutting down indicates that certain drivers might not be updated. Windows offers a built-in utility, Device Manager that assists to perform all the necessary tasks such as roll back, remove, update the drivers, and know its details and properties. Therefore, move along with the steps to update the drivers manually –
- Press – Windows key + R.
- Type – devmgmt.msc.
- Hit the enter key to launch the Device Manager.
- You can see a list of all installed devices and drivers on the GUI. Double-clicking on a device will unfold the drivers’ list.
- So, double click every item there successively and check if any driver has a yellow caution mark.
- If found, right-click and select – Update driver from the list of options.
- From the wizard that appears, click on Search automatically for drivers.
- When the system shows – The best drivers for your device are already installed then it is right.
- Repeat the same with all drivers having the caution and see if Windows 11 is shutting down now.
Way-9: Uninstall updates
Commonly, installing Windows updates solve errors and problems in Windows the opposite is equally valid. Yes, on many occasions, Windows 11 won’t shut down after update and this occurs because of bugs arrived through the push. Sometimes Microsoft recognizes the issue and sends resolution through small update but if mass number of users are not affected you may have to solve the issue yourself. The easiest option in this condition is to uninstall the Windows update. The most important thing about this method is you must have to confirm that the error started after installing an update. Go along with the steps –
- Click – Start.
- Type – updates.
- Press – Enter.
- Once Setings page appears, click – Update history.
- Open every section (“Feature update”, “Quality updates”, “Driver updates”, “Definition updates”, and “Other updates”) and check the date when they are installed. If anyone is installed just before the starting of the shut down problem then you will have to remove this. Note the KB number.
- For this, press Win + R.
- Type – appwiz.cpl.
- Hit the – Enter.
- Click the link that says – View installed updates.
- Right click the update (having the shape of KB…..)
- Select – Uninstalled.
- Confirm and go through the instruction until the uninstallation is completed.
- Now your device should shut down for sure.
Way-10: Run a full scan of Windows Defender
The presence of malware on a computer always makes a mess and so with this issue. When getting Windows 11 not shutting down properly problem you must run an antivirus program that can detect and kill the threat. Windows Defender is a robust built-in tool and you don’t need to be concerned about the malware as it is fully capable to deal with this situation. All you have to do is run a full scan of the tool with the help of the instructions below –
- Press – Windows key + I.
- Select – Privacy & Security.
- From the right side of Settings page, click Windows Security.
- Select – Virus & threat protection.
- An additional app Windows Security will prompt up, click on Scan options link.
- Check the option – “Full scan”.
- Click – Scan now.
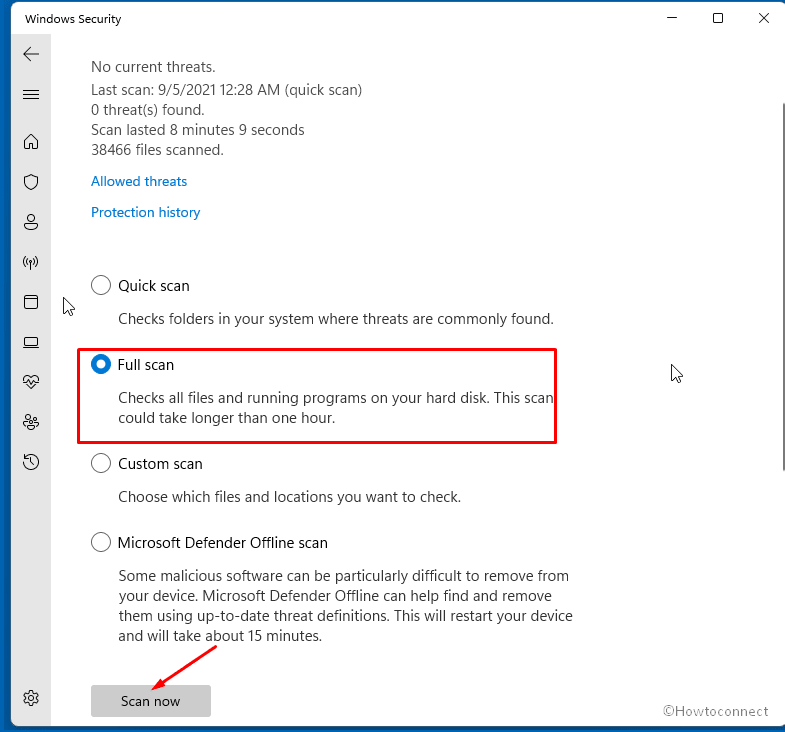
- This process will take some time so sit back and after this is finished, follow the suggestions of the Windows security app.
Way-11: Uninstall heavyweight or buggy third party programs
If you are a game lover and have installed heavyweight gaming apps and software the there is possibility that the shut down issue on the laptop is originated because of these. Therefore, remove them by following the steps –
- Click the Search from the taskbar.
- Type – apps & features.
- Press – Enter.
- Find the software that you need to remove.
- Click on 3 vertical dots and select Uninstall.
- Give your confirmation by again clicking on ‘Uninstall’.
- Follow the instructions on the Setup of the software to remove it completely.
Way-12: Do a clean boot
Clean boot will ensure that no third-party services are somehow interrupting the normal procedure of your computer. Using this configuration Windows 11 will start with loading the set of only basic programs where no interference will occur. This method will give you a space to check whether what is the actual reason for the Shut down issue. Then you can resolve the problem using the following guideline –
- Press the keys Windows + S.
- Type – “Msconfig” (without quotes).
- When System configuration appears in the results, click and open the same.
- Click on the Services tab.
- Be sure to put a checkmark in the box next to “Hide all Microsoft Services”. This will prevent us from disabling the essential Windows operations in the next step.
- Then, click on “Disable all”.
- Click on Apply and then OK.
- When prompted, hit Restart.
- Now see what is the behavior of Windows 11 when shutting down.
Way-13: System restore
Doing a System restore would be useful if you started facing a certain issue after some changes were made on the system, intentionally or unintentionally. Sometimes, it could be hard for us to pinpoint what exactly went wrong or what changed on the computer. This method allows using the System Restore tool to revert the system back to a point where everything was working just fine. Remember that the data and changes of this period will be wiped therefore store them in a separate drive if necessary. Now pursue the steps carefully –
- Click the Search.
- Type – rstrui.
- A wizard will show up saying – Restore system files and settings; click on Next.
- Choose a restore point prior to the day when the problem started. Click Show more points if you want to choose from any manually created or Automatic restore points.
- Select one and then click on Next.
- From the coming screen click on Finish.
- Note that this is a time taking process and might take a couple of hours to complete as a lot of changes need to be made to the system.
- Finally, Windows 11 not Shutting Down all the way will be fixed.
Way 14: Reinstall Windows 11
If Windows 11 not shutting down PC still persists despite following all above methods then you can reinstall the operating system. By default this version offers built-in Settings to reset PC keeping the files and apps in the Recovery section. We have already covered these tips, so, follow every step in this post carefully – How to Reinstall Windows 11 without losing data.
Methods list:
Way-1: Alternate ways of Shutting down Windows 11 PC
Way-2: Change Power options
Way-3: Disable Fast startup
Way-4: Run Power Troubleshooter
Way-5: End task unnecessary processes
Way-6: Run System File checker
Way-7: Install available updates
Way-8: Update drivers
Way-9: Uninstall updates
Way-10: Run a full scan of Windows Defender
Way-11: Uninstall heavyweight or buggy third party programs
Way 12: Do a clean boot
Way-13: System restore
Way 14: Reinstall Windows 11
That’s all!!