Among the most common emerging problems in Windows 11, slow performance is on the top. Furthermore, you might have to deal with issues File explorer, slow boot, battery drain, overheating, lagging in games, and many other on this version. Therefore, you can try some workarounds manually to fix Windows 11 performance problems.You can check solutions to similar nature issues in – How to Fix Windows 11 disk usage 100% or high.
There could be multiple reasons behind performance issues in Windows 11 such as outdated OS, incompatible graphics driver, corruption in hard disk, conflicts in programs, low disk space, and others. Moreover, the PC might require extra hardware or resources to boost the performance even if the machine you are using meets the system requirement of Windows 11. Performance issues may also arise when the Operating system performs unnecessary actions in response to write operations especially when a feature called “NTFS USN journal” remains enabled. The feature is enabled only on the C: disk by default; so none of the bugs will affect any other partitions or drives.
Windows 11 performance problems
Here is How to Fix Windows 11 performance problems –
Way-1: Install Windows update
Every single patch released by Microsoft is solely to improve the user experience from an Operating System and the primary intention is always to provide maximum security. However, users can also experience the latest UI, handy tools, and a stable operating system.
Every code that comes with a new patch is enough to deal with loopholes, errors, outdated software components, and conflicts. If we do not carry out Windows update, the system will not giveaway the best performance. Therefore, follow the below guidelines to install the latest patches for Windows 11 –
- Press – Windows + I.
- Select – Windows Update.
- Click – Check for updates.
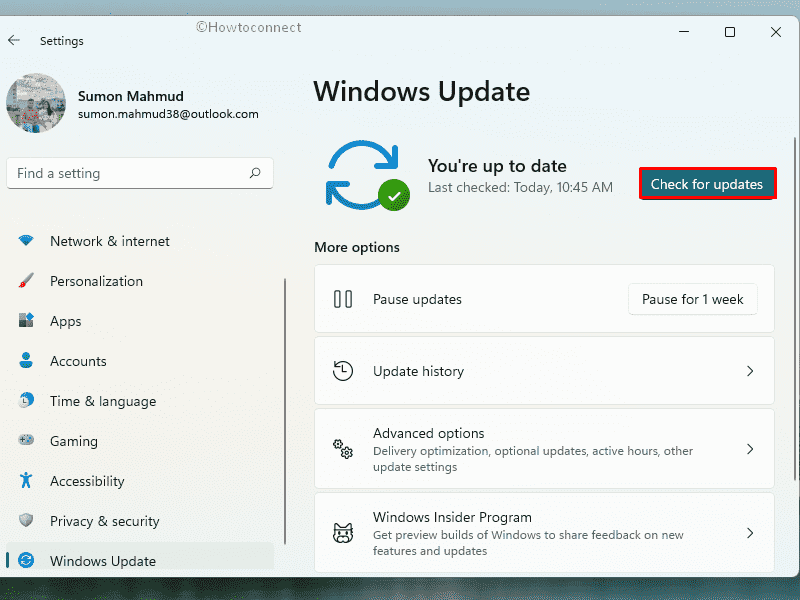
- If available, allow the update to download and install.
- When a notification prompts, click – Restart now.
Way-2: Update graphics driver
When Windows 11 operated computers run at a relatively slower speed, there is a possibility that the graphics card driver has got some issues. Mostly outdated drivers are responsible for slow performance as they effectively maintain the inter hardware-software relation overall.
You must maintain the drivers in fully updated condition on a higher priority basis to avoid Windows 11 performance problems. This will not only keep the device in a great operating condition but also will protect it from harmful glitches every time. This is quite frustrating that we usually pay less attraction and neglect updating the drivers leading to get a low performance from Windows 11. Before it gets belated, here are the guidelines to update the Graphics card driver –
- Press – Windows + X.
- Select – Device Manager.
- Look for – Display adapters.
- Double-click the same.
- Right-click on the graphics driver and select – Update driver.
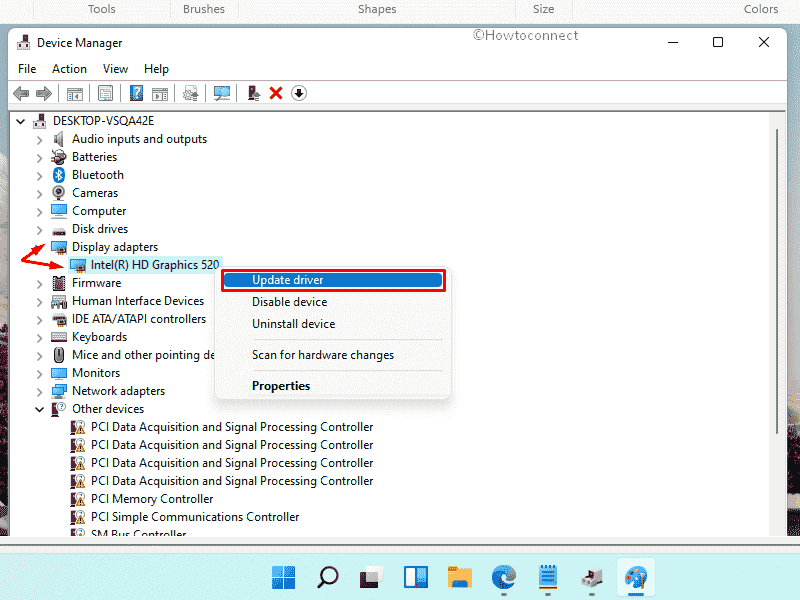
- Click – Search automatically for drivers.
- If any updated version of the driver is available, it’ll be installed automatically and the system will notify about the same.
- In case the system shows the best-suited driver is already installed, visit the manufacturers’ website for a manual update.
See – How to update drivers in Windows 11 (Best ways)
Way-3: Run Windows Update troubleshooter
Windows updating takes place in the Operating System automatically when any new release is available for a specific device. Though this is an autonomous process, it might involve glitches as well. Incomplete installation of an update can create potential issues including slow boot of Windows. The issue should be resolved automatically with a fix developed by Microsoft usually but that doesn’t happen every time.
Windows Update troubleshooter is a handy utility to fix up update-related troubles. If you are experiencing Windows 11 performance problems, run the troubleshooter using the below steps –
- Press – Win + I.
- From the right pane of the Settings page, click – Troubleshoot.
- On the next page, select – Other troubleshooters.
- Click – Run.
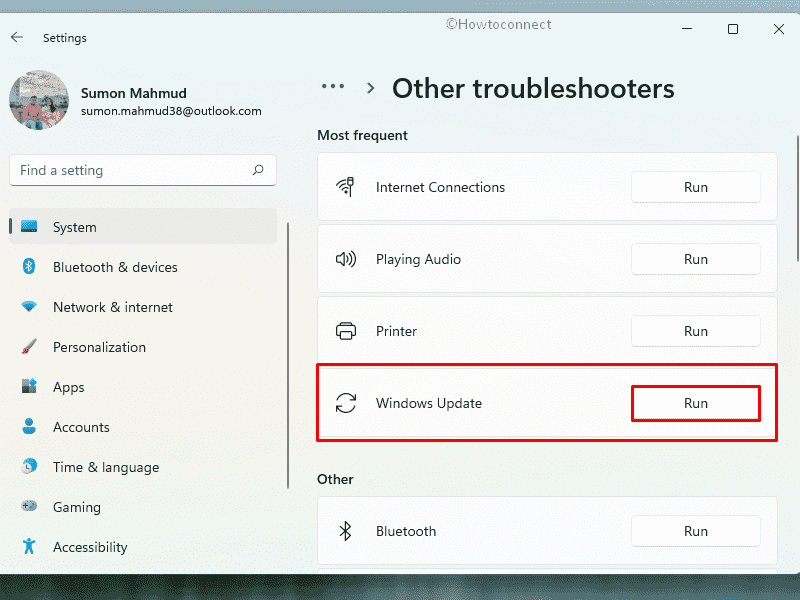
- Follow onscreen instructions to carry out the process.
- If the utility suggests a fix, apply it or do accordingly.
Way-4: Disable unnecessary startup programs
The greater number of programs you install in the system, the longer time it will take to boot up Windows. More often this has come to light that, various unnecessary programs loading at the booting phase increases the startup time of a computer.
Startup programs such as antivirus applications, webcam software, native keyboard if installed will be loading automatically and these are really necessary. Other than these few, any other programs like Spotify, adobe Acrobat, and others are not so necessary as Startup programs. Therefore, if you are experiencing Windows 11 performance problems, disable them sharply. Windows has specific procedures to disable the startup applications and here are the guidelines –
- Press – Ctrl + Shift + Esc.
- If the Task Manager is in compact view, click – More details.
- Shift to – Startup tab.
- Find the programs that are unnecessary and you hardly use.
- Select the same and from bottom, click – Disable.
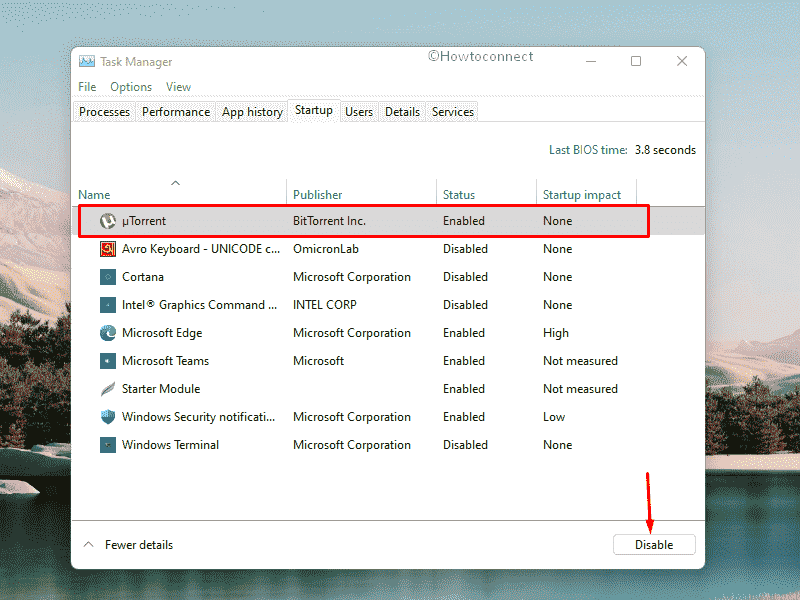
- Reboot Windows.
Way-5: Get rid of junk files
Having junk files on the computer is nothing new and these things aren’t as harmful as bloatware or viruses. When using the device, applications, some files are created for the acceleration of the task and their execution. They help to run a program smoothly and stores recovery backup for accidental data loss as well.
However, a lot of junk files, temporary files are not well suited for a smooth operation of OS for sure. We cannot expect top-notch performance from Windows 11 with piled-up junk files in it over time. Steps to be taken to delete these components can be easily carried out by using the default tool. Here are the guidelines to clean up junk files from Windows 11 –
- Press – Windows + R.
- In Run Dialog box, type – clenmgr.exe.
- Hit – Enter key.
- When a pop-up appears where C: is selected as disk drive, click – OK.
- From the bottom of the next wizard, click – Clean up system files.

- Hit – OK for the next pop-up.
- When Disk Cleanup window shows up, again click – OK.
- For final confirmation, click – Delete files.
- Once completed, restart the device.
Way-6: Take help of Performance Troubleshooter
While encountering any Windows 11 performance problems, you may consider running Performance Troubleshooter. This is a really crucial utility in the latest inclusion of Windows that brings a lot more room for the users to bring the most out of the OS. To run the tool, follow the below guidelines –
- Press – Start button.
- Type in – cmd.exe.
- When Command Prompt appears at top of the search result, choose – Run as administrator from the right flyout.
- Allow the User Account Control by clicking Yes.
- On the elevated Command Prompt, type the following and hit Enter –
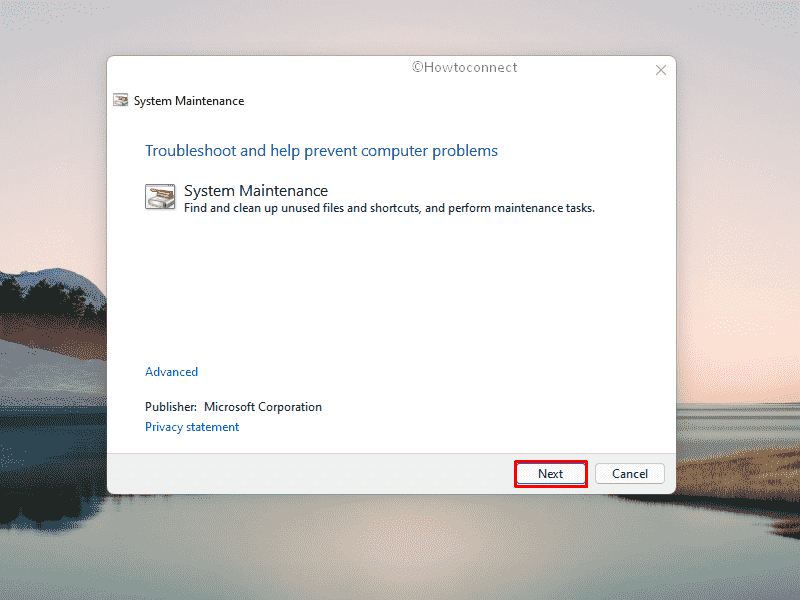
msdt.exe /id PerformanceDiagnostic
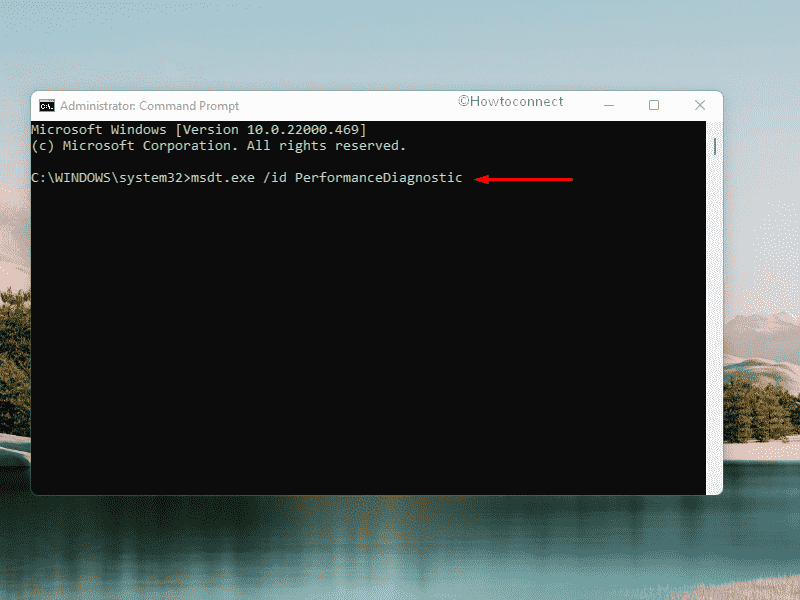
- Follow on-screen instructions to continue the process.
- If anything incorrect is found, the utility will adjust settings to improve operating system speed and performance.
Way-7: Scan full system for malware
Various types of malware are available in recent times for attacking the security of an Operating system. These bugs are so well coded that, it’s really hard for even a strongly coded security interface to demise them. Some trojans, bloatware, spyware, worms are always in a race to target the system and can easily cause havoc in the system files.
After being affected by malware, system files lose their integrity, necessary components which affect the regular operation. Windows 11 starts running slow, crashes follow-through, and drags more frequently which is never expected. To make the system run smoothly again, you can run a full system malware scanning and Fix Windows 11 performance problems. Instead of having a wide scale of anti-malware programs, we would prefer to try out Windows Security. The application has a robust construction and real-time features to detect and resolve any strong virus. Here are the guidelines to run the scan –
- Press – Windows key.
- Type – Windows Security.
- Hit – Enter.
- Click – Virus & threat protection.
- From the right pane, click – Scan options.
- Select – Full scan.
- Finally, click – Scan now.

- After it finishes scanning the full system, follow the recommendations of Windows Security.
Way-8: Check for corrupted system files
As mentioned earlier, the system files lose integrity and valuable components once being attacked by viruses. Few other reasons like sudden power surge, outage, conflicts of similar programs in the OS will lead the system files to go missing or damage them.
Windows system files are the core components for running the OS without any trouble. Once these files are at stake, Windows 11 cannot perform as it was supposed to and you observe abnormalities like slow starting and low performance. However, you can fix the corrupted system files and recover the missing ones with SFC and DISM scan. These are built-in utility run in Command Prompt when you execute dedicated command tools.
- Press – Win+S.
- Type – cmd.
- Select – Run as administrator.
- Click Yes when User Account Control prompts.
- Type – SFC /Scannow.
- Hit – Enter.
- When System File Checker finishes scanning the system, run the following command in the same way –
DISM.exe /Online /Cleanup-Image /Restorehealth
Way-9: Scan disk for error
Disk errors take place when the system is unable to finish data writing to a file, or form an inaccessible file. This is a severe issue in Windows that causes data loss and significantly affects the regular operation of the OS.
If you are having Windows 11 performance problems upfront, there might be errors in your disk drive. The easiest way to check and fix the former is to run Disk Checking tool. The utility is well designed to fix any data corruption in the disk once executed in Elevated Command Prompt. To run this, follow the below guidelines –
- Open Command Prompt as administrator.
- Type in – chkdsk C: /f /r /x
- Hit – Enter.
- When the scanning process ends, reboot Windows.
Way-10: Run Windows boot performance diagnostics
You may often observe Windows 11 start a bit slow or shows performance problems. Mostly, disabling a few unnecessary Startup programs will reduce this time and make PC faster. But the performance optimization issue still prevails when the booting process takes a lot of time even after a relatively fast startup. Here comes the Windows Boot performance diagnostic tool. The utility is built to determine the root causes and offer automatic fixes for the glitches. Here are the steps to run Windows boot performance diagnostics –
- Right-click on Start.
- Select – Run.
- Enter the below command in the Run dialog box –
%systemroot%\system32\msdt.exe -id MaintenanceDiagnostic- Hit – Enter.
- Once the Troubleshooter wizard comes in, click Next button.
- Click – Try troubleshooting as an administrator.
- Comply with on-screen instructions to complete the process.
- Restart once the tool finishes the task.
Way-11: Fix RAM issues
it might be the RAM for which the device is offering Windows 11 performance problems. For a defective RAM, the machine freezes frequently, reboots all of a sudden and brings up a few glitches like blue screen errors. Corruption in the system files is a leading cause to bring up performance issues in the OS that can be caused by troublesome RAM.
RAM can be faulty when it is subjected to be removed from a powered-up device or it is separated from the motherboard when the laptop is still not fully discharged. Static discharge can be another reason to make your RAM faulty which occurs when a user touches it without making it grounded. Usually, such issues need a complete replacement of the unit and you can ask the help from purchase centers. But before you decide to buy a new one, run the memory diagnostic tool to check where the real problem is.
- Click – Start.
- Type – mdsched.exe.
- Hit – Enter.
- When Memory Diagnostic tool appears, click – Restart now and check for problems.
- Doing so will reboot the system and start diagnosing.
- The test result will appear on the screen after login back in.
If you don’t see the result, check it manually with the help of the next steps –
- Press – Windows+R.
- In dialog box, type – eventvwr.msc.
- Hit – Enter.
- Go to the right pane and click – Find.
- In the search box, type – MemoryDiagnostics-Results.
- Press – Enter.
- Check the result thoroughly and take further steps.
Way-12: Uninstall unwanted third-party programs
Installing third-party programs on various occasions doesn’t always help instead, they cause the system to run slowly. These programs often alter the Windows experience beyond your attention. The controlling alternation takes place in the form of browsing sometimes leading to unidentified downloads, unauthorized installations, error messages, and modification of settings.
In order to get a better Windows experience, you should rely on the default applications and programs from Microsoft Store only. There are great variations of software for aiding specific tasks that would definitely meet your requirements. Avoid installing unnecessary applications to have a low performance from Windows 11 and associated glitches. To uninstall any third-party program, follow the below guidelines –
- Press – Win+S.
- Type – appwiz.cpl.
- Hit – Enter.
- When Programs and Features window shows up, look for the unwanted apps.
- Right-click on an unnecessary application and select – Uninstall.
- Click – Uninstall once confirmation prompt appears.
- Restart Windows once the process ends.
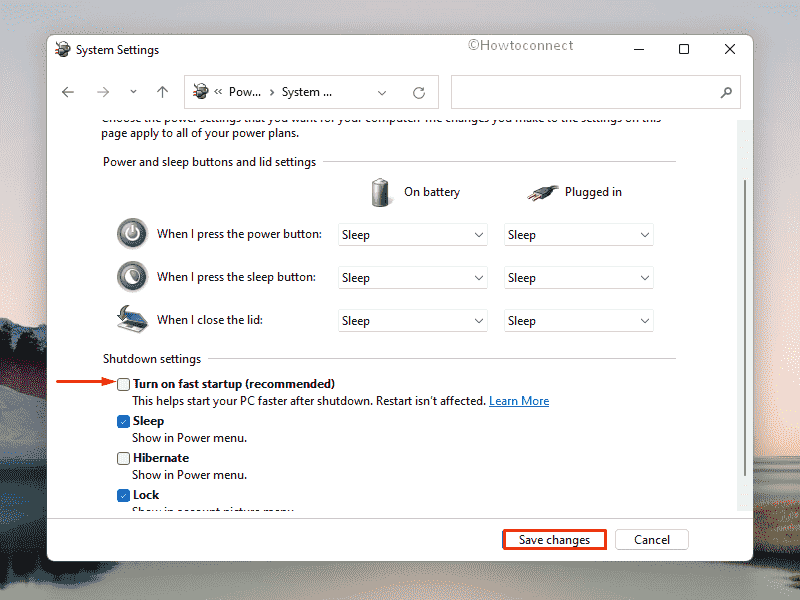
Way-13: Turn off Fast boot
Fast Boot in Windows computers is a special feature provided to shorten the bootup time from a fully shut down condition. However, this doesn’t help many of us as it will prevent the device from a regular shut down. Therefore, compatibility issues rise up sharply especially in the machines not supporting the Sleep mode or hibernation.
If you are having Windows 11 performance problems in a UAD-2 Firm Wire machine, disable this feature right away. To do so, here are the guidelines –
- Open Control Panel.
- Choose – Power Options.
- From the left overlay, click – What the power buttons do.
- Hit the link that says – Change settings that are currently unavailable.
- Uncheck the box set before Turn on fast startup (recommended).
- Click – Save Changes.
Way-14: Move Windows 11 to SSD
Solid State Drive is the latest technology that operates more quietly, with high efficiency without any moving components. It has very few breakable parts than a traditional HDD having spinning platters making the reading and writing operations faster.
SSDs offer a significantly fast boot time for Windows 11 computers, data transfers are immediate and it has a very high bandwidth. The business world today needs ultra-high-speed data handling which can be achievable by SSDs only. If you are facing Windows 11 performance problems while having a traditional; HDD, can consider swiping to SSDs.
To do so, follow How to Reinstall Windows 10 or 11 from HDD to SSD
Way-15: Rollback to the former Windows version
After performing the above tips and tricks if you are still having performance issues with Windows 11, the computer may not have the proper specifications to run the OS. It might be a bit old PC and cannot really cope with the higher configuration of Windows. If this is true, we regret to recommend you to go back to earlier versions of OS, i.e. Windows 10 preferably.
- Press – Windows + I.
- Select – Windows Update.
- Shift to the right-hand side.
- Click – Update history.
- Once on the next page, click – Recovery options.
- Hit – Go back.
- Comply with the on-screen instructions to finish the process.
Methods list:
Way-1: Install Windows update
Way-2: Update graphics driver
Way-3: Run Windows Update troubleshooter
Way-4: Disable unnecessary startup programs
Way-5: Get rid of junk files
Way-6: Take help of Performance Troubleshooter
Way-7: Scan full system for malware
Way-8: Check for corrupted system files
Way-9: Scan disk for error
Way-10: Run Windows boot performance diagnostics
Way-11: Fix RAM issues
Way-12: Uninstall unwanted third-party programs
Way-13: Turn off Fast boot
Way-14: Move Windows 11 to SSD
Way-15: Rollback to the former Windows version
That’s all!!