Windows 10 includes an awesome Multitasking feature Sets that allows you open Files and apps tabs, and switch between them. Currently, this is available for Windows Insiders who opted for Fast ring level and run later than build17063. The System settings already lay an option to Disable or Enable Sets in Windows 10 but sometimes when it doesn’t work you need to take support Regedit or Gpedit.
Registry Editor incorporates a DWORD Value similarly Group Policy Editor have a Policy setting dedicated to grabbing this multitasking feature. You can easily make changes in the tools and override the option in the Settings app.
How to Disable Enable Sets in Windows 10 From Gpedit and Regedit
Here is how to disable enable Sets in Windows 10 From Gpedit and Regedit –
Enable Sets in Windows 10 From Regedit
Step-1: In order to access Registry Editor, launch Start Menu and type “regedit“. When the result displays the same command on top, press Enter and hit on Yes when a UAC prompts up.
Step-2: Once Registry Editor comes into the view, navigate to the following path on the left sidebar.
HKEY_CURRENT_USER\Software\Microsoft\Windows\CurrentVersion\CloudStore\Store\Cache\DefaultAccount\$$windows.data.tabshell\CurrentStep-3: Shift to the right side, right-click the Binary value named DATA. From the menu that pops up, click Modify.
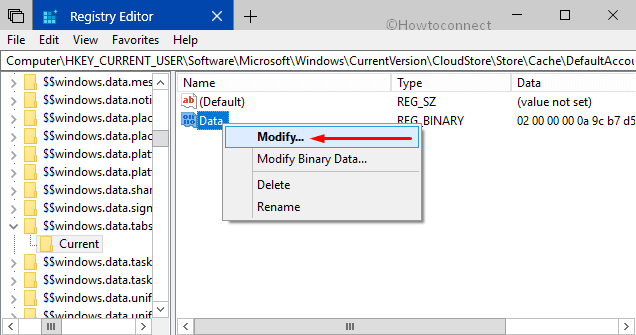
Step-4: Now, set the following value on the box that shows up and click OK to implement the changes.
02,00,00,00,51,1a,48,fb,c1,cd,d3,01,00,00,00,00,43,42,01,00,00
Step-5: Finally, sign out from your user account and sign in again to “Enable Sets in Windows 10 through Registry Editor.
Disable Sets in Windows 10 From Regedit
Now you know how to Enable Sets in Windows 10. Let’s see how to disable it.
• Make a combined press of “Win+R” to open Run dialog box on the PC screen. Type regedit in the box and hit on the OK button. When a UAC comes into view, press Yes to continue.
• Reach out to the below-given path on the left column of the Registry.
HKEY_CURRENT_USER\Software\Microsoft\Windows\CurrentVersion\CloudStore\Store\Cache\DefaultAccount\$$windows.data.tabshell\Current• Move to the right side to set the BINARY value named Data to the following value:
02,00,00,00,7a,fa,5c,b5,bd,cd,d3,01,00,00,00,00,43,42,01,00,02,00,00
• To make the changes visible, sign out and sign in again to your user account.
Disable Enable Sets in Windows 10 From Gpedit for all users
Before proceeding further, keep in mind that Gpedit is available only in Pro, Education and Enterprise edition of Windows 10.
See How to Activate Local Group Policy Editor / Gpedit.msc in Windows 10 Home.
Step-1: Type “gpedit” in Cortana and make a click on Edit Group Policy.
Explore more ways to Open Group Policy Editor in Windows 10.
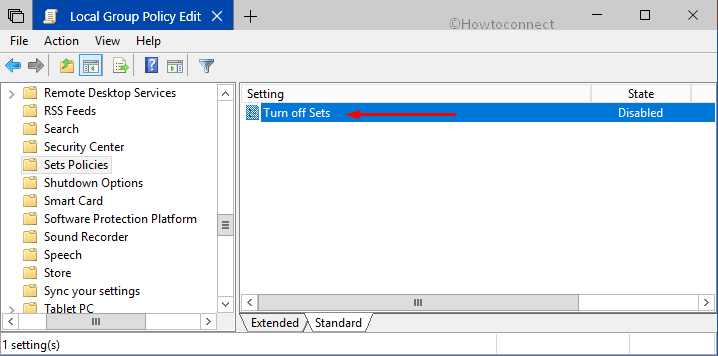
Step-2: When Group Policy Editor will show up, go to the following address from the left pane.
Computer Configuration =>Administrative Templates =>Windows Components => Sets Policies.
Step-3: Thereafter switch to the right pane and double-click the policy Turn off Sets.
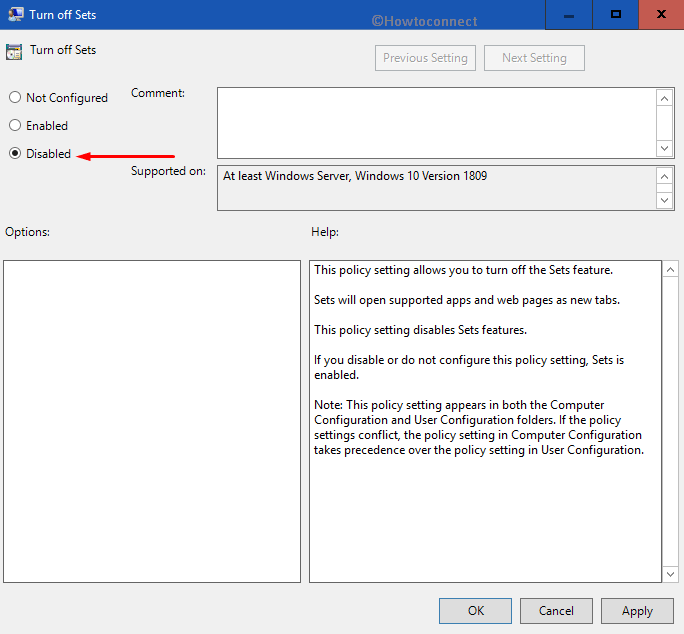
Step-4: Upon completing the above steps, you will see a new pop-up window. Now, to disable Sets, select the Disable radio button and click OK to implement the changes.
Disable Enable Sets in Windows 10 From Gpedit for Specific user:
1. First of all, launch “specific users or groups” in Local Group Policy Editor. Reach out to the following address:
User Configuration => Administrative Templates => Windows Components => Sets Policies.
2. Move aside to the right pane and double-click on the Turn off Sets policy.
3. After that choose Enabled or Disabled from the new window and click OK to save the change.
That’s it. Choose any method that you prefer and enjoy the amazing features of Sets.