When you Enable and Use Eye Control in Windows 10, you can directly interact with your system through eyeballs. You don’t need any shake of mouse or touchpad to position your cursor on any place but dwell of eyes is sufficient. Microsoft introduced this new eye-tracking technology for its Insiders, however, very soon it will be available for all the users on the original version. The Ease of Access category contains a specific section for Eye Control. But to use this feature, you should connect a compatible eye-tracking device moreover install its application on the system.
How to Enable and Use Eye Control in Windows 10
Requirements to Enable and Use Eye Control in Windows 10
Before you start with the tutorial, you have to acquire certain things. For the time being, Eye Control actually supports two eye-tracking devices – “Tobii Eye tracker 4C” and “Tobii EyeX” respectively. Microsoft states that these are the two devices that this feature currently supports. You can grab them from Amazon.
Secondly, this feature is available in devices running Windows 10 Insider Builds. Therefore, you need to Find the Version of Windows Installed on System.
So, first purchase one eye tracking device and then proceed to Enable and Use Eye Control in Windows 10.
Download and set up the Eye-tracker
The eye tracker device will only function in Windows 10 when you download and install it’s a utility on the PC.
Step 1 – Head to the Tobii Eye tracker web page and download the program. Once the download gets over, Run its executable file.
Step 2 – Moving ahead, directly connect the eye tracker device to your system through the USB port.
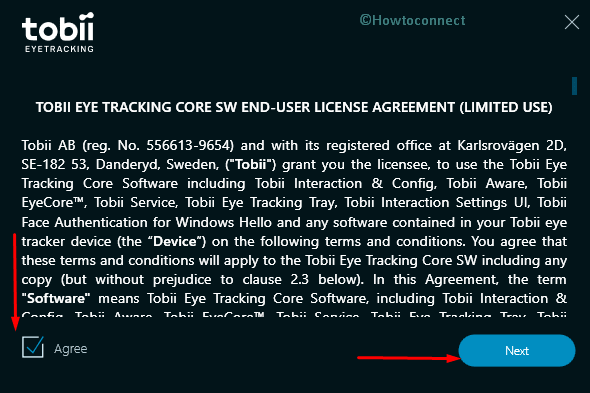
Step 3 – On the setup window of the software, tick the checkbox next to the option Agree and click Next. Now, wait for few minutes for the installer to finish.
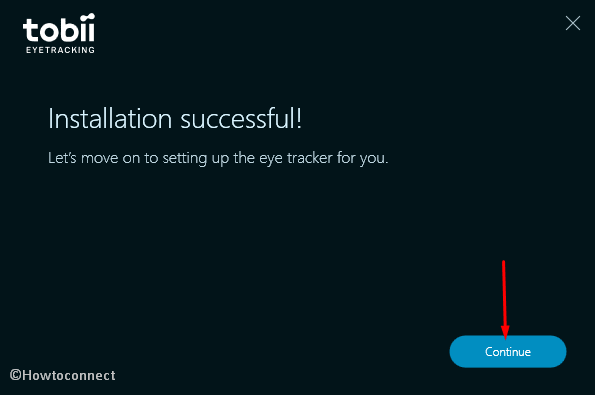
Step 4 – When you see Installation successful message on the setup, click Continue followed by a click on Next.
Step 5 – Perform a click on “This display” button to set up the eye tracker on your system. Here try to position the eye tracker at the bottom center of the monitor. Moreover, also align the lines that you notice there using the mouse.
Step 6 – Click Done.
Step 7 – Now make sure that the eye tracker can actually see your eyes. That tool will ask you to see how much you can move around.
Step 8 – To properly and accurately calibrate the eye tracker follow rest of the guidelines on the screen.
Step 9 – Once you finish optimizing the eye tracker, type your name and click Save.
Now, to Enable and Use Eye Control in Windows 10, follow the below sections carefully.
How to Enable Eye Control in Windows 10
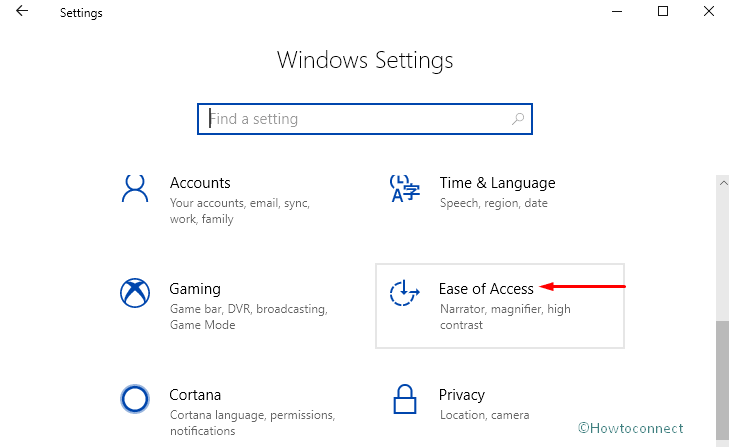
i. Click the Windows logo icon on the extreme left of the taskbar to open the Start Menu. Select cog icon to launch built-in Settings application. However, to quickly access the program, press Win + I keys.
ii. Make a click on “Ease of Access” tab on the next screen.
iii. Select Eye Control section on the left column of the following page. Shift to the corresponding right side and toggle On the switch Control your PC and type with an eye-tracking device.
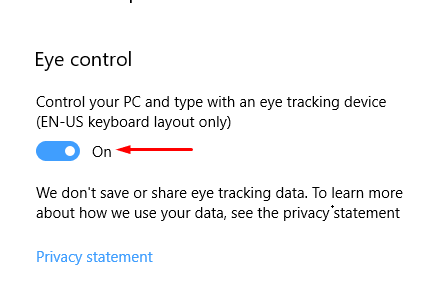
Your system is now ready to be used with your eyes.
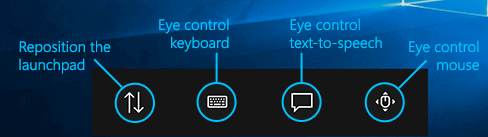
How to Use the Launchpad Through Eye Control in Windows 10
The moment you enable this feature, the launchpad immediately appears on the screen. It displays four buttons and they allow you to –
I. Reposition the launchpad – Regulate the “eye control” mouse cursor to click as well as access things on your PC.
II. Eye control keyboard – Type whatever you want using this button.
III. Eye control text-to-speech – Use this button to type words on the computer screen and let the feature “read them aloud”.
IV. Eye Control Mouse – With this button, relocate the “launchpad” either to the bottom or top of the screen.
So to select any of these buttons, rest or dwell your eyes until it activates. The dwelling is to simply fix your eyes on a certain portion of the screen and looking there for a specific amount of time. This time period is known as “Dwell time”.
How to Control the Mouse via Eye Control in Windows 10
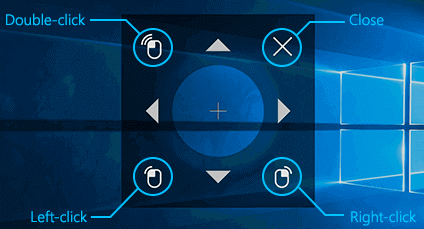
A. First of all, dwell on the fourth button, “Eye control mouse” that appears on the launchpad.
B. Next position your eyes on the screen where you want to place the cursor. Now fine-tune the position and choose the action you want to perform. Actions such as right-click, double-click, left-click or close as shown in the below screenshot.
How to Type using the Eye Control Keyboard in Windows 10
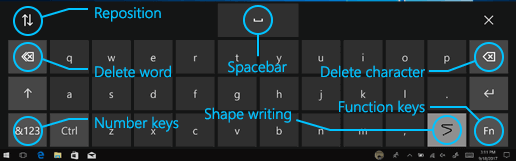
• On the launchpad, dwell on the “Eye Control Keyboard” button. This will immediately open the keyboard on the screen.
• Now, dwell on the characters that you wish to type.
• As you focus on each letter, the prediction of the word shows at the top of the keyboard. If the predicted word matches with the one you want to type, then dwell on that specific word to select.
• Moreover, dwell the &123 key when you have to type symbols and numbers.
• Also, select the Fn key to type other keys.
For reference, you may like to read our tutorial to Turn on Standard Layout Full On-Screen Keyboard in Windows 10.
How to Use Shape Writing in Eye Control Windows 10
Shape writing is another feature of Eye Control that lets you type words faster and quicker. It will form words when you dwell on the first and last letter and also by glancing at letters. On the last letter, a hint of the word will appear. If the prediction is incorrect, choose another predicted word.
# On the Eye Control Keyboard, select Fn key. Moving ahead, choose the Settings key.
## Here, Turn On Shape Writing. By doing so, you can anytime toggle on or off the Shape writing button on the keyboard.
How to Change Eye Control Settings in Windows 10
To suit your needs, Eye Control serves you few decent range of settings. To access them, first, dwell “Fn” key on the “Eye Control Keyboard“. Next, select Settings key. Here, you can modify the following options.
Typing dwell time: It lets you assign dwell time period for symbols, numbers as well as letters.
General dwell time: Easily configure the dwell or the focus time for mouse cursor control, word predictions, moreover function keys.
Shape writing: When you activate this setting, it lets you type words quicker and faster.
Gaze cursor: This switches on a cursor that displays where your eyes are pointing on the screen.
How to Use Eye Control Text-to-speech in Windows 10
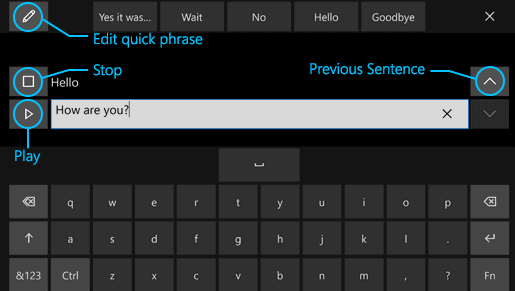
Easily and directly communicate with your near and dear ones through text-to-speech. So, on the launchpad, dwell on Text-to-speech button.
Now use the keyboard to type sentences and finally select Play button to hear them aloud.
At the top of the keyboard, you see quick phrases. Those phrases will be spoken aloud when you select them. Therefore, to modify the quick phrases, simply dwell on the Edit button. The Edit button is visible on the top left.
Furthermore, read our tutorial to Customize Speech Settings in Windows 10.
That’s all about How to Enable and Use Eye Control in Windows 10.