Looking for some easy and quick ways to resolve the KB5026361 Failed to Install? This issue is common and is faced by many Windows 10 users and can occur due to a variety of reasons, including corrupted system files, conflicts with other installed software, or issues with the Windows Update service. The error codes during this occurrence might be 0x800f0922, 0x800736b3, 0x800F0984, 0x80073701, or other.
When you are unable to install KB5026361, a message, “There were some problems installing updates, but we’ll try again later. If you keep seeing this and want to search the web or contact support for information, this may help: (0x800736b3)” appears. The error codes may be different with this message. Fortunately, several methods exist to resolve this error, including running the troubleshooter, resetting the Windows Update components, or manually installing the update using the standalone package. See: Fix KB2267602 Failed to Install in Windows 11 or 10.
Table of Contents
KB5026361 Failed to Install in Windows 10
Here is How to Fix KB5026361 Failed to Install with Error in Windows 10 –
Way-1: Use Microsoft Update Catalog Standalone Package
Installing Microsoft Update Catalogue hosted Standalone Package allows you to download and install Windows updates manually. It is a very direct way to resolve the KB5026361 failed to install issue on your system.
After witnessing automating Windows Update failure, this procedure runs the standalone program to make the system error-free and lower the likelihood of future system issues or security vulnerabilities. Here are the steps to follow:
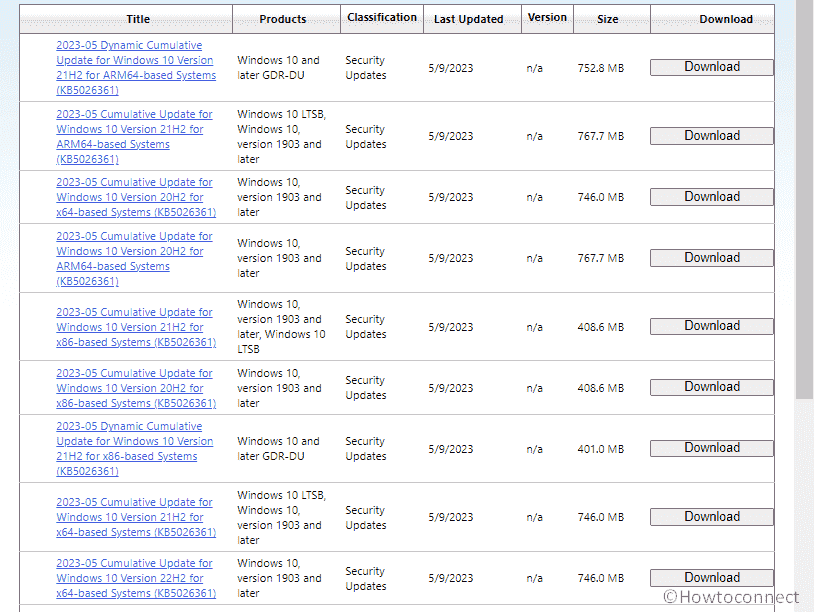
- Go to https://www.catalog.update.microsoft.com/Search.aspx?q=KB5026361 to get started.
- Choose the file compatible with your processor from the list and press Download.
- From the popup page, click the link.
- When the download is complete, double-click the .msu file:
windows10.0-kb5026361-x64_961f439d6b20735f067af766e1813936bf76cb94.msu
or
windows10.0-kb5026361-x86_5861f2d9fce08abba0ae33d7891a43aeeaea27bd.msu
or
windows10.0-kb5026361-arm64_e4e366ee0bf58b89c6d200e966a934b76d1c1524.msu
- When asked, choose Yes.
- The machine will restart several times before the installation is complete.
Way-2: Utilize Windows Update Troubleshooter
The KB5026361 0x800736b3 error can be fixed with the help of the built-in Windows Update troubleshooter. This diagcab application works by scanning the Windows Update service for common issues such as missing or damaged files, wrong settings, and other issues. To utilize the Windows Update troubleshooter, head to the following instructions:
- Select Search.
- Type troubleshoot into the box.
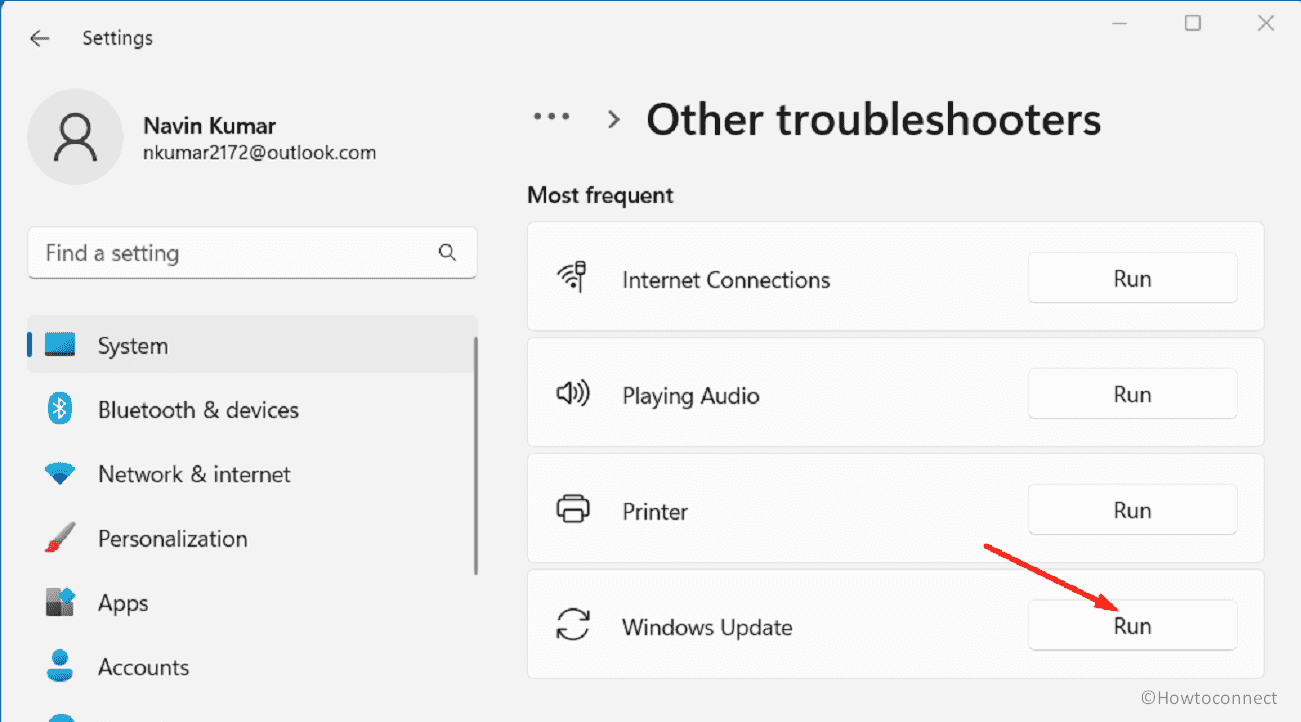
- When the Settings app appears, select Other troubleshooters.
- Locate Windows Update and click the Run button.

- Hold on until the problem is thoroughly addressed.
Read: Use Common Windows Update Troubleshooter on Windows 11, 10, 8.1, 7.
Way-3: Run SFC and DISM Scan
SFC (System File Checker) and DISM (Deployment Image Servicing and Management) are essential built-in Windows 10 tools that can assist in the resolution of numerous system faults, including the KB5026361 Failed to Install error. These utilities look for and restore any damaged or missing system files that might be causing the problem.
SFC scans the system for file corruption and replaces any damaged or missing files whereas DISM scan resolves any faults with the Windows image, including the system files and other components that are not operating correctly. Check out the steps mentioned below to use these tools:
- Start by clicking the Search button.
- Enter – cmd.exe.
- Choose Run as administrator.
- When asked for permission, choose Yes.
- Then, on the keyboard, write
SFC /Scannowand hit the Enter key. - Depending on the quantity and size of files and folders, it may take some time.
- Finally, restart the system to determine if the problem has been repaired.
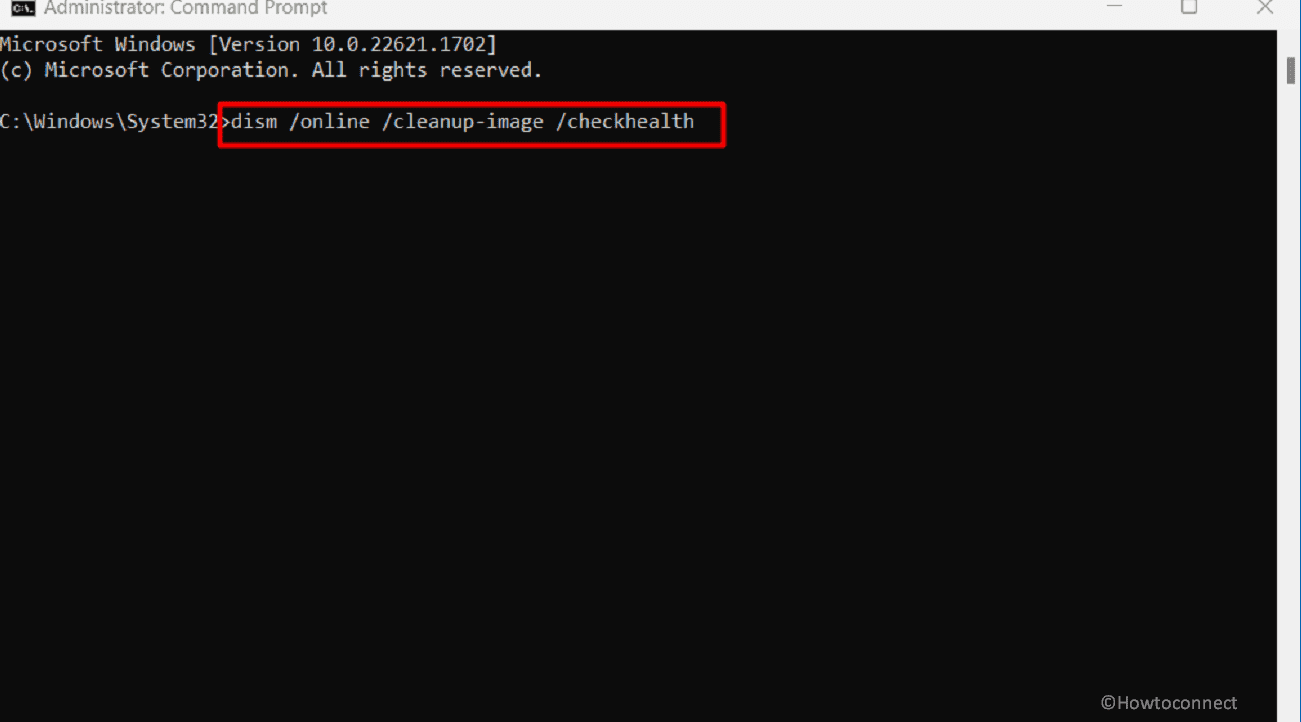
- If the error code continues to appear, restart the Administrator: Command Prompt. Then, one by one, execute the following commands:
dism /online /cleanup-image /checkhealth
dism /online /cleanup-image /scanhealth
dism /online /cleanup-image /restorehealth
- Restart the PC once you have done the above three instructions for Deployment Image Servicing and Management.
Way-4: Temporarily Remove Third-Party Antivirus Program
Still struggling with KB5026361 0x800736b3, 0x800f0922?, 0x800F0984, 0x80073701 error codes. It’s time to remove your third-party antivirus because such programs can interfere with the installation process. Moreover, sometimes they can prevent Windows updates from downloading or installing effectively or can create clashes with other system components required for the update to function properly. Follow these instructions to uninstall a third-party antivirus program:
- Press the Winkey and R.
- Type appwiz.cpl.
- Then hit the Enter key.
- Locate the antivirus software.
- Then, right-click on the program and select Uninstall.
- On the confirmation popup, click the Yes button.
- If you come across a wizard, follow the directions on the screen.
- Finally, reboot the device you are using.
- After then, go to Settings > Update & Security > Windows Update and click on Check for updates to see whether the issue has been resolved.
- Once installed, you can reinstall the antivirus.
Way-5: Correct Windows Update Services
Windows update services such as CryptSvc, BITS, and Wuauserv are all engaged in the Windows Update process. CryptSvc is in charge of handling certificates used for a secure connection, BITS is responsible for background file transfers, and Wuauserv is viable for checking for and downloading updates from Microsoft servers.
In circumstances when the services are not configured correctly or have gotten damaged, changing their configuration might assist in resolving the KB5026361 Failed to Install problem in your concerned system. Here’s how to change the settings for these services:
- Press the Windows and Q keys at the same time.
- Type – Services.
- Hit – enter.
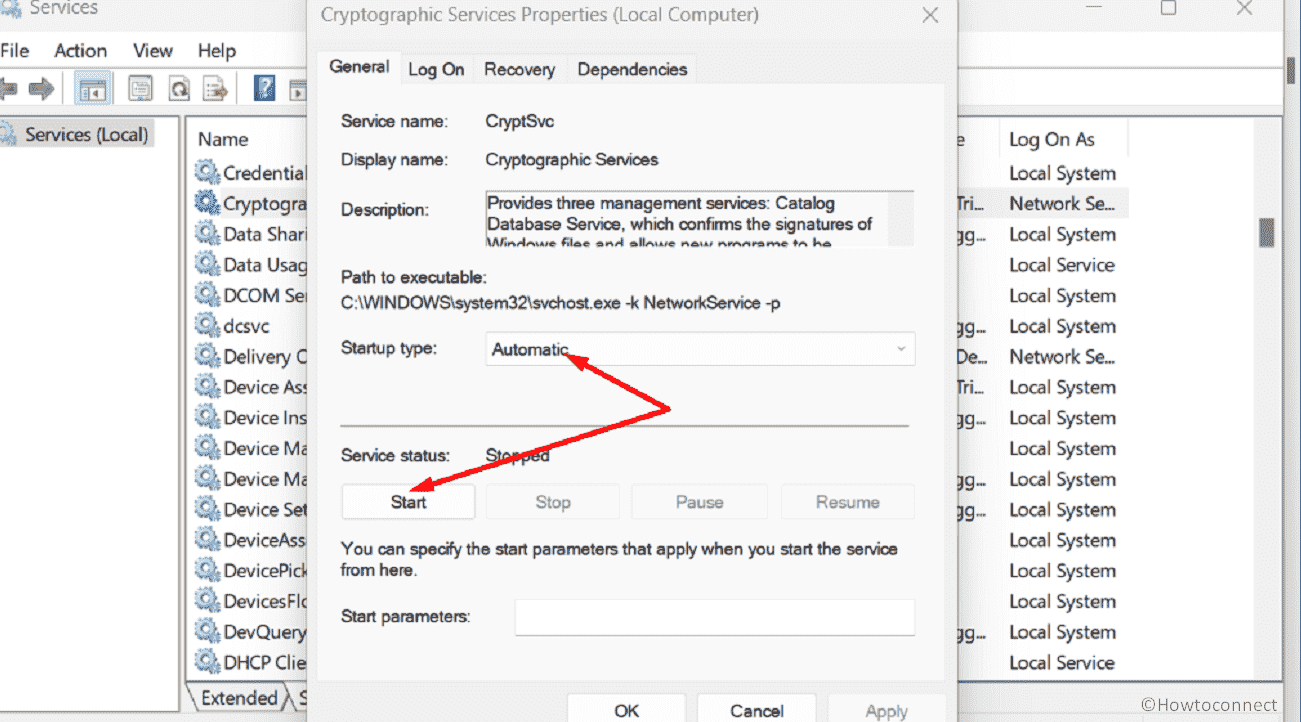
- In the Name column, look for Cryptographic Services.
- Right-click it and choose Properties.
- Select Automatic from the Startup type dropdown option.
- From the Services status field, choose Start.
- Finally, click OK and Apply.

- Restart Background Intelligent Transfer Service and Windows Update as needed.
- Navigate to Settings => Update & Security => Windows Update and select Check for updates.
Way-6: Clear the Windows Update database Cache
Another possible way to fix KB5026361 failed to Install error is by clearing the cache which is nothing but a temporary folder that Windows uses to store update files before installing them.
These cached files can become damaged or incomplete at times, resulting in the aforementioned issues or errors. To clear the Windows Update cache, follow these steps:
- Download Reset_Windows_11_update.zip.
- Then, right-click on the zip file.
- Select Extract All.
- WuReset.bat is located in the unzipped folder.
- Select Run as administrator from the context menu when right-clicking on this bat file.
- Simply press any key to proceed.
- Allow the scripts to complete their tasks before restarting your device.
Way-7: Fix Installation Error with In-Place Upgrade
In-Place update is a Windows feature that allows you to update your current version of Windows to a newer version while retaining all of your files, settings, and apps. This can help in the quick resolution of Windows update issues such as KB5026361 when other fixes may have turned out to be futile.
An In-Place Upgrade effectively can reinstall Windows on your computer without losing any of your data or existing programs and also remove any underlying problems or corrupted files that are generating the Windows update error. The following are the procedures for performing an In-Place Upgrade in Windows 10:
- Visit https://www.microsoft.com/en-in/software-download/windows10.
- Scroll down to Create Windows 10 installation media and click it.
- Click the Download tool now option.
- Select Yes after double-clicking on the downloaded media production tool setup file.
- Check the box to accept the agreement’s terms and conditions.
- Upgrade this PC right now.
- Then press the Next button.
- Choose Install.
- Finally, the error code will be fixed with the installation of the operating system.
Way-8: Use the Disk Cleanup
Disk cleanup is a built-in Windows utility for freeing up disk space on your system by eliminating temporary files, system files, and other unwanted objects.
This tool can help to solve Windows update issues such as the “KB5026361 failed to install” when there is insufficient free space on your machine to finish the upgrade. To resolve it, follow these steps:
- Click – Search on the taskbar.
- Type cleanmgr.exe into the search box.
- Press – Enter.
- Choose (C:) from the Drive Selection pop-up (Important: we suppose C: is the installation drive for your machine).
- Select OK.
- From the wizard that displays, choose Cleanup system files.
- Select (C:) once more and press Enter.
- Tick all the boxes in Files to delete before clicking OK at the bottom.
- From the confirmation box, choose Delete Files.
- Lastly, check for updates.
Methods:
Way-1: Use Microsoft Update Catalog Standalone Package
Way-2: Utilize Windows Update Troubleshooter
Way-3: Run SFC and DISM Scan
Way-4: Temporarily Remove Third-Party Antivirus Program
Way-5: Correct Windows Update Services
Way-6: Clear the Windows Update database Cache
Way-7: Fix Installation Error with In-Place Upgrade
Way-8: Use the Disk Cleanup
That’s all!!

Sunita
says:True! You can try Fix fltmgr.sys BSOD or Blue Screen Error in Windows 10.
MerleOne
says:Hi,
That’s ironic, my current issue with Win10 is that this KB5026361 is causing many BSOD since it was installed. I had to uninstall it but, running Win10 home, it gets pushed back. The fault appears to be linked to a Windows driver fltmgr.sys. Before this KB, my Win10 was very stable ! Any hint on how to “block” this update (or notify Microsoft). I had the minidump analyzed by a specialist, it pointed to a non Microsoft driver. I have since then removed the software & driver but the issue remains. Any hint ? Thanks.
Merle1