Devices and Printers is a part of classic control panel that allows you to add and manage peripherals on Windows 10. Furthermore, The platform provides information about pending documents in the queue for printing, size of the paper in use and lets you adjust the settings. So we are going to discuss all possible ways to open Devices and Printers (Control Panel) in Windows 10 here.
The Devices and Printers applet includes every setting and option for Mouse, Fax, printing machines added via bluetooth or USB ports. Moreover, you can see how each of them is working, share over network, troubleshoot errors with specific tools, and check necessary information.
Open Devices and Printers
Here is how to open Devices and Printers (Control Panel) in Windows 10 –
1] With help of Control Panel
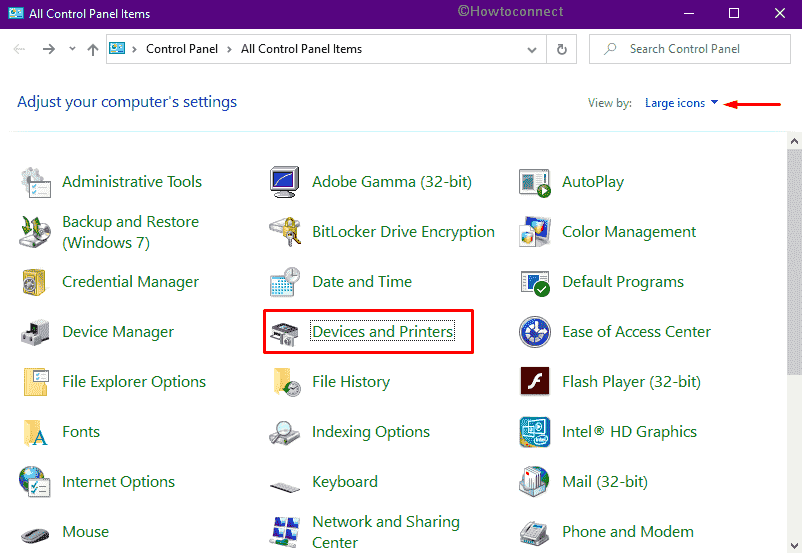
- Click on Windows logo on keyboard and write control panel.
- Hit Enter.
- Set the View by option to Large icons.
- From the available links, select Devices and Printers.
2] Using Windows Settings app
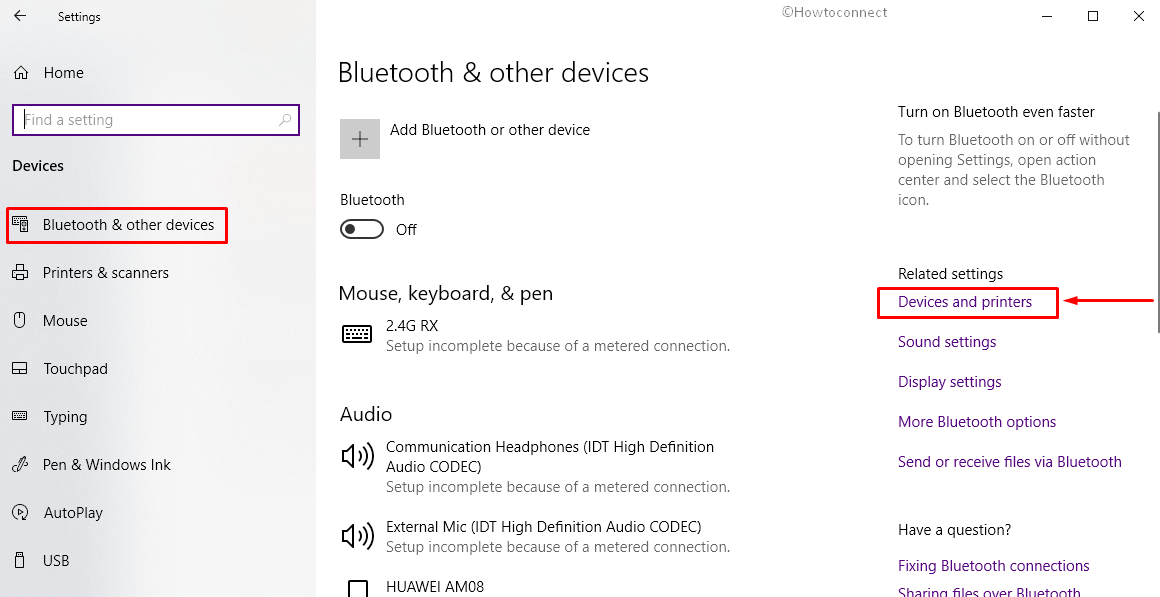
- Press Win and I hotkey together.
- From the Settings interface, click Devices.
- When the next page appears with Bluetooth & other devices unveiled, move to the right surface.
- Click the link Devices and Printers located in the extreme right column.
3] Making use of Command Prompt
- Press Win+R to invoke Run command.
- Put cmd in the available empty field and click OK button.
- Once in the black panel, insert control printers.
- Finally, hit Enter key to open Devices and Printers.
4] Open Devices and Printers via Run
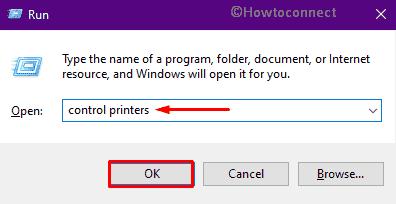
- Right-click on Start icon and select Run.
- Type control printers in the command box.
- Finally, Click on OK.
5] Through Windows PowerShell
- Press Win+S altogether to invoke taskbar search.
- Type powerShell and hit Enter key.
- Let the utility to activate to execute a command.
- Hereafter put control printers after the blinking cursor.
- Press Enter to open Devices and Printers.
6] Pin Devices and Printers
- Open Control Panel first.
- Make sure the View by option is set as Large icons.
- Right-click on Devices and Printers.
- Choose Pin to Start.
- Similarly, you can opt for Pin to Quick access.
7] Create Desktop shortcut
- Right-click on any void space and choose New => Shortcut.
- When a wizard shows up, type in control printers in the available box.
- Click Next button to continue.
- On the consequent wizard, provide the shortcut a name such as Devices and Printers.
- In the end, click on Finish.
- The system will create a desktop shortcut immediately and from now on, you just need to double-click the same.
8] Generate hotkey to open Devices and Printers
- First of all, create a shortcut for Devices and Printers by following the above method.
- Once created, right-click on the same and choose Properties.
- When a wizard makes an appearance, click the bar set aside Shortcut key.
- Press a key you prefer.
- You will notice the system has added Ctrl+Alt before the pressed key.
- Therefore, the hotkey will look like Ctrl+Alt+key you entered.
- Click Apply followed by OK.
- Now onward, press the keyboard shortcut at one go to open Devices and Printers.
9] Add Devices and Printers in the context menu
- Open Run Dialog box and put regedit in the text field available there.
- Hit the OK button.
- If a UAC prompts for permission, click Yes to provide your consent.
- When Registry Editor becomes visible, navigate the following directory –
HKEY_CLASSES_ROOT\DesktopBackground\Shell
- Right-click on Shell present in the left column and choose New => key.
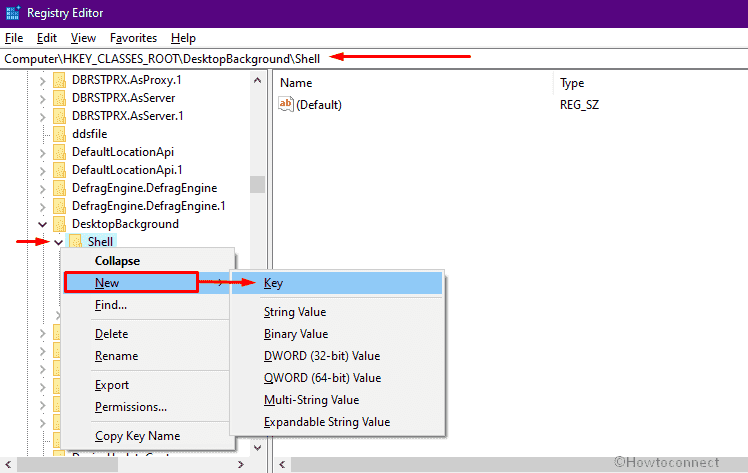
- Name the subkey as DevicesAndPrinters.
- Move to the adjacent right.
- After that, right-click on an empty space and select New first followed by String Value.
- Name the value MUIVerb.
- Double-click on MUIVerb thereafter set its value to Devices and printers.

- Similarly, create another String Value named Icon and set %systemroot%\system32\DeviceCenter.dll,-1 as value data.
![]()
- Later on, right-click on DevicesAndPrinters from the left column and choose New => Key.
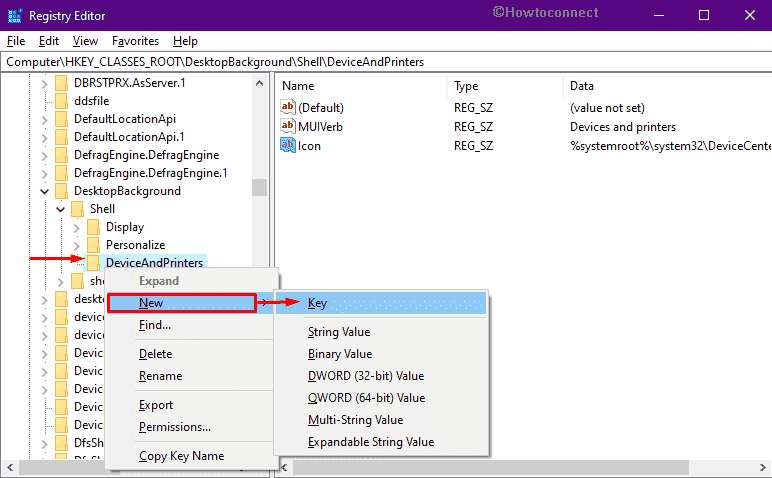
- Put Command as name.
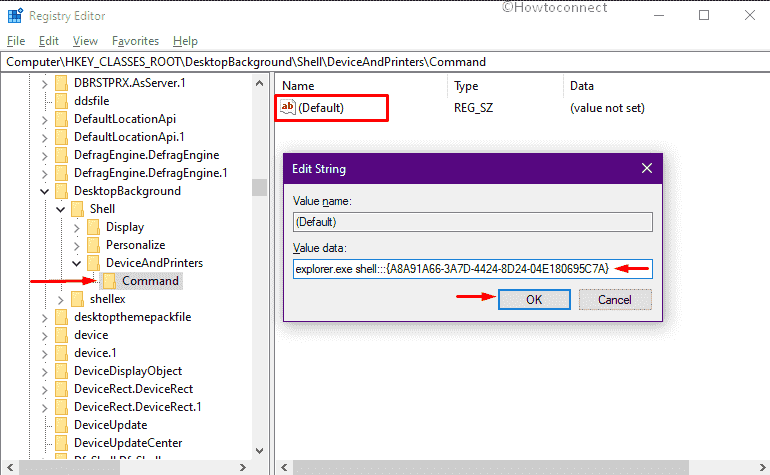
- Now, shift yourself to the right-hand side and double-click the string key named Default.
- Copy the following and paste it in the Value data box –
explorer.exe shell:::{A8A91A66-3A7D-4424-8D24-04E180695C7A}
- Click the OK button to save the changes.
- Finally, go to the desktop screen and right-click on a void space.
- Opt for Devices and Printers from the context menu.
Methods:
1] With help of Control Panel
2] Using Windows Settings app
3] Making use of Command Prompt
4] Via Run Command
5] Through Windows PowerShell
6] From Pined Devices and Printers shortcut
7] Using Desktop shortcut
8] By means of hotkey
9] From context menu
That’s all!!