Most people are wary to have enhanced performance out of Windows 11. However, you can get remarkable improvement in PC speed through making some simple changes settings. Even on an old computer, you are able to achieve best performance using some hidden tricks in Windows 11. In this write-up today, we will show you some tips to Speed Up Windows 11 without the use of any tool.
You might be knowing that before installing Windows 11, all PCs must undergo Health Checkup testing to ensure if it really competing for the least system specifications. Some computers might pass the test and have the new OS in it, unfortunately, becomes a lot slower. It may happen in slightly older PCs, devices with low configuration but other conditions are involved sometimes. Furthermore, some computers failed to deal with heavyweight programs and work slow. Let’s move forward to have positive results for having better PC performance while running Windows 11.
How to Speed Up Windows 11
Here is how to Speed Up Windows 11 –
Way-1: Disable Visual Effects
Windows 11 comes with a lot of visual effects to make it look sleek and lucrative. These always represent the attraction of the operating system but can sometimes reduce the speed significantly. The reason behind this is, Windows operated machines will act sluggish when there is a relatively less powerful GPU.
If you are using a slightly older computer or a low configured one, we recommend you to disable the visual effects in order to Speed Up Windows 11. Thankfully the process is much easier in the version, follow the below guidelines only –
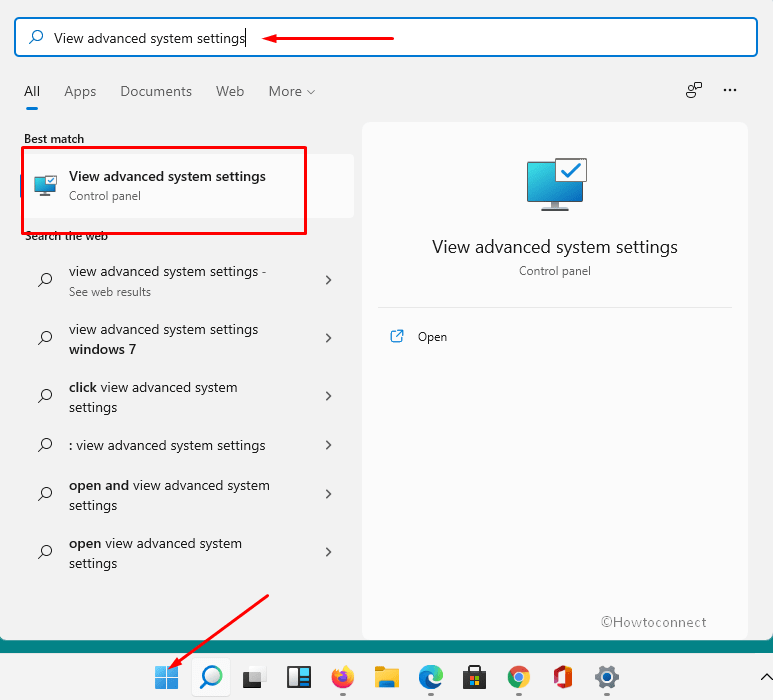
- Click the – Search.
- Type – system settings.
- Click View advanced system settings when appears.
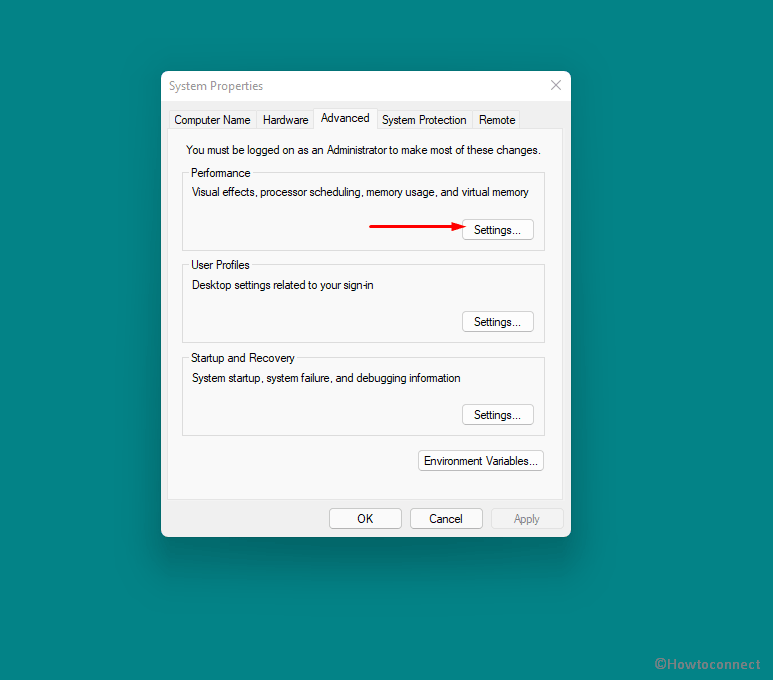
- Click Settings from the Performance section.
- Click the radio button set before – Adjust for best performance.
- Click Apply then Ok to save the changes.
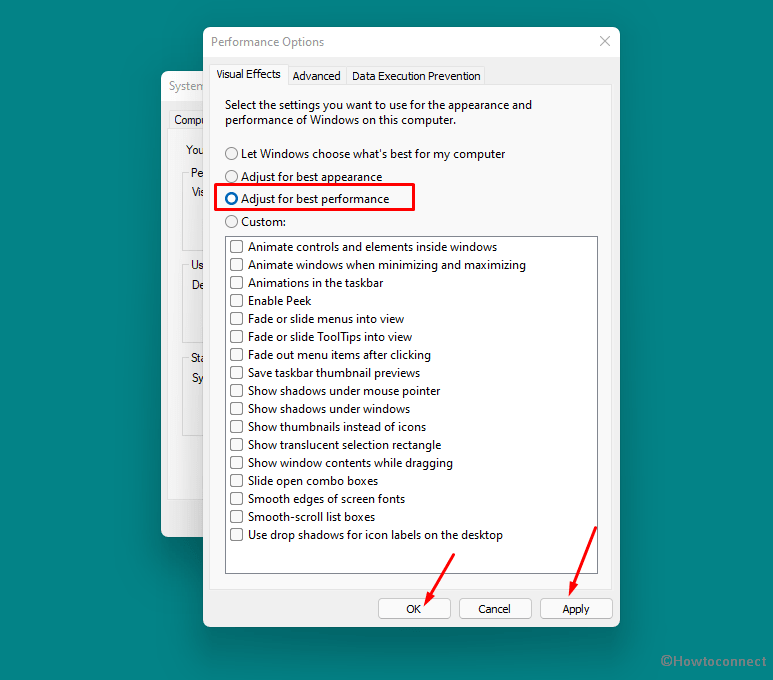
After the changes being effective, the Visual effects in Windows 11 will be adjusted or disabled as required for the best performance.
Way-2: Remove the Startup apps
Applications that are launched once you boot up Windows 11 are Startup app and they remain in the running state even you don’t turn them On manually. Usually, many of them are not necessary and you don’t know that they are open in the background. The worst thing about Startup App is, these programs eat up most part of the memory and make Windows boot significantly slower.
Since most Startup programs are unnecessary to run the regular works in Windows, you can easily disable them from Task Manager (taskmgr). This is how to make PC faster in Windows 11 and enhance system performance. Here are the steps to follow to disable Startup apps from Task Manager in Windows 11 –
- Press – Ctrl+Shift+Esc.
- Once Tak manager appears, click More details to see its expanded view.
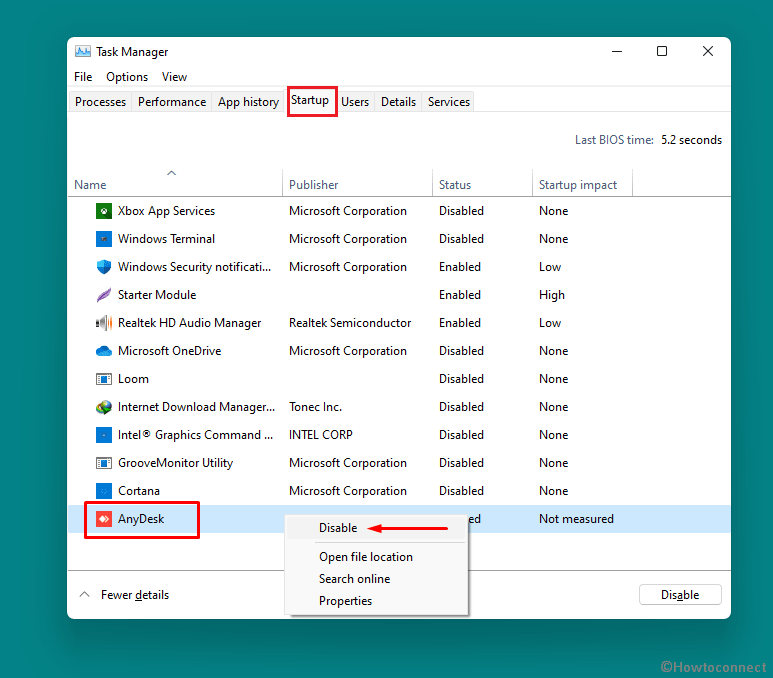
- Click the – Stratup tab.
- Right-click on an app and select – Disable.
- Do the same for all the unnecessary apps in the list.
- Restart Windows 11 and check the efficiency after booted.
Way-3: Carry out disk defragment
Disk fragmentation is a usual process in Windows 11 computer and it happens once a file is split up into different parts to be fitted on the hard disk. A file in the OS is constantly written, often resized or deleted, and could be widespread in various places in drive eventually become unreadable.
However, fragmentation forces the hard disk to do additional work, and eventually the computer acts slower. With respect to that, defragmenter in Windows 11 is provided to re-arrange the fragmented components so that, they can work effectively. Defragment is one of the best ways to Speed Up Windows 11 therefore, it takes place automatically in the OS. However, we can carry out the process manually by following below tips –
- Press – Windows key.
- Type defragment.
- Select Defragment and Optimize Drives when appears.
- Select a drive from the Optimize drive window to carry out defragment.
- Click – Optimize.
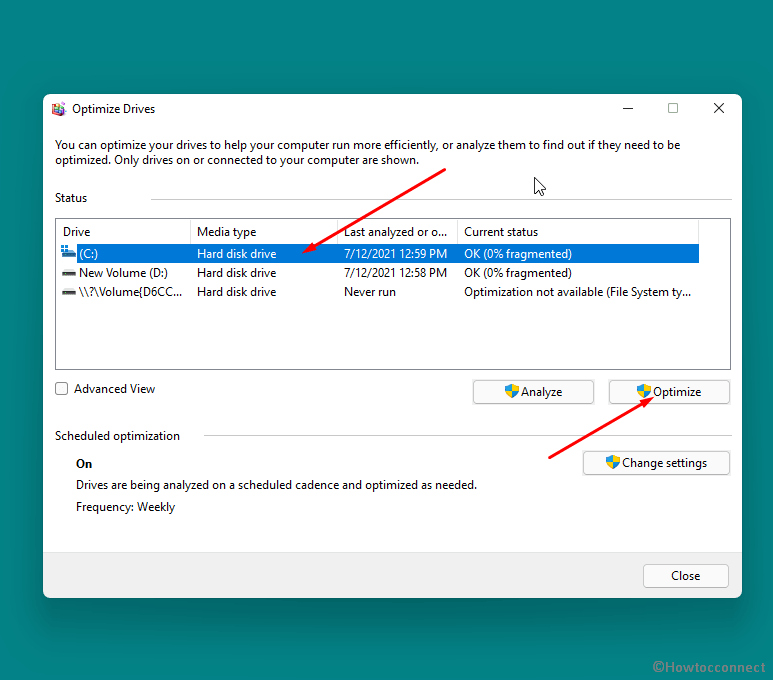
- Monitor the percentage and once completed, Windows will show “0% fragmented” in the Optimize Drives utility.
Way-4: Disable Game mode to Speed Up Windows 11
For enhanced and uninterrupted gaming performance, Windows 11 has built-in Game Mode enabled in it. This tool prioritizes CPU and GPU resources so that to the best gaming performance. However, this will definitively have an adverse effect on the OS speed and the operation will be sluggish.
Game Mode engages a big portion of Windows resources for making instant screen, audio capture, and video recording available. If you are not a game enthusiast, we recommend you to disable the Game Mode in order to Speed up Windows 11. The steps are as follows –
- Press – Winkey + I.
- From the Settings app home, click Gaming.
- Choose Game Mode from the right pane.
- Turn Off the toggle switch under “Game Mode” on the right.
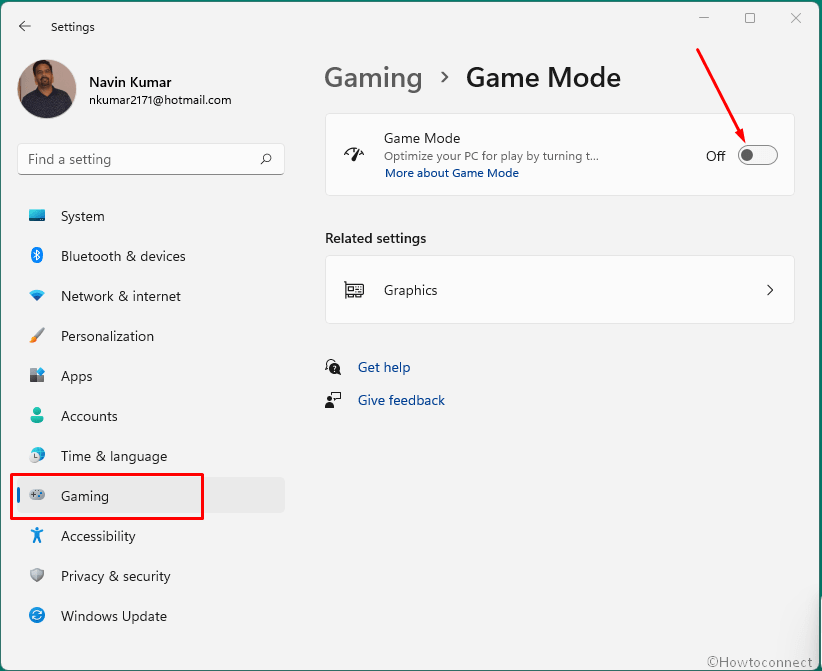
- Now back on the same page and select “Xbox Game Bar”.
- Disable Open Xbox Game Bar using this button.
- Restart the Windows 11.
Way-5: Use High Performance Power Plan
A Power plan in Windows is a combination of system settings and hardware in order to optimize energy consumption. By default, this is set to Balanced Mode to deliver optimum performance keeping the battery life longer.
However, if you don’t need to care much about the battery life, can Set the Power Plan to High Performance. To accomplish this, follow the below guidelines –
- Click the Start icon from Taskbar.
- Type – control panel and press enter
- Select the – Power Options.
- Check High Performance on the newly opened window, and select it.
- If you cannot find this option, click Create a power plan from the left pane.
- In the next window, select – High Performance.

- If High performance is missing open command prompt.
- For this, press Winkey and type cmd.
- Click the – Run as administrator and select Yes on UAC.
- Copy
powercfg -duplicatescheme 8c5e7fda-e8bf-4a96-9a85-a6e23a8c635c, right-click on command prompt and press – Enter. - Return back to the Power options window.
- Click – Show additional plans.
- Check – High performance.
- If you are still not seeing this option, click – Create a Power Plan from the left pane.
- Check – “High Performance”.
- Give the plan a name.
- Select – Next.
- Click on Create from the coming page.
- Now, click Change Plan Settings located beside the new Plan.
- Select Change Advanced Power Settings on the next page.
- Look for Processor power management in popup window.
- Expand the – Minimum processor state.
- Click On battery (%) and set it to 100.
- Hit Plugged in (%) and set it to 100.
- Click Apply and then OK to save the modifications.
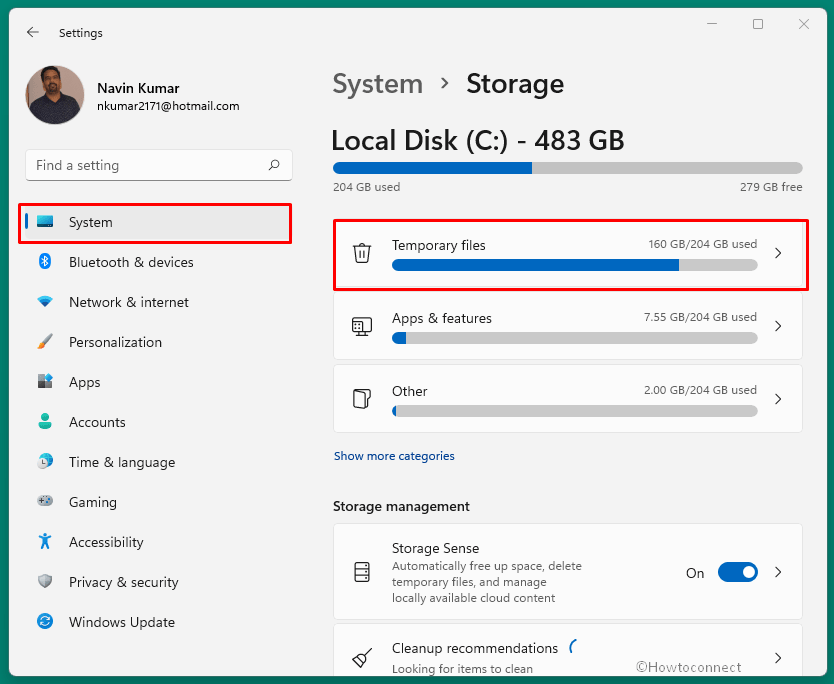
Way-6: Clean up junks from hard Disk drives
Oftentimes a device operates at a relatively low speed due to tons of junk files cluttered in the hard disk. These temporary files may contain the thumbnails, different types of cache, downloads, feedback diagnostics, update logs, delivery optimization files, and so on. These Windows components are created every time and system stores them in the drive eventually storage gets full.
We should clean up these junk files regularly in order to get the optimum speed out of the Windows 11 system. There are lots of third-party applications to deal with but we recommend avoiding them. Instead, you can always take help from Windows 11 built-in Clean up tool. To clean the junk files from hard disk, follow the below instructions –
- Open Windows Settings by pressing Winkey and I.
- Click – System.
- Select – Storage from the right pane and allow the options to load.
- Now, click – Temporary files in there.
- On the next page, allow some time for scanning the junk files.
- Next, select the category of files you might opt to remove from storage.
- Click – Remove files.
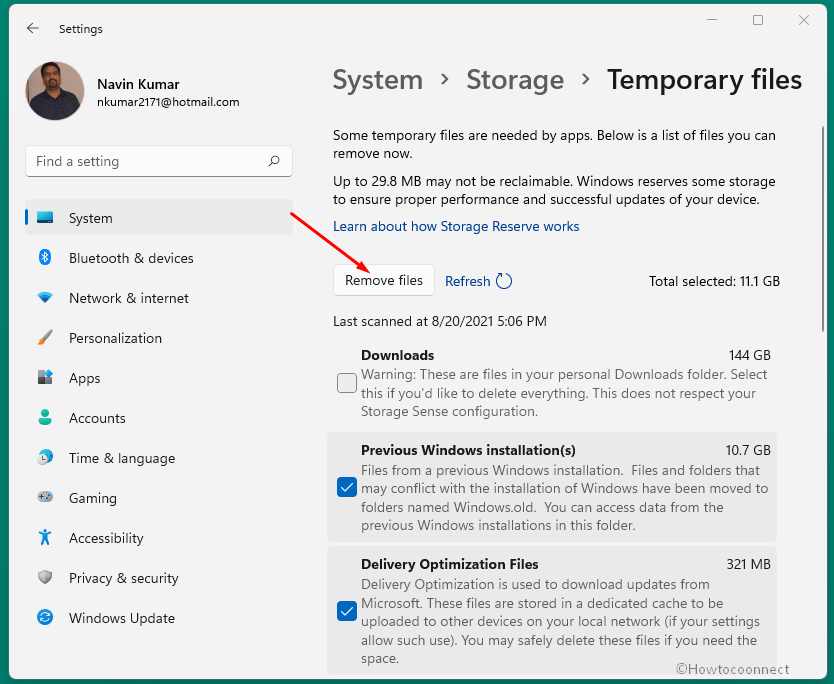
- Select Continue on the confirmation popup if prompts up.
- Restart the machine once the process completes.
Way-7: Update applications and drivers
Windows 11 usually performs really well and with great speed unless some of the components become outdated. Whenever there is an opportunity or a new update is available, you must install it. When the drivers are outdated, device cannot operate them in the correct order. Hence, the optimum performance is obstructed and the overall operation becomes sluggish.
To speed up Windows 11, we have to keep the drivers up to date always. To do so, here are the instructions –
- Press – Windows key and R together.
- In the Run dialog box, type – devmgmt.msc.
- Next, press – Enter.
- When the Device Manager is up, look for a driver that needs to be updated.
- Expand the driver list and right-click outdated driver.
- Select Update driver option.
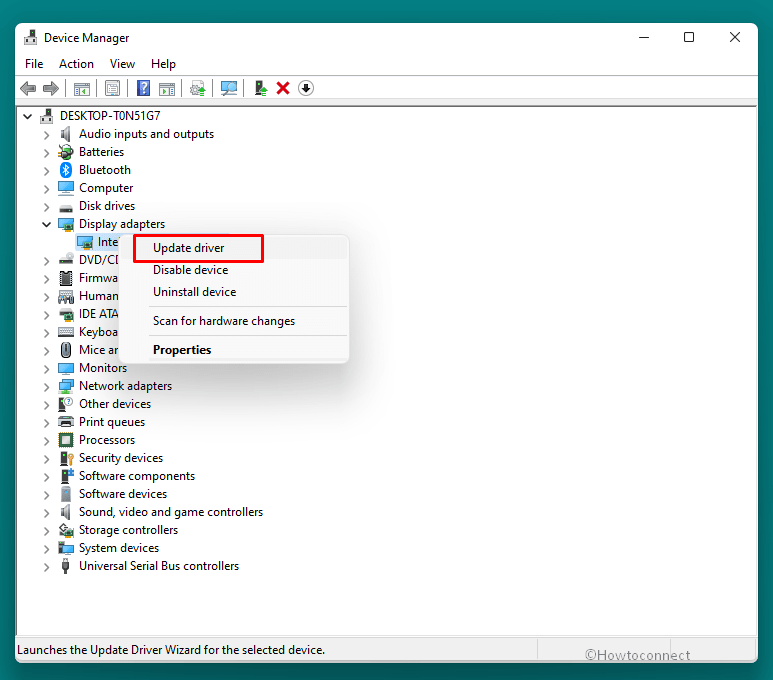
- From the How do you want to search for driver software dialog box in the following page click on the – Search automatically for updated driver software.
- Ensure a stable internet connection with the device to allow the downloading process.
- Once the driver updating ends, carry out the same process for all outdated drivers.
- Finally, Restart Windows to make these changes effective.
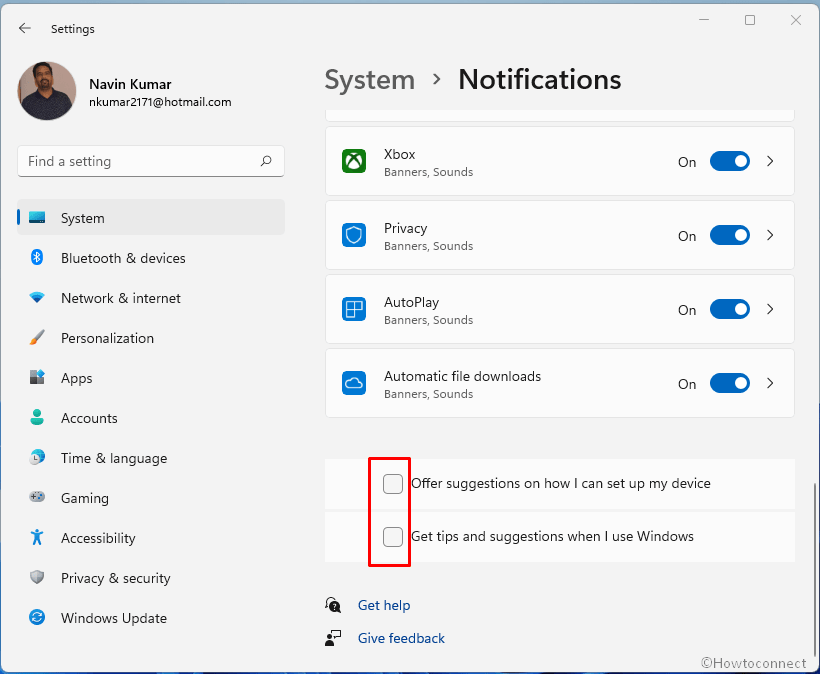
Way-8: Turn Off Notifications and Tips
In order to keep you updated and help users, Windows 11 keeps on sending tips and tricks. These tips and notifications are sent to users based on the system criteria. Hence, the process needs to continuously scan your computer which might affect the performance as well.
In order to get the maximum output from a system and speed up Windows 11, you can take a break from this feature. Here is how you can stop Windows tips and notifications –
- Open up Settings app (Win+I).
- Click – Notifications from the right side.
- Go to the last part of the next page and turn off both the options “ Offer suggestions on how I can set up my device” and “Get tips and suggestions when I use Windows”.
Way-9: Disable Background Apps
Programs in Windows 11 system run in the background for the sake of receiving updates and notifications. Some apps need to be active in the background always like messaging and email but most others are useless. For example, some gaming apps will make the Windows system performance sluggish as they remain in sync always.
You have to choose the background applications wisely as they continuously run making the computer slow. Additionally, the battery life drains out faster too. Windows 11 has removed the Settings to disable background apps unlike Windows 10 which is having a direct option in the Privacy category. Hence, disable the unnecessary background apps using below steps –
- Click – Start.
- Type – cmd.
- Right-click on – Command Prompt.
- Select – Run as administrator.
- Copy the below piece of codes –
Reg Add HKCU\Software\Microsoft\Windows\CurrentVersion\BackgroundAccessApplications /v GlobalUserDisabled /t REG_DWORD /d 0 /f- Next, right click anywhere on the command prompt and you will see a message – The operation completed successfully.
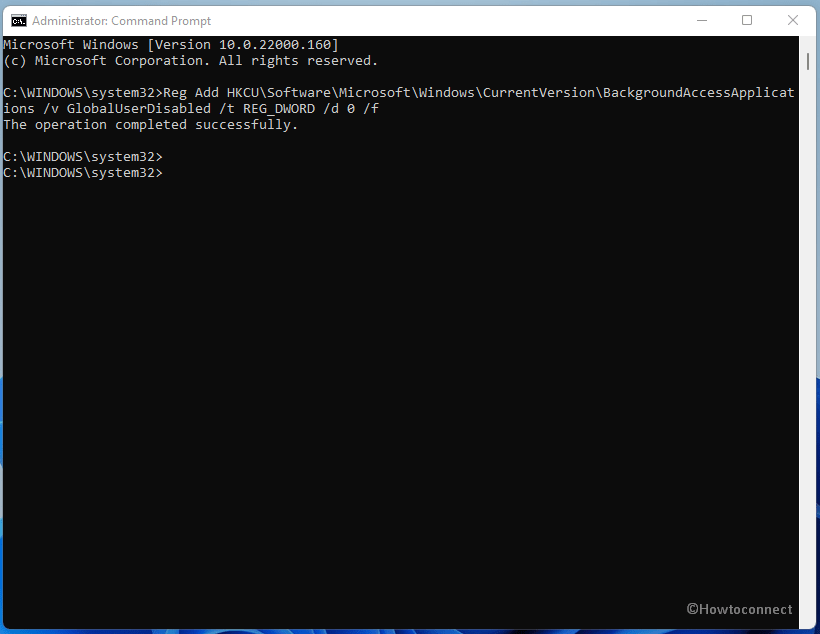
- Restart your PC to experience the change.
Way-10: Uninstall unnecessary program
A lot of programs are installed in the system where some are extremely helpful and many come to no use ever. Several apps are heavyweight but do very little help in the action on Windows 11. All the application in the system forces the processor to do work and hence, it becomes slower when the load is more.
There is no harm in installing programs but it is recommended to have only the necessary and trustworthy. Therefore, uninstall the unnecessary programs using the below steps –
- Press Win+R.
- Type appwiz.cpl in the Run dialog.
- Click – Ok.
- Check the apps in – Programs and Features Window.
- Right click unnecessary application.
- Select – Uninstall.
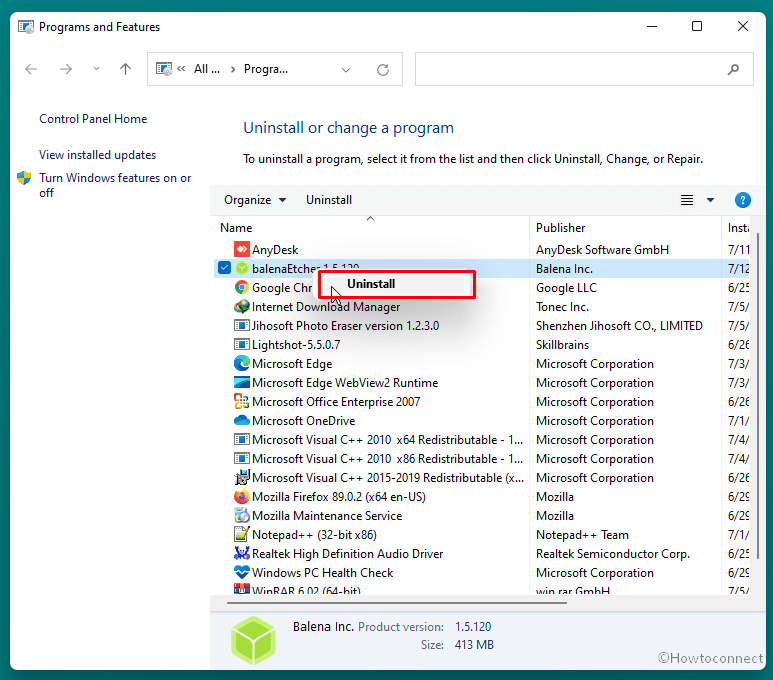
- Click – “Uninstall” once confirmation prompt appears.
- Restart Windows once the process ends.
Way-11: Run Disk Cleanup to Speed Up Windows 11
A lot of unnecessary files are generated in Windows devices every day for the execution of tasks. Most of these files are not necessary, some are temporarily useful, and very few come in necessity. There are temporary files, browsing cache, thumbnails, delivery optimization files, shader cache that only take up additional space on the disk. Windows Update logs can often take up gigabytes of space which is useless you have to carry out system restore. All of these components jam together and make the Windows operation slower.
To clean these files easily, Windows has a default Disk Clean up tool and you don’t worry about the safety as well as integrity of the system. Follow the below steps to run the Disk Cleanup tool –
- Click – Start.
- Type – cleanmgr.
- Press – Enter.
- On Disk Cleanup: Drive Selection window, click – OK.
- On the next window, click – Clean up System Files.
- Again, on Drive Selection window, select ‘OK’.
- After a while, you will see Disk Cleanup for (C:) Window.
- Check all the boxes under Files to delete section.
- Click – Ok.
- Hit – Delete files.
- Restart the device after Disk Cleanup ends.
You can follow – Windows 10 – How to Open and Use Disk Cleanup.
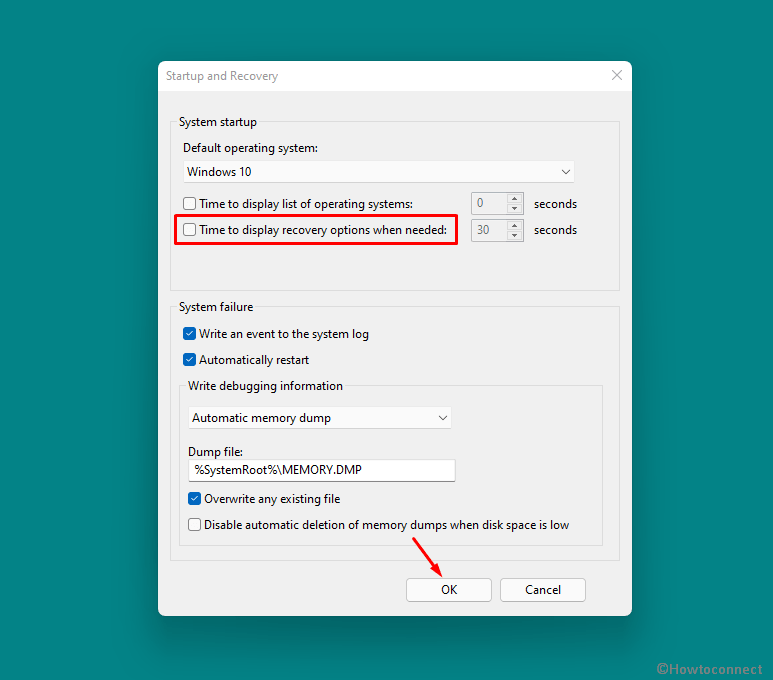
Way-12: Eliminate Boot Menu timeout
Windows after starting, take a break for some time to allow uses for proceeding for advanced menu like Booting in Safe Mode. This timeout is 30 seconds by default, therefore you are clearly delaying the startup each time. However, if you opt to save this time at the startup, can skip the boot menu timeout and speed up Windows 11 by 30 seconds. This is how to make windows 11 boot faster.
Disabling the Boot menu doesn’t affect the startup instead, it will load the programs faster. To carry out this, follow the below guidelines –
- Press Windows key.
- Type – Advanced system settings.
- Hit – Enter.
- Click – Settings from Startup and Recovery area in the next window.
- Uncheck the box before – Time to display list of operating systems.
- Click – OK.
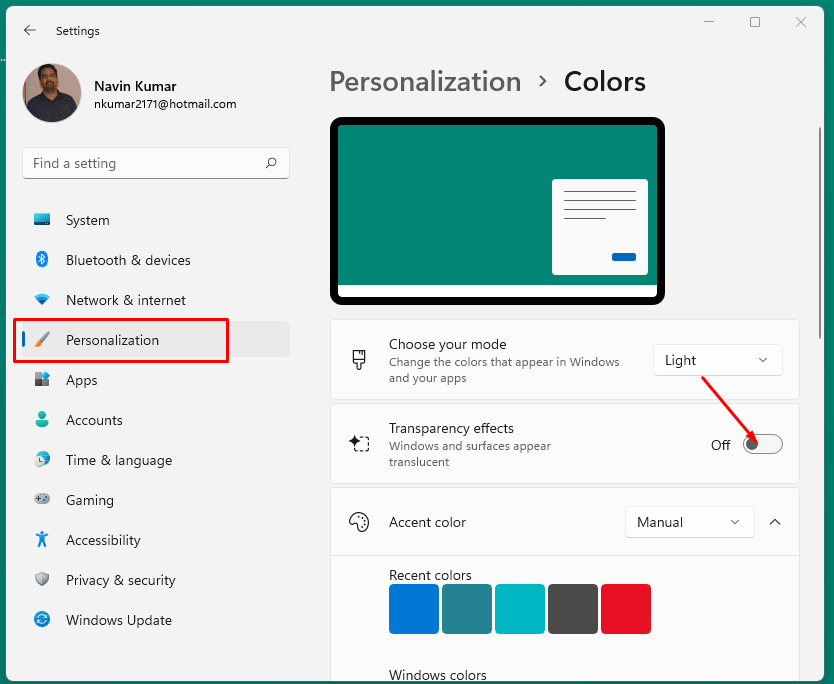
Way-13: Disable Start menu transparency
Start Menu Transparency is a cool thing in Windows 11 and it gives a very sleek look to the OS definitely. However, when this is enabled it definitely uses a good number of system resources. Some computers act sluggish when the Transparency is On and you can disable this to speed up Windows 11.
In order to disable the transparency in the Start menu, taskbar, and action center, follow the below guidelines –
- Press – Winkey and I.
- From Settings app, click – Personalization.
- Select Colors from the right side.
- Turn Off the switch under Transparency effects.
Way-14: Enable Storage sense
Another great idea to speed up Windows 11 is to turn On the storage sense. This feature works super cool in deleting the unwanted and temporary files automatically keeping the disk space free from junk files. Junks that will be deleted include recycle bin items and temporary execution files mostly.
You can enable the Storage sense in Windows 11 following the below steps –
- Press – Win+I.
- From the Settings app home, click – System.
- Choose – Storage.
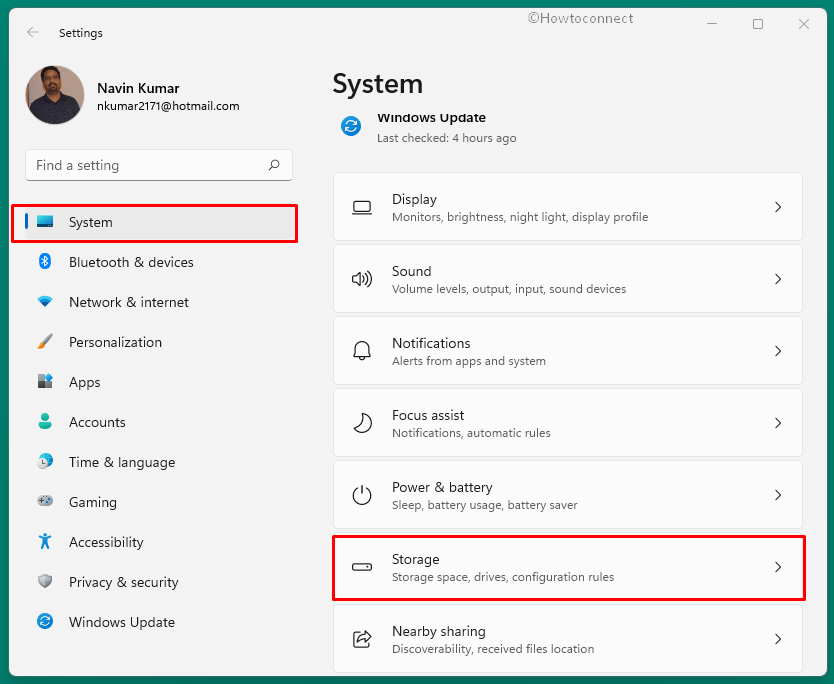
- Turn On the switch for – Storage sense.
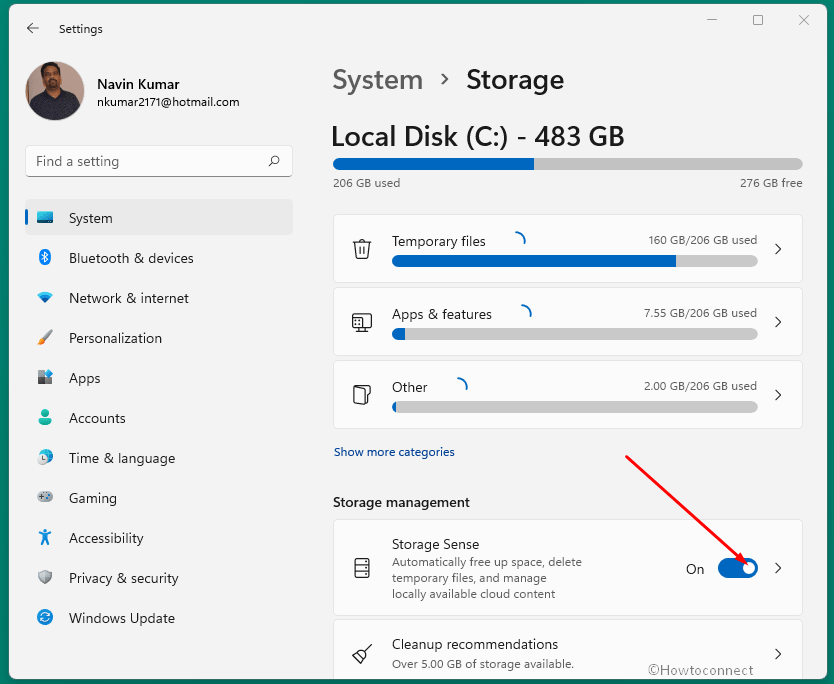
- If you want to customize the setting, click the arrow of the Storage sense block.
- Turn the switch Off for Automatic User content cleanup.
- Click the dropdowns under Run Storage Sense, Delete files in my recycle bin if they have been there for over, and Delete files in my Downloads folder if they haven’t been opened for more than: and select your preferable number of days.
Way-15: Run Performance Troubleshooter
Performance Troubleshooter allows to trace out if something wrong is going on in Windows computers. The tool will find out the problem for which the usual speed is being affected and resolve it accordingly.
The utility is a default tool and makes changes without affecting the system resources or settings. Here is how to run –
- Right click on Start.
- Select – Run.
- Enter the below command in the Run dialog box –
%systemroot%\system32\msdt.exe -id MaintenanceDiagnostic- Hit – Enter.
- Once the Troubleshooter wizard comes in, click Next button.
- Click – Try troubleshooting as an administrator.
- Restart once the tool finished the task.
Way-16: Delete Temporary files Regularly
Main resistibles of faster Windows 11 PC are junk and garbage. However, Disk cleanup allows to wipe out the items in form of temporary files but it is a bit long process rather. You are able to delete temp files manually in a flash of time and it can be done in a regular way. Follow the method –
- Press “Win+R”.
- Type – %temp%.
- Hit – Enter.
- Select all the files and folder in the upcoming window and delete.
- In the same way, run Temp, and recent shortcut commands and remove the unwanted files and folders to Speed up Windows 11.
Methods list:
Way-1: Disable Visual Effects
Way-2: Remove the Startup apps
Way-3: Carry out disk defragment
Way-4: Disable Game mode in Windows 11
Way-5: Use High Performance Power Plan
Way-6: Clean up junks from hard Disk drives
Way-7: Update applications and drivers
Way-8: Turn Off Notifications and Tips
Way-9: Disable Background Apps
Way-10: Uninstall unnecessary program
Way-11: Run Disk Cleanup utility
Way-12: Eliminate Boot Menu timeout
Way-13: Disable Start menu transparency
Way-14: Enable Storage sense
Way-15: Run Performance Troubleshooter
That’s all!!