When you need to power on a system remotely you are fortunate that Microsoft lets you activate Wake on LAN in Windows 10. Using this terrific feature, you can wake up the computer from shut down, sleep or hibernate over a local area network from miles away. Having WoL (Wake on LAN) support in hardware, this special feature turns into the power button. This ability to power on a remote system depends on two things – Network card and your BIOS.
The interesting fact is that you don’t require any particular 3rd party software to enable WOL. You can either activate it using the network card’s firmware or through BIOS. So, here, we will discuss the way to Wake on LAN Windows 10 moreover tweak BIOS settings if necessary.
Table of Contents
How to Activate Wake on LAN in Windows 10
Wake on LAN (short form WOL) is known for waking up from either sleep, hibernate or shut down mode. After enabling this feature, you can awake Windows by sending the “magic packet” having MAC address from others. Before going any deeper, you need to ensure the device is in hibernation or sleep mode instead. Additionally, there should be an end to end network between two or more devices and an active Ethernet connection.
Now, pursue the below-given series of steps and activate Wake on LAN in Windows 10.
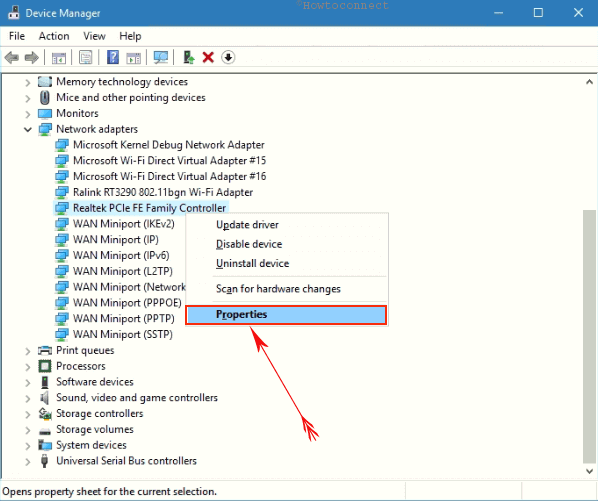
Step-1: First and foremost, execute a right-click on the Start button on the taskbar. From the menu that shows up on the screen, locate and hit Device Manager.
Step-2: Expand Network Adaptor from left and put a right-click on your network card in use.
Step-3: Select Properties from the list and open Advanced tab from the popup.
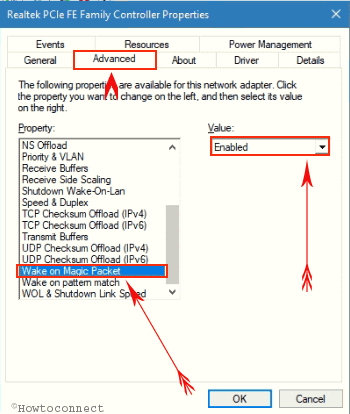
Step-4: Roll over the list of Property and select Wake on Magic Packet as depicted in the given image. Once you find it, click the drop-down under Value and choose the Enabled option.
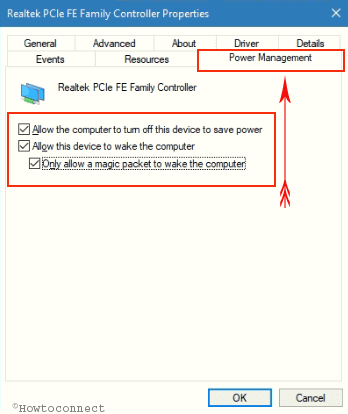
Step-5: Next, head to the Power Management tab as well as check the options entitled with “Allow this device to wake the computer” and “Only allow a magic packet to wake the computer”.
Step-6: Hit on OK button from the bottom with a view to saving changes.
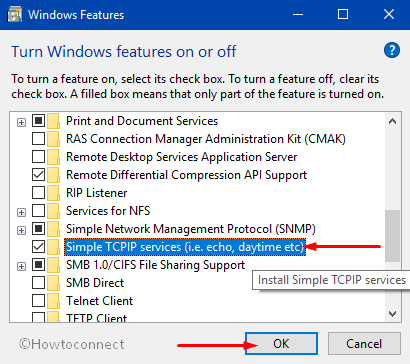
Step-7: Once, you do this, you have to install the simple TCIP Service feature. So, on Cortana text field, type Windows Features and press Enter.
Step-8: On the window that opens up, tick mark the option Simple TCPIP services and click OK.
These guidelines are same for all the manufacturers but enabling WOL on BIOS differs from one to another. So, in the below section, we are going to discuss the series of steps to activate Wake on LAN in Windows 10 in different BIOS setup.
01. Asus BIOS Wake on LAN Configuration
- Enter into “BIOS setup” by hitting any of these keys – ESC, DELETE or F2.
- Conduct a click on Advanced tab from BIOS SETUP UTILITY screen.
- Head to APM and make the “Power on by PCIE/PCI” option Enabled.
If you find the steps are not complying with your one, we recommend you to go through the Motherboard manual provided by the manufacturer. You will get instructions there for your Windows and thus you can follow that for the same purpose.
02. HP BIOS Configuration Wake on LAN
a) Once you power on the system, hit the assigned key to get into BIOS which is generally the “F1, F2, Del, or Esc” key. But it may differ depending on the BIOS version.
b) Open the Power tab using right arrow key and engage using Enter.
c) Reach out to “Hardware Power Management” with the help of arrow keys and hit Enter once selected.
d) Here, ensure that “S5 Wake on LAN” option is set to Enabled. If you find it Disabled, use arrow keys in order to change the status.
For many, the Wake on LAN in Windows 10 fails to perform after the upgradation. If you are also facing issues, follow the given sequence of phases and their steps carefully.
Phase 1 – Update the BIOS
The vital task is to verify whether you hold the latest version of the BIOS. To do so, navigate to the HP official website and ensure to install the appropriate BIOS update for your computer.
In this concern, you may prefer to follow Windows 10 – 5 Ways To Know BIOS Version of MotherBoard.
Phase 2 – Turn Off Hybrid Shutdown
1. Conduct a right-click on the battery icon at the taskbar and click on Power options as depicted in the following image.

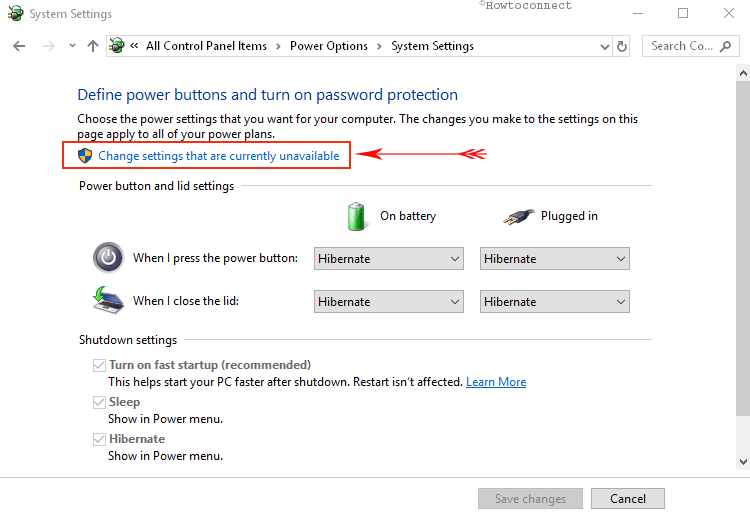
2. Make a click on the option namely Choose what the power button does on the left column of the next window. Moving ahead, click Change settings that are currently unavailable ( see snapshot).
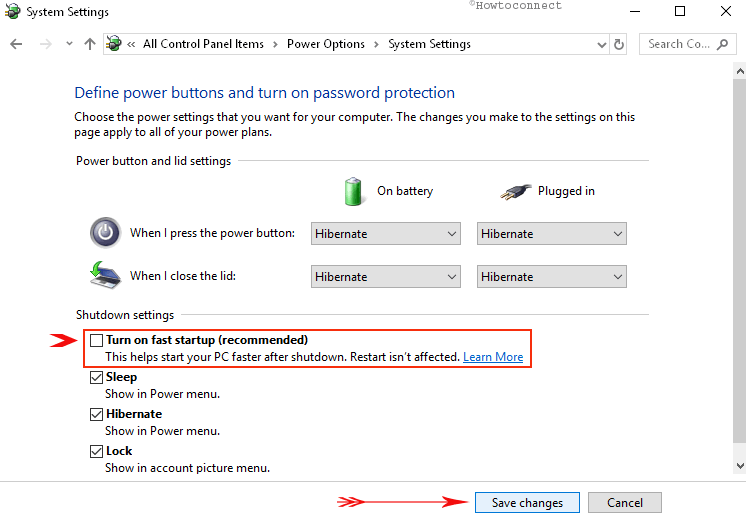
3. Here, ensure to uncheck the option “Turn on fast startup“. Lastly, click Save changes button.
Phase 3 – Activate Wake on LAN in Windows 10 setting for LAN driver
1. First of all, access Device Manager using any of your ways. Once you open it, expand the “Network Adapter” and then identify your LAN driver.
2. After locating the LAN device, conduct a right click on it and choose Properties.
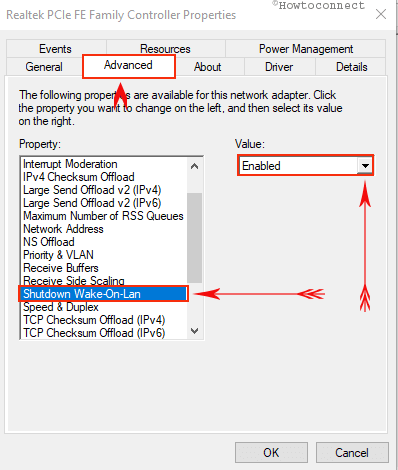
3. Here, head to the Advanced tab and underneath the Property list locate the option Shutdown Wake on LAN. Once you find it, select it. Now, on its right side click the drop-down below Value option and choose Enabled.
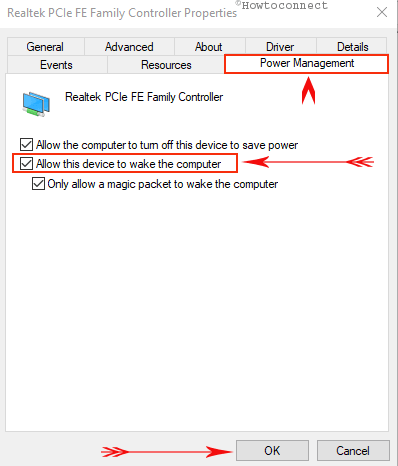
4. Now, switch to the Power Management tab and ensure that the option namely “Allow this device to wake the computer” is selected (see snapshot). Finally, click the Ok button and implement the changes you did to the LAN device.
Phase 4 – Manually Include the HP Registry Key
Type the command regedit on Cortana and hit Enter to access the “Registry Editor”. Click Yes upon the prompt of UAC on the screen.
Now, reach out the following path carefully –
HKEY_LOCAL_MACHINE\SYSTEM\CurrentControlSet\Services\NDIS\Parameters
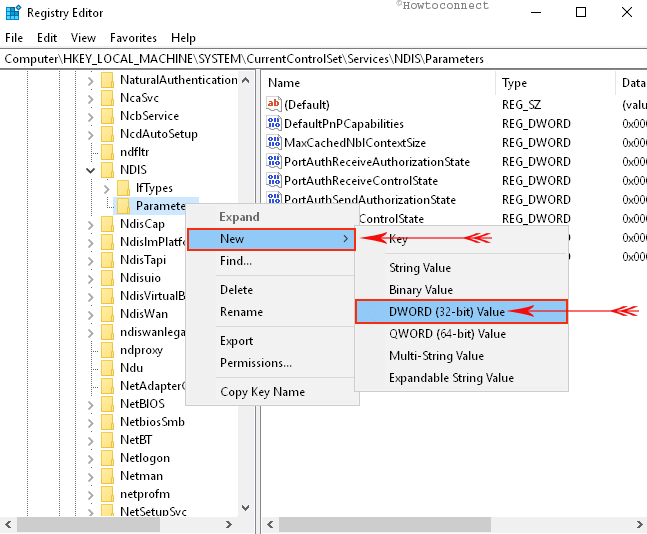
Once you reach Parameters key, right-click and hover the cursor over New. Next, choose DWORD (32 bit-Value) and name it as AllowWakeFromS5.
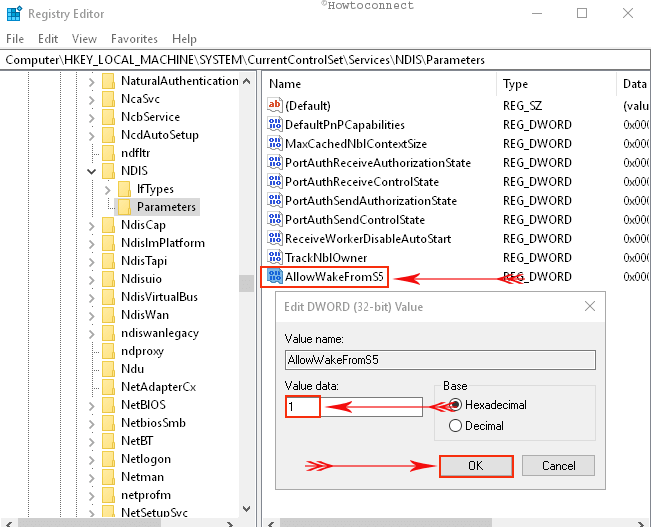
Double-click on the DWORD and assign its Value as 1 and click Ok to save the modification.
03. Acer BIOS Setting Change for Wake on LAN
First of all, turn on the system and sharply press “F2 or DELETE” key when the logo shows up on the screen and get access to the BIOS. Moving ahead, navigate to Power Management Setup using arrow keys and hit Enter button.
Next, go to Deep Power Off Mode and change its status to Disabled and lastly press Enter key. Now, move to “Power On by PCIE Devices” and set it as Enabled. Lastly, save all these modifications the by pressing F10 key.
04. For Biostar BIOS WOL activation
Power On the Windows and Press F1, F2, Esc and Del keys at the startup. You will be guided to BIOS setup utility and keys will vary from one model to others. Select the Power Management Setup using navigation keys and hit Enter immediately.
Find the option WOL(PME#) From Soft Off in the list and change its status to Enabled. If it is not, then with the help of the arrow keys to highlight it.
05. American Megatrends BIOS settings for Wake on LAN
- Enter into the BIOS setup screen and to do so, first, turn on the system. Upon the first beep, quickly hit one of these keys – F1, F2, Esc and Del key.
- Go to the Advanced menu using the side arrows.
- Now, find Chipset Configuration, select it and hit Enter. Moving on, reach out to Southbridge Configuration, and again press Enter key.
- Here, locate “Wake on LAN from S5” option and set its status as Enabled.
06. Dell BIOS Setting for Wake on LAN
- Follow this link and download Dell Command | Configure in the first place. Once downloading ends, Run it as Administrator.
- Once prompt, select Multi-Platform Package in the type of package. Make changes in the status of following options:
a) “Wake On LAN- Enable
b) Block S3 sleep state- Enable
c) Deep Sleep Control- Disable”
- Hit the Export .EXE button from the bottom. The System will ask the passwords for the sake of authentication. However, you can skip this step as there was no password configured before.
- You can now run the feature by distributing it using the network share. Alternatively, you can execute commands such as PSEXEC or GFI Remote Console.
07. Lenovo
The experts at the Lenovo Community explicitly explains on How to activate Wake on LAN in Windows 10. For Lenovo system, all you need is to configure the network adapter settings shown above. When the computer is in shutdown or in hibernate state, WoL requires crossing the BIOS. So, waking up from sleep will be fine as the LAN card supports it. And it is the operating system that wakes the system up and not the BIOS.
How to Use Wake on LAN in Windows 10 Feature to Resume a System Remotely
Way 1 – By Port- Forwarding
After you activate Wake on LAN in Windows 10 through network card and motherboard, let us learn how you will resume the system.
1. Once you successfully enable the WoL feature, restart your Windows 10 PC. Next, type Windows Firewall on Cortana search field and hit Enter. Click Advanced settings option on the left sidebar of the following window.
2. Conduct a click on Inbound Rules on the left column.
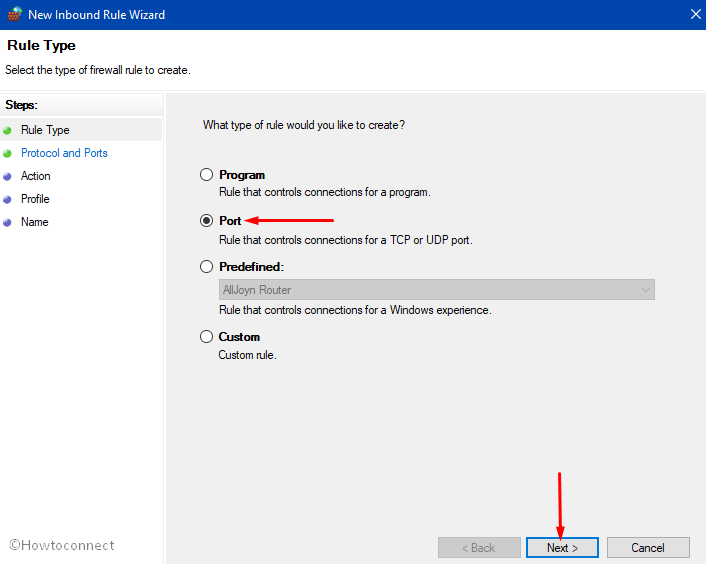
3. Click New Rule option from the right pane. Select Port radio button when a new wizard pops-up and click Next.
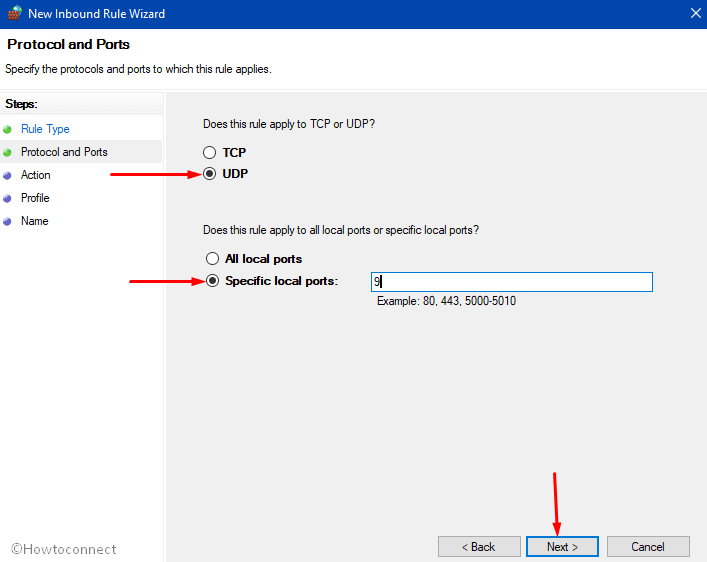
4. First, select UDP and then choose “Specific local ports“. Usually, most utilities use port 7 0r 9, so you can type 9 in the Specific local ports field and click Next. Follow the guidelines of the wizard and finish generating a new Inbound Rule to launch the required port.
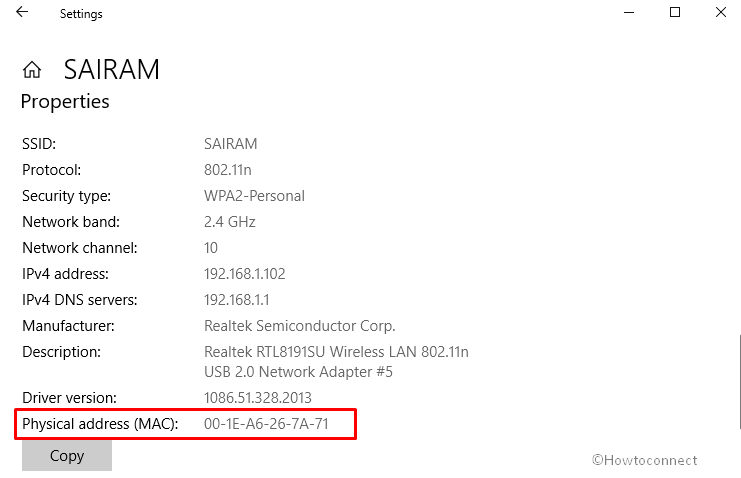
5. Now, you need to note down the MAC address somewhere safely and do to so, launch Settings application using “Win – I” hotkeys.
6. Navigate to Network & Internet => Ethernet and click the connection name on the right side. If you are using a wireless connection, click Wi-Fi and select the connection name.
7. On the next page, scroll down and you can notice the MAC address, note down it somewhere safe.
8. Moving ahead, on another computer, download this free utility WolCmd using the below link.
https://www.depicus.com/wake-on-lan/wake-on-lan-cmd
9. Finally, run this command line utility as per the given below syntax –
wolcmd [mac address] [ip address] [subnet mask] [port number]
10. For example, to resume my computer, I have to run this command –
wolcmd 001EA6267A71 192.168.1.102 255.255.255.0 9
Note – Ensure to remove “–” from the MAC address before running it.
If you are not aware of the IP address, subnet mask, then go through our tutorial on How to Detect IP Address of Router on Windows 10.
11. As the last thing, you can also generate a shortcut of wolcmd and wake up the system with a single click.
Way 2 – Using Remote Software
Another simpler way to resume a system through Wake on LAN is by using a remote software such as TeamViewer. It has a built-in support to awaken the PC. Here, we are taking Team Viewer as an example and let us go through the steps now.
- On the main screen of TeamViewer, click Extras tab and select Options.
- Under Network settings section, locate Wake on LAN option. To set it up, make a click on the Configure button that appears next to it.
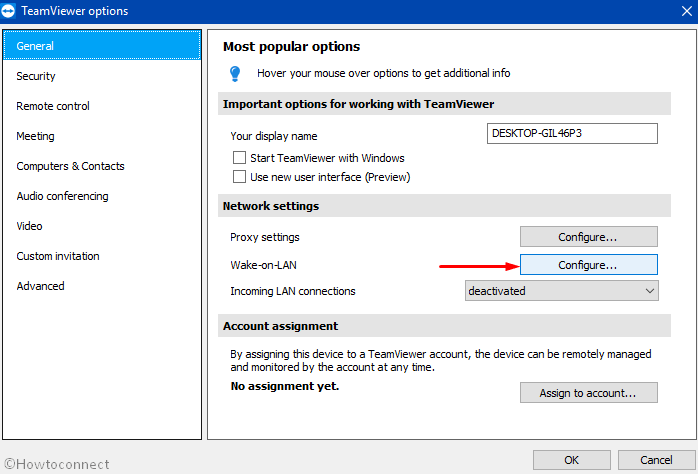
- To monitor and manage things remotely, you have to first assign your device to a “TeamViewer account”.
- Follow the guidelines on the dialog and complete the setup in order to use Wake on LAN in Windows 10.
For reference, if you use Team Viewer to remotely access another system, you may like to read our tutorial on How to Connect to Teamviewer Partner Without Password.
Conclusion
For enjoying the ultimate ease of access, Microsoft adorns Windows 10 with a special feature to activate Wake on LAN in Windows 10. Though the procedure is same for but irrespective of different manufacturers, settings in BIOS are different. We have discussed probable setup options so that you can enable this feature for your Windows. If you have some more information on other important motherboards, do share with us.