When you will Use Android Oreo on your smartphone this will be certainly a moment of big surprise. Amazing features, sleekly appearance, and too many enhancements have made this OS version a must grab one. Oreo has already made a huge buzz in the industry with its improved battery performance, Autofill password, Enhanced wireless settings, picture in picture mode and last but not the least introduction of notification channels. But these are just starters and plenty of amazing things are yet to come. We will discuss the methods on How to Use Android Oreo in a nutshell.
How to Use Android Oreo All New Features
Android has become the most user-friendly operating system for the smartphones and tablets over the years. With every update, Google tried to bless the OS a whole new dimension. As an addition to this, Oreo is released with lots of features that were not prevalent before. So, we are going to talk about availing these features. Below section will be thoroughly helpful to know How to Use Android Oreo.
How to Download and Install Android Oreo
Being the latest inclusion to Android family, Oreo is not yet available for all the devices even the latest ones. Few handsets have got this one on a test basis. However, we have got two ways in order to install this operating system on your smartphones or tablets.
Way-1: Over The Air (OTA) method
While you make an attempt to learn How to Use Android Oreo, the first thing is to download it. The easiest way to get Oreo on your handset is using OTA method. If you have enrolled yourself in “Android BETA” program, you will automatically get a notification to update the operating system to 8.0. Same happens too in the case of using Nexus player, pixel, Pixel C or Nexus 5X and Nexus 6P either.
Go through the on-screen instructions with a view to upgrade your system to Android Oreo.
Way-2: Manually upgrading to Android 8.0
If “Over The Air” method is not valid, still you are able to acquire the freshest update manually downloading factory images from Google Android Developer page and later on install it.
Google’s services are universal and they have brought things down to general people. Therefore, you don’t need to worry to use Android Oreo when you do not own a Nexus device. Partners such as Samsung, HTC, Huawei, Nokia users can also avail this operating system as well as can enjoy all features equally.
So far, you can download the latest update for “Pixel and Nexus” devices. In addition, you may equally try on different sets at your own risk. If you find difficulties for this one, go through the steps carefully before any proceeding but save a backup of your phone as a safety measure.
Download Android 8.0
Step-1: Follow the link below and download the system image files compatible with your device.
https://developers.google.com/android/images
Step-2: Once download finishes, download the platform tool for your operating system from here –
https://developer.android.com/studio/releases/platform-tools.html
Step-3: Once you click on the operating system, you need to confirm the T&C from the following popup. Before clicking the Download SDK Platform-Tools for Windows, check the box for “I have read and agree to the above terms and conditions”.
Step-4: After having both the downloaded files, extract them all and copy the platform tools in a firmware folder. For the ease of accessibility, rename the folder to Oreo.
Install Oreo
Step-5: Moving ahead, put your Android handset in “Fastboot mode“. Visit manufacturer’s website to know the guidelines.
Step-6: Connect the phone to the computer and unlock the bootloader. This will wipe out all your data from the device. Therefore, preserve a copy of the backup in a secure location.
Step-7: Enter the folder where you have kept all the files before. Press hold the Shift key, at the same time make a click on the option Open new Command Windows.
Step-8: Type or copy/paste the given command and press Enter:
Fastboot Flashing Unlock
The operating system will send a message if the bootloader is already unlocked.
Step-9: Now you have to perform a Flashing in Firmware. Just make a double click on the Flash-all.bat file and let Android Oreo install (10 minutes).
Now Drag the Zip file located in the Firmware folder inside the Terminal window and you are done. Let’s go through on How to Use Android Oreo and enjoy its amazing features.
01. Extra Strong Battery Performance
Android users used to get nailed by the battery life again and again. This operating system has a feature called “Wise Limits” which restricts unnecessary tasks that drain the cell. In the process, you don’t run out of charge even after excessive usage. Two types of limits namely: execution limit and location limit restricts apps in the background and asking for location services repeatedly respectively.
01: Swap screen down and tap the gear icon to launch “Settings” menu.
02: Put a touch on Battery option and move inside battery setting options.
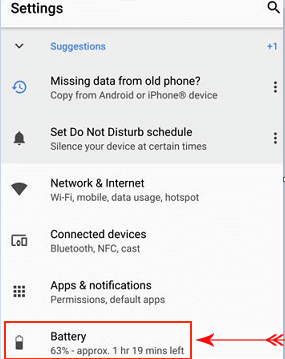
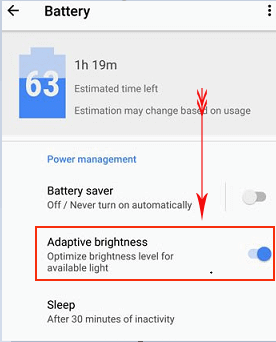
03: Toggle Adaptive brightness switch On from Power Management section so that battery doesn’t drain with unnecessary brilliance. It also lets you enable “Power saving mode” from here while running out of the cell.
04: Moving down, you will have the list of apps draining battery most. Tap any to see how much power they are consuming while running versus when in the background. Depending upon this, restrict running in the background for those apps.
You may like to read How to Stay Awake Phone Screen While Charging on Android.
02. Comfy Settings Menu and System UI Tuner
Google has made a necessary change over Nougat (Android 7.0) to give an improved infrastructure to the Settings menu. The subtle grey texture on a pure white background will mesmerize you. Settings options are made simple as well as straightforward. Most attractive with the same effective feature is UI Tuner that allows you to control the appearance such as Lock screen shortcuts being invisible.
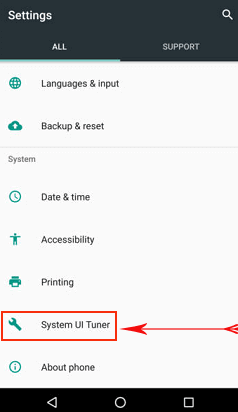
Swap down the expanded notification and press Settings cog icon.
Tap the System option and scroll down to bottom.
Activate System UI Tuner by selecting it to have the privilege to add shortcuts to Chrome tabs as well as other applications from the right moreover left side of your lock screen.
03. Exclusive Notification Channels
Notifications from apps are pretty helpful when you going to avail those advantages and on the contrary, these create disturbances while deeply engaged with other works. As a result, Oreo has added special notification channels when control over the alert is no longer bestowed with the developers rather in your own hand. So, depending on the requirement and use, Google divided the whole process into four different categories:
Major Ongoing: With the highest priority, these notifications ranked at the top on the basis of urgency. Such applications are like Audio apps and navigation control.
People-to-people: Messaging coming from people is included in this part.
By the Way: These actually don’t appear on the Lock screen, like weather and traffic.
General: Miscellaneous applications who don’t belong to top three.
However, the given-below guidelines will help you to get the feature:
i. Open the Settings as mentioned in above feature.
ii. Head to Apps and Notification straightway and put a tap on it.
iii. Select App info from the following page by tapping an individual app from the list.
iv. Upon opening, you will see “Allow notification dot” option. This is also the latest inclusion in Oreo that will show a dot on the app logo while swapping over application list. Toggle it On if you feel necessary.
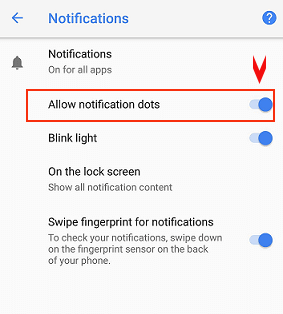
v. Usually, the app sends a notification with toggle switch for each. Turn On/Off based on what you need.
You can further Snooze the notification for an individual app for 15 minutes following below tips:
- Swap an app right from the app list following notification setting as mentioned above.
- Touch the Clock icon and let the system pause the notification for next 15 minutes. If you need to mute it for a longer, customize that just after snoozing.
04. Picture-in-Picture Mode and Multitasking
Multitasking is going to another level and seems easier in Oreo after Google included “Picture-in-Picture mode” in this version. Users can watch YouTube videos at the same time can have a video call or check email.
Open the Settings by sliding down the screen and tap gear icon.
Tap Apps & Notification from the list and select Advanced from there.
On the following page, touch Special app option and toggle Allow Picture-in-picture switch On.

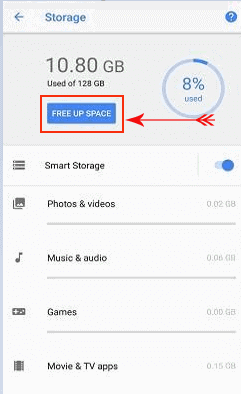
5. Top Class Storage Management
With prolonged use, lots of unnecessary things pile up in the storage and make the device slow. In order to get rid of this, Oreo came up with features to free up space.
I. Swipe down the screen and tap the cog icon to launch Settings.
II. Reach out to Storage and put a tap on it.
III. Upon opening, touch “FREE UP SPACE” option with a view to clear the storage.
The built-in File Manager is quite new now with this version. Downloads shortcut from the past is eliminated by Files app to make sorting is easier.
- Tap any file from File app and hold down for a while.
- The menu will flash on screen with Open now option and Sort.
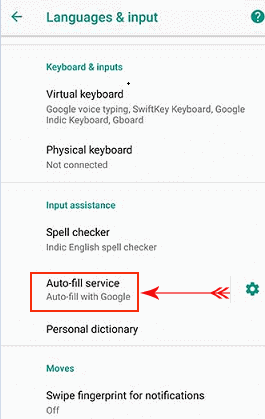
06. Autofill Password and Smart Text Selection
When you want to know How to Use Android Oreo, it prioritizes most of your efforts. Hence, they put the feature to fill up passwords for various usernames, ids and so on automatically. This will eliminate the rush for forgotten passwords. Though it was only a desktop feature in the past, Oreo has brought in the Smartphones.
Open the Settings by swiping the screen to the bottom and tapping the gear icon.
Head to System and from there select Language & input.
Tap Advanced and choose gear icon alongside “Autofill service” option.
By default, Autofill services are activated for Google accounts. Moreover, use this feature for other accounts and provide information by tapping “Add service” option under Autofill with Google.
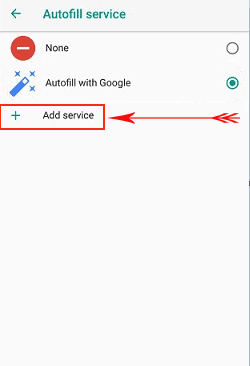
If this feature seems to be unnecessary as well create additional problems, simply select None from the top to deactivate this.
07. Drastic Changes in Wireless Connection
People usually connect with mobile data in absence of Wi-Fi connection away from home. When you start to use Android Oreo, it detects the location of your Home Wireless network once connected.
Another blast announced by Google in recent past is, Oreo understands the Wireless connection speed from slower to faster. If the speed is not enough, it will send notification for failure and wait for good connectivity when you access the sites like Netflix or YouTube.
• Open Settings and proceed to Network & Internet.
• Once opened, touch Wi-Fi and head towards Wi-Fi Preferences.
• Toggle On the option namely “Turn on WiFi automatically”. This will instantly connect to a known network when a location comes in range.

• Tap Advanced and select Network rating provider in the process. Select any of the criteria as listed below:
Slow: You can send and get emails and texts but images appear gradually.
OK: It allows you to read WebPages, use social media, stream music and standard-definition (SD) videos.
Fast: Quickly stream most “high-definition videos” and make video calls.
Very Fast: Lets you easily stream very high-quality videos.
If you think this feature is useless for you and you don’t want to get the notification, simply select None instead of the above criteria.
Get 3 Best Google Voice WiFi calling Android apps.
08. Security While Installing Applications
While you know How to Use Android Oreo, you will be aware that the devices might be vulnerable. In the end, you can become victims when untrusted applications are installed on it. As a result, Oreo has made the security system stronger.
#1. Open Settings by tapping gear icon and select Apps & Notifications from the list.
#2. Touch Special App Access and from there choose Install Unknown Apps.
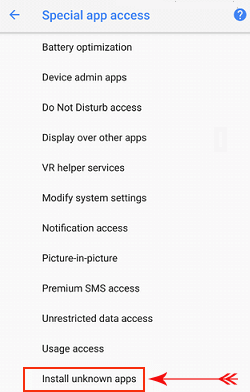
#3. You will find a list of external sources from where apps can be installed. Select any source and permit that one by toggling “Allow from this source” to On.
09. Changing Shape of Home Screen Icon
Even the users of Android 7.0 and above struggles to bring changes in icon shape on the home screen. In the process of learning How to Use Android Oreo, it is an important thing for personalization lover users. Oreo lets you modify the icon shapes into squircle, rounded square, teardrop or square.
- Tap and hold any void space on Home screen and select Settings.
- Put a touch on Change icon shape and choose from the list that appears.
![]()
10. Advanced Camera App and New Emoji
Android Oreo has produced significant modifications in default Google Camera app for Nexus and Pixel devices.
- Launch the Camera app and you can zoom in sharply only by tapping the screen.
- Easy icon available beside shutter button switches between “video and photo” mode.
11. Cutting Loose from Android Boot Loops
Random System crashes as well as patching into continuous boot loop is a very common scenario for the Android users. As a rescue measure, Oreo introduced “Rescue party” in the system. It actually detects the core system components stuck in the loop and releases them.
Miscellaneous points on How to Use Android Oreo
While you are learning How to Use Android Oreo, there are many latest and miscellaneous features that it provides. Aside from these features, we have discussed above, it has made the system supporting a wide range of Bluetooth devices as to propagate audio. Additionally, overlaying sticky notification, well-furnished Installer progress bar, advanced unknown source security protection settings made it lucrative. Furthermore, Advanced security and privacy app called Google Play protection is going to be launched with the introduction of Oreo. Android users can shout out loud once they get it beforehand.
These are the effective ways, features that probably say most about How to use Android Oreo!!!